3 Ingredient Mug Cake

So…. I love to bake. And there are some nights that I just want a delicious warm baked good but don’t have the time ANDDD also don’t really want to deal with the leftovers. But this. This recipe solves all my issues :-) Easy, fast, warm, delicious, no leftovers… badda boom badda bang! Just like that!!
This is super simple and will definitely satisfy your sweet tooth! And the best part… it uses banana as a sweetener!!
Okay, you gotta check this out!
3 Ingredient Mug Cake
Ingredients:
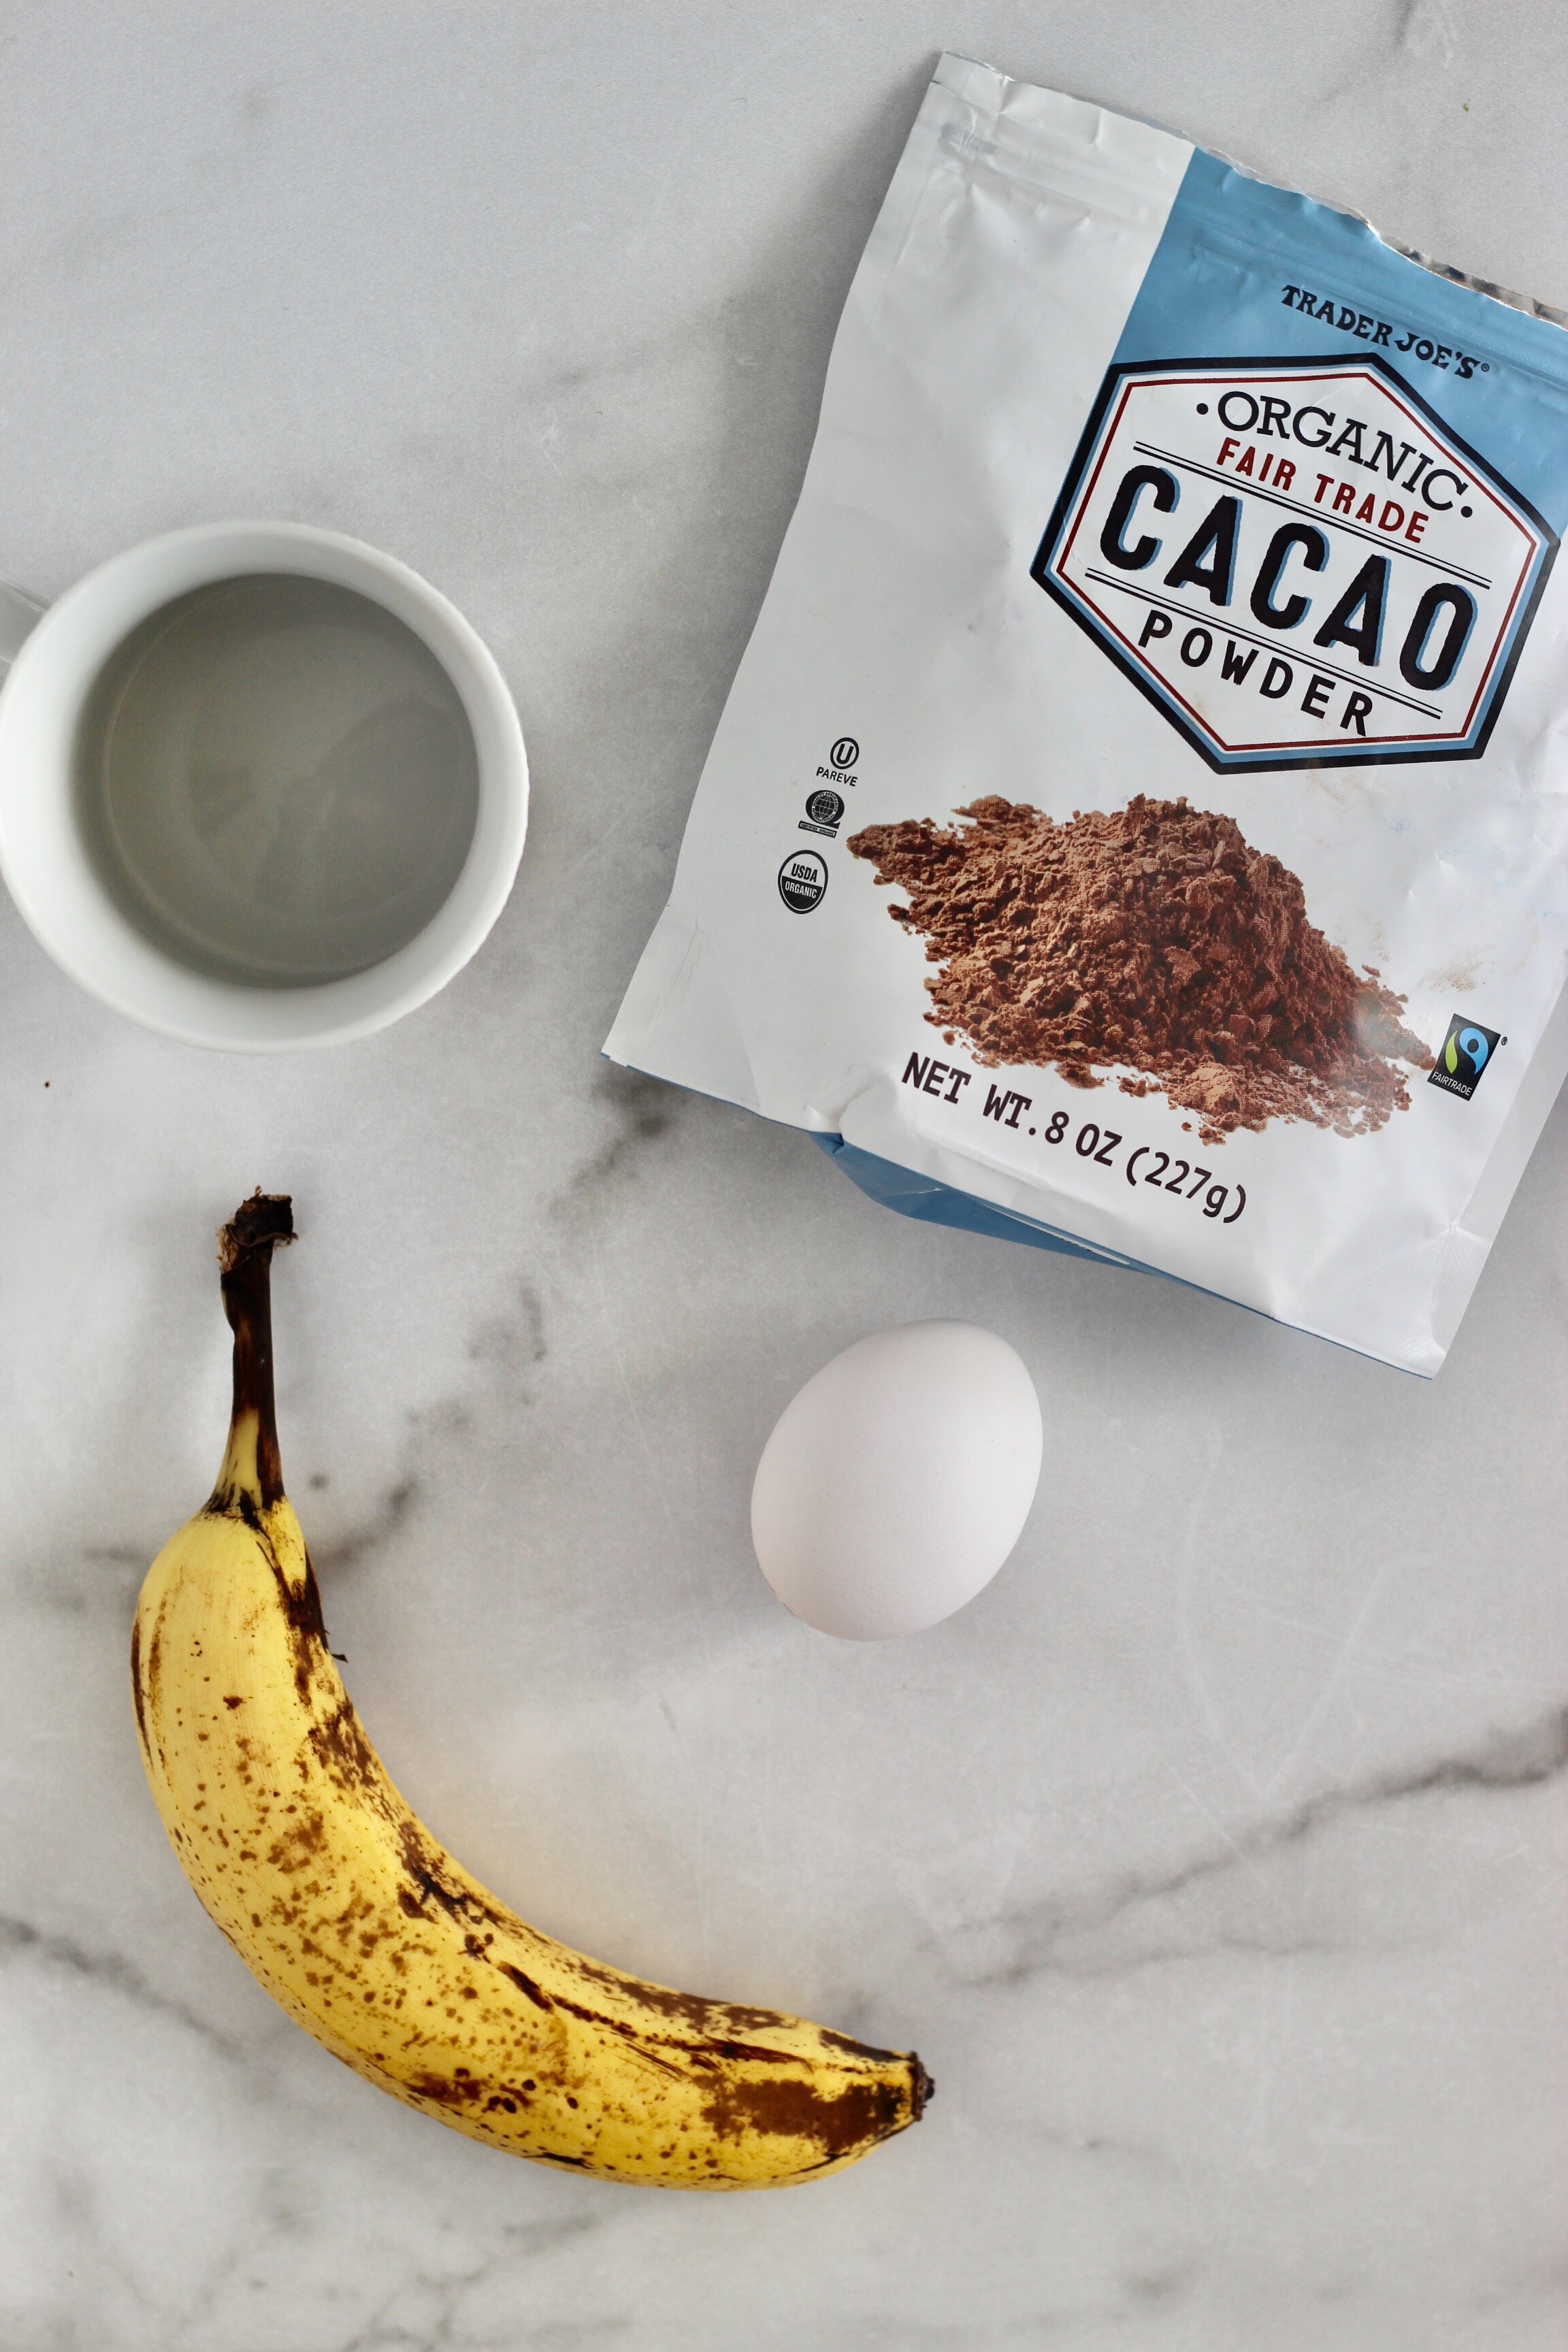
1 small ripe banana
1 egg
2 TBSP unsweetened cocoa powder
How to:
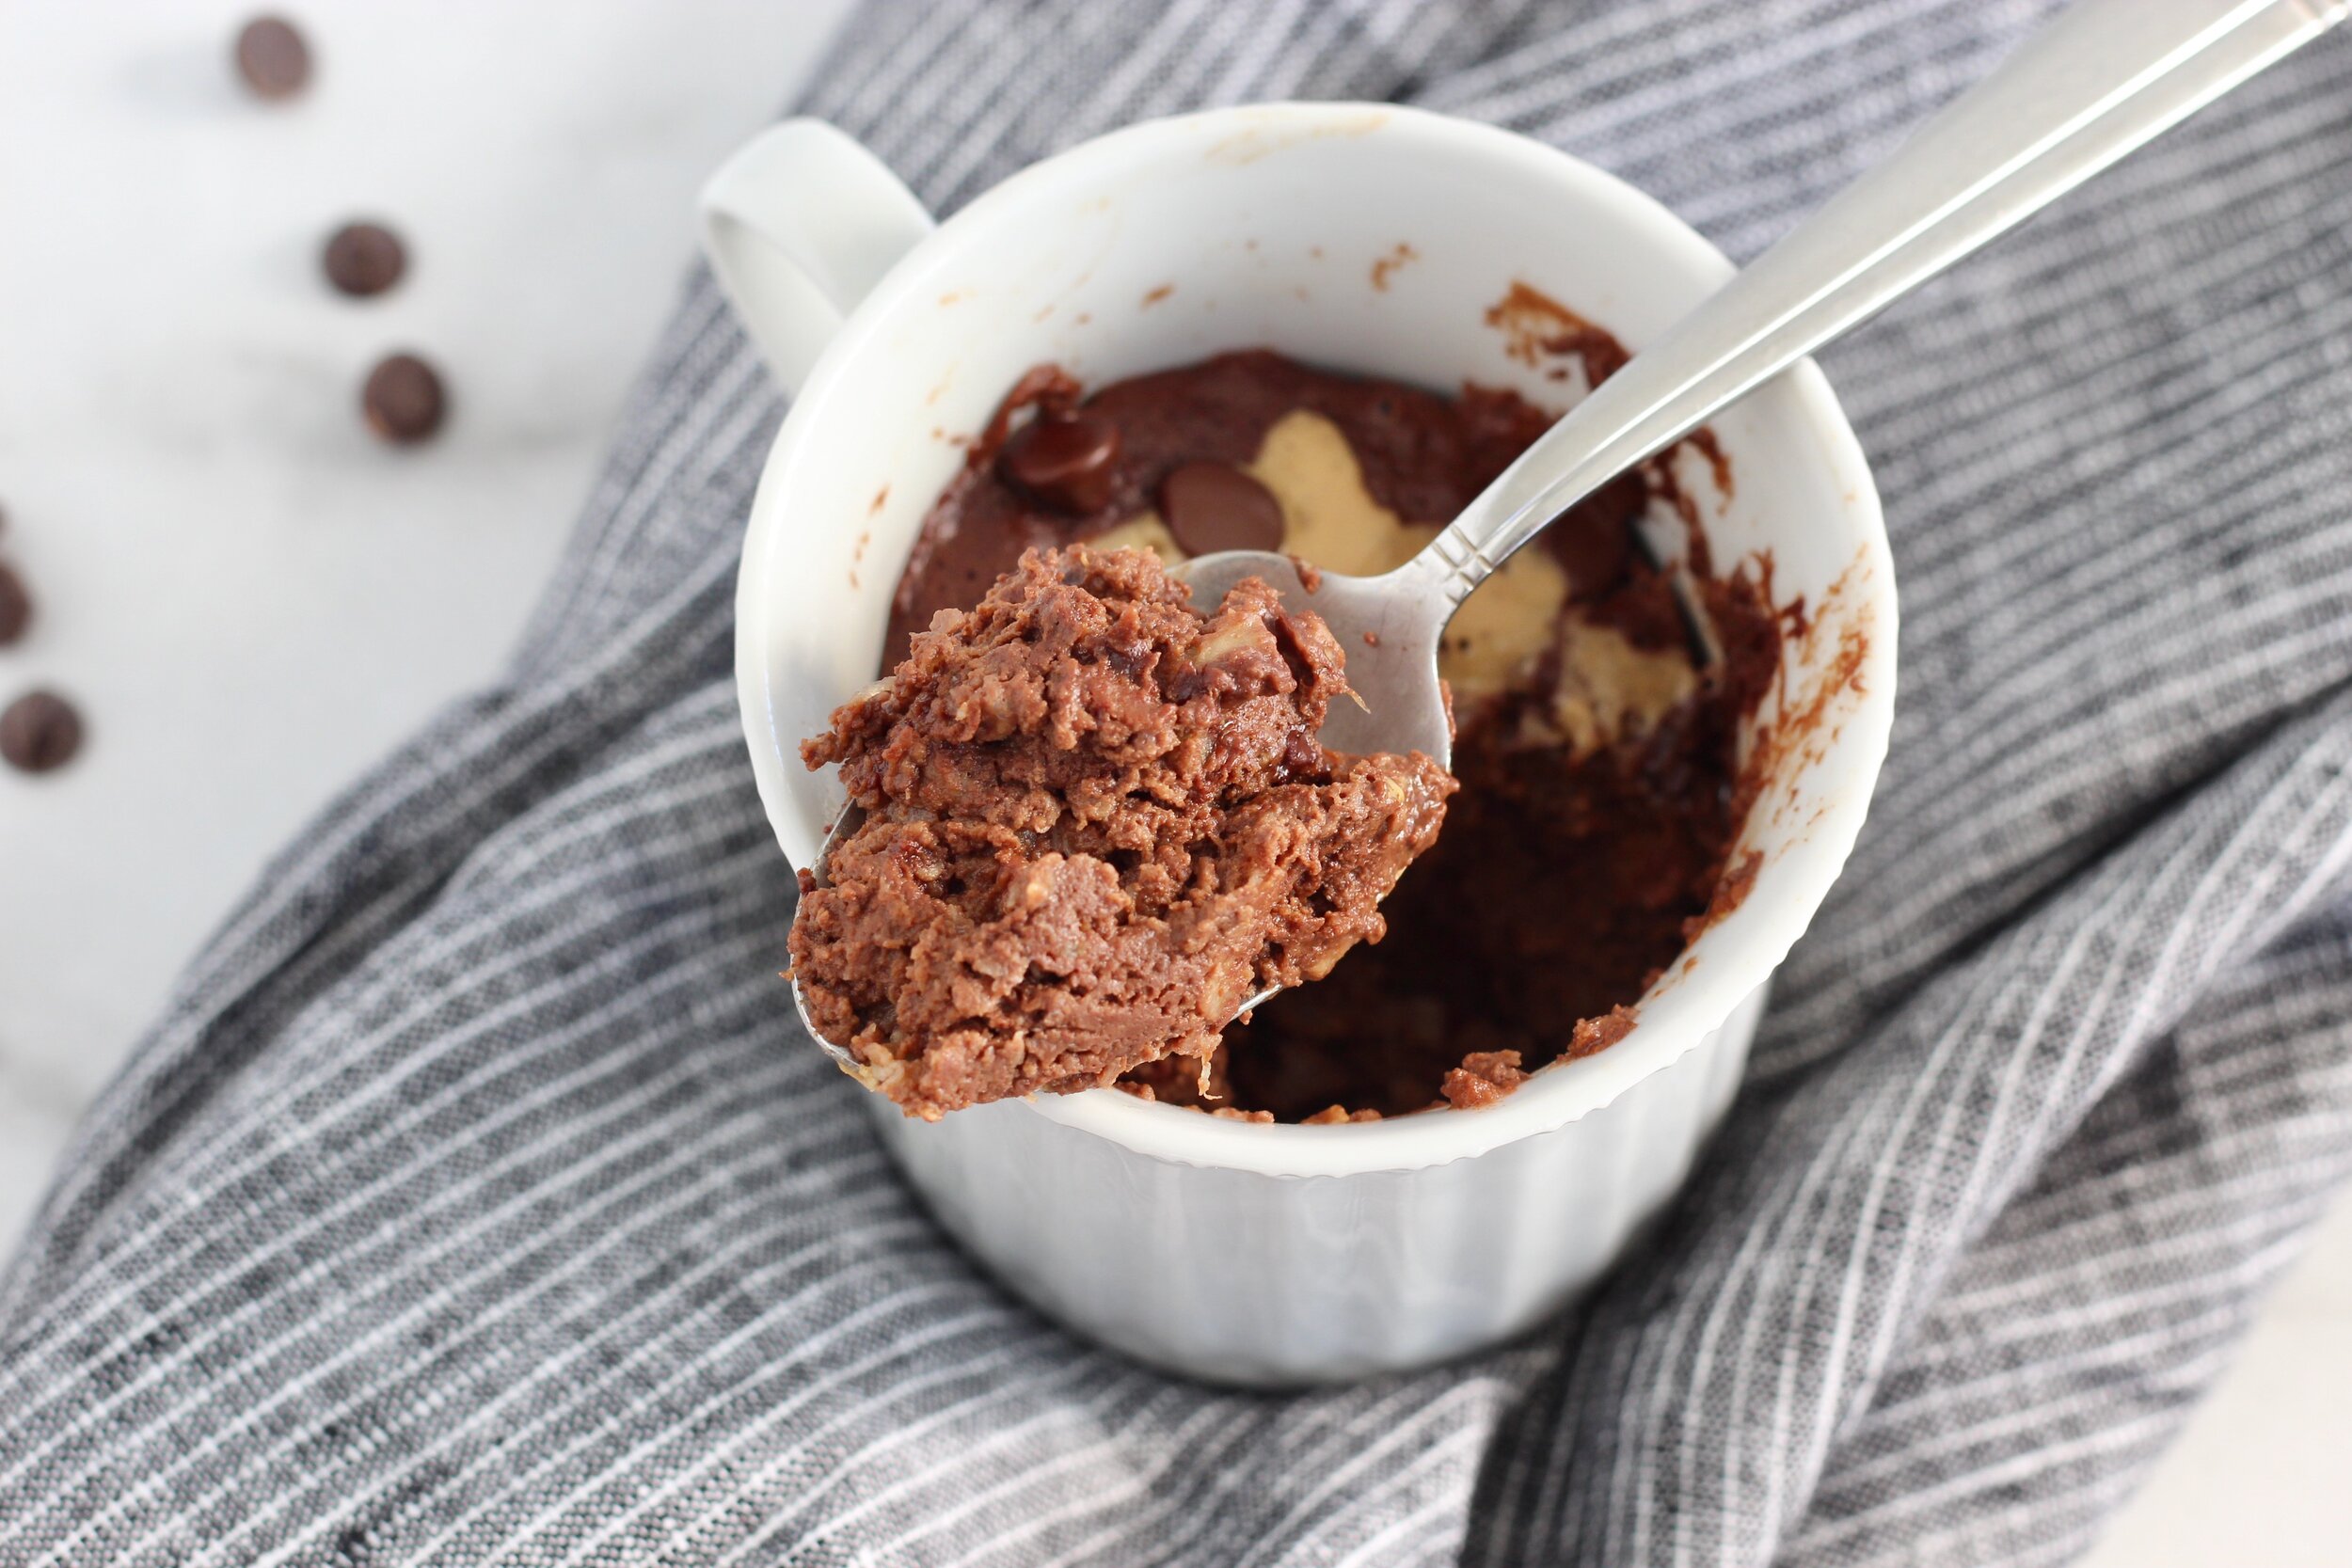
Add banana to a large mug and mash until mostly broken down.
Mix in egg and cocoa powder and stir until everything is fully combined into a batter-like consistency.
Microwave for 60-75 seconds. Batter should look cooked through and have a cakey texture.
Add your favorite toppings!! (Mine are peanut butter and chocolate chips!!)
*Note: use a large mug because the cake will puff up when it cooks and you don’t want it to spill over!
*Note: the riper the banana, the sweeter the cake!
Nutrition information: Calories: 185, Carbs: 29g, Fat: 6g, Protein: 9g
I hope you enjoy this as much as I do!!
Products I Love

Guys! I have been wanting to do this forever and am very excited to finally be doing it! I wanted to make a page that you can land on to find products that I recommend frequently (and use myself too!) Check it out!!!
Food:
SNACKS:
PB2: Add to yogurt, smoothies, pancakes… anything really!
RXBar Nut Butters: These are great traveling snacks!
RXBar Oatmeal: Find out how I use these here
Whole Grain Triscuits: My go-to cracker!
BARS:
WORKOUT NUTRITION
Gogo Squeeze Applesauce: Great pre-workout and/or during workout.
Fig Bars Great pre-workout and/or during workout.
Graham Crackers Great pre-workout and/or during workout.
Lyte Balance Electrolytes Everyday hydration
Skratch Labs Hydration (strawberry lemonade): Shorter workout hydration
UCAN: Great for workouts lasting longer than 60 min
Hammer Perpetuem (Cafe Latte): Great for workouts lasting longer than 60 min
Hammer Endurolytes Fizz: Great for post workout hydration
GU Gels: Great for workouts lasting longer than 60 min
Science in Sport Gels: Great for workouts lasting longer than 60 min
Clif Bars: Great for workouts lasting longer than 60 min
Fuel for Fire: Quick post workout snack
Noka Smoothie: Quick post workout snack
COOKING to add flavor:
Spiceology Spice Mixes (any of them)
Trader Joes Green Goddess or Carrot Ginger Miso Dressing
Salsa (always)
more to come….
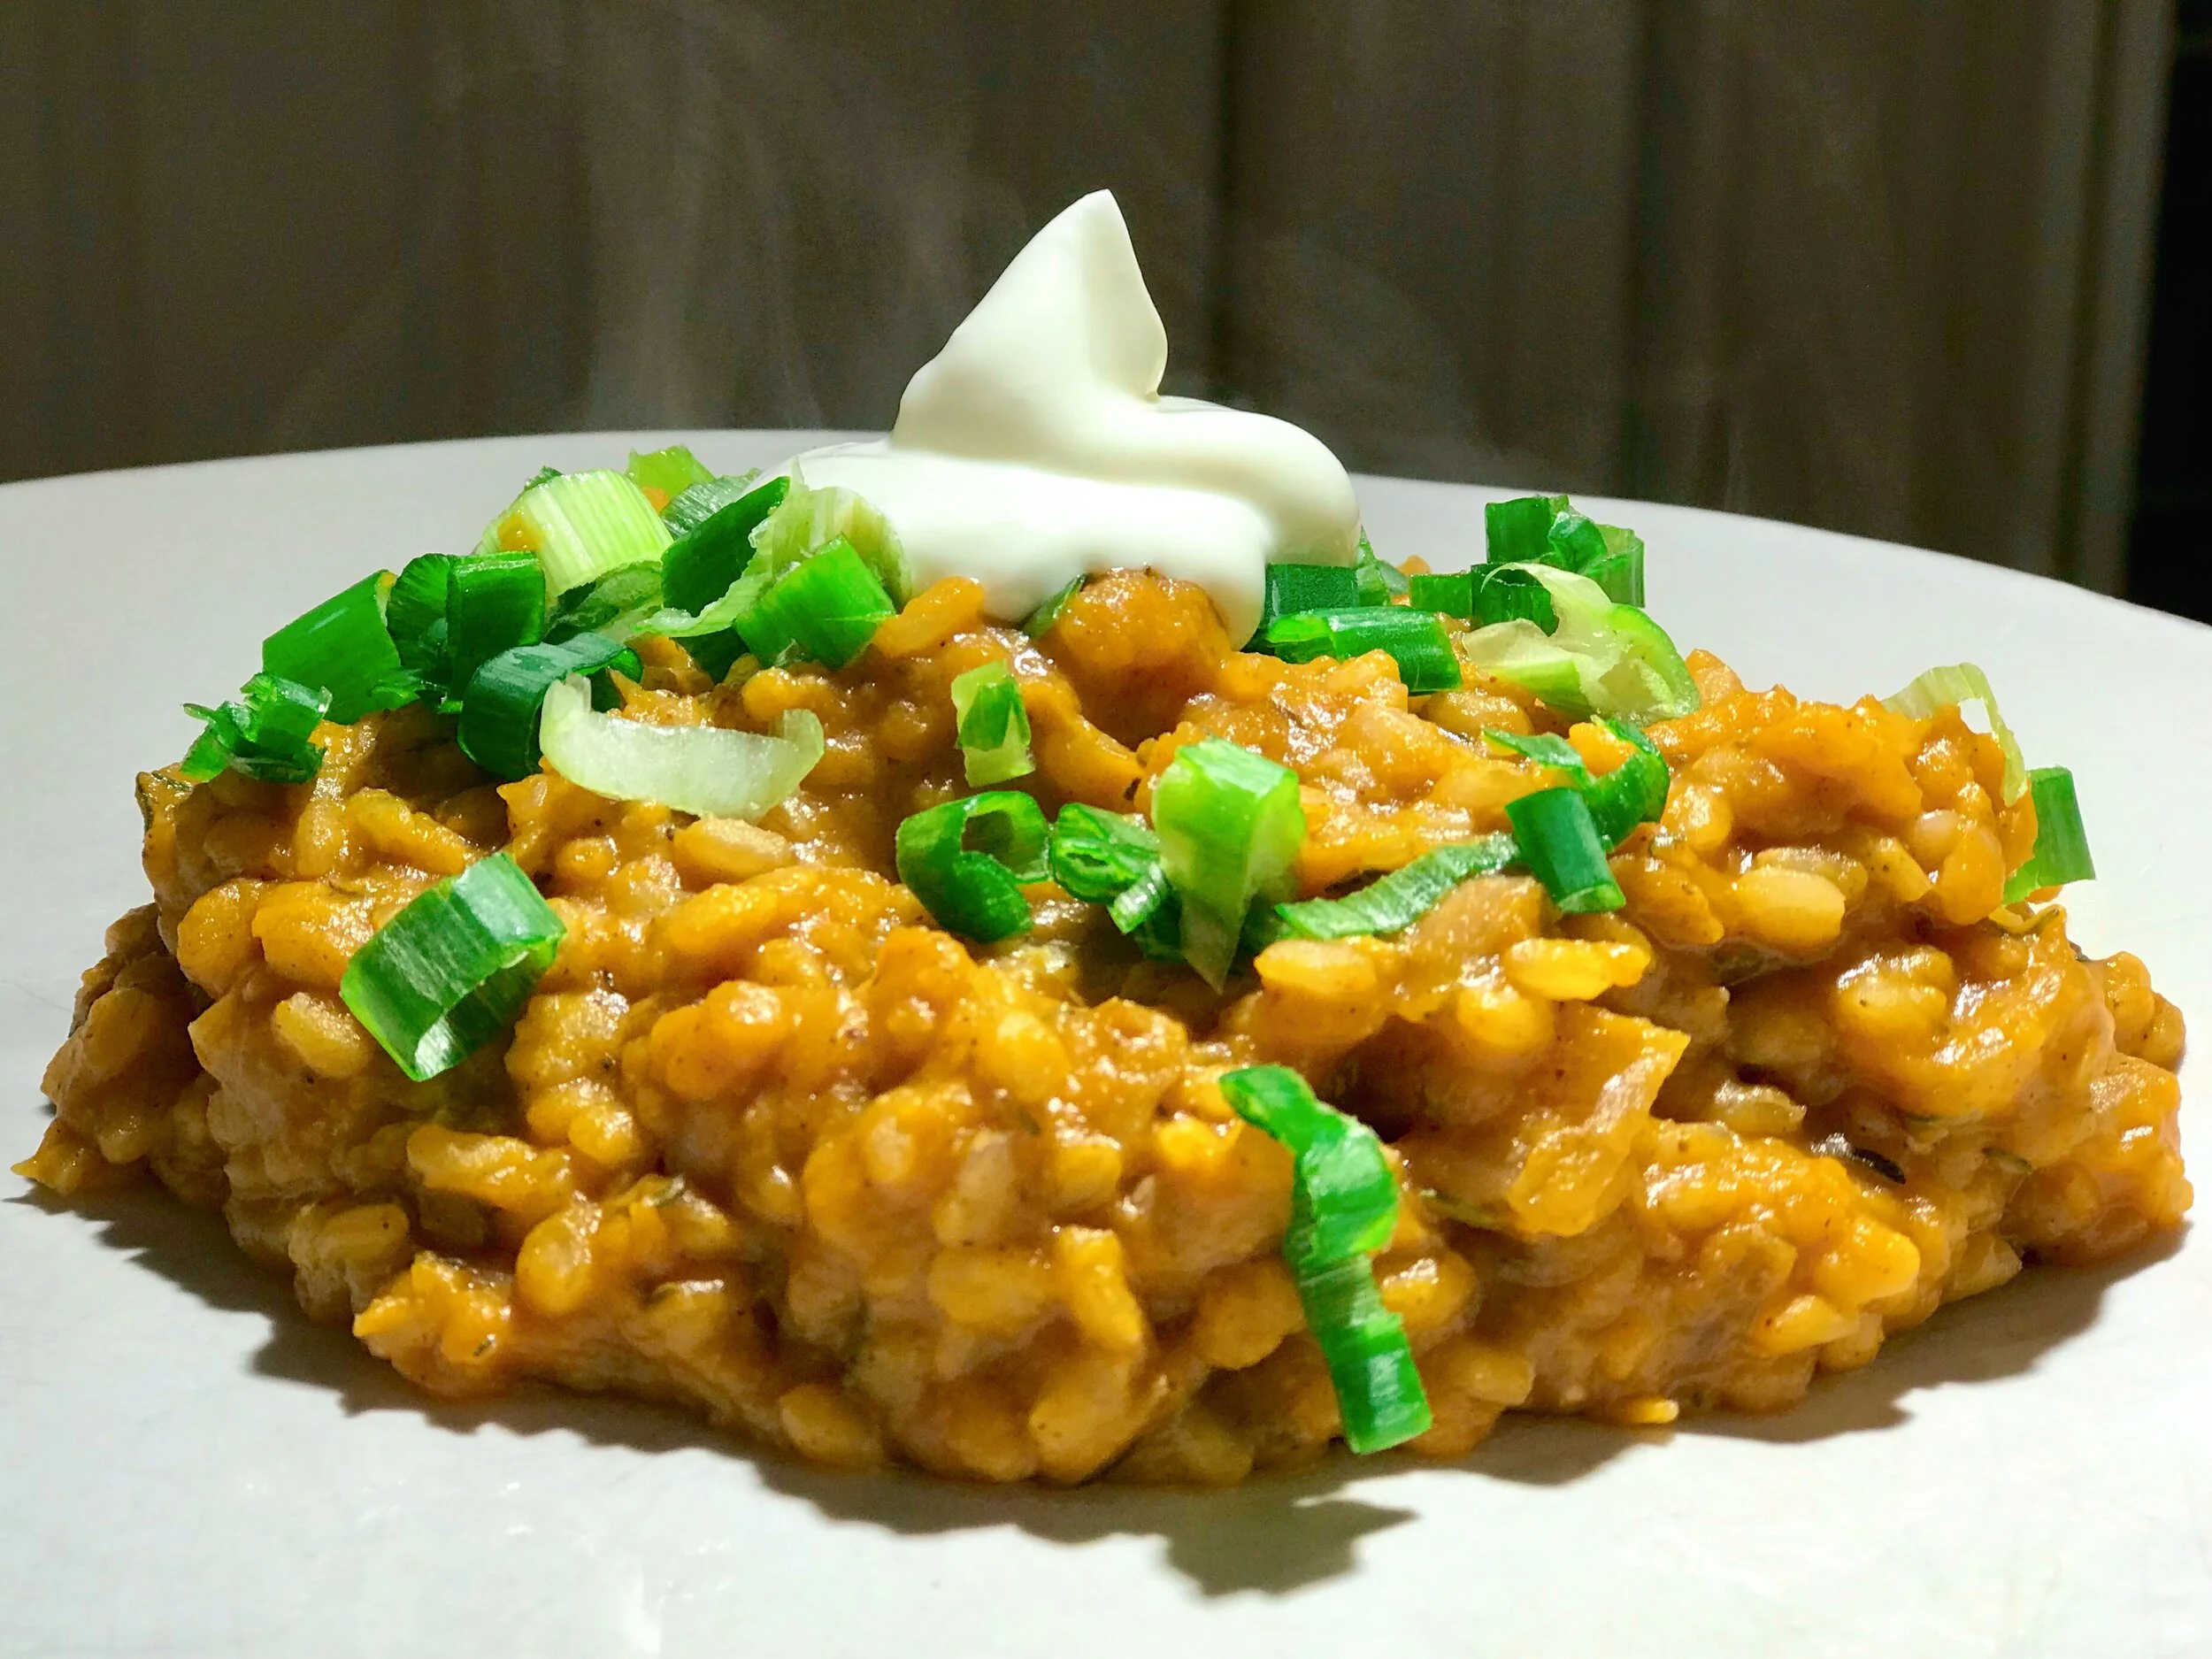
Weeknight Curry

Guys… I finally found my go-to quick curry recipe!! I have been on a long time hunt for one that is packed with flavor but also really easy to make and this is it!!
One great thing about this recipe is it can be made with lentils and beans or with chicken, or, if you can’t decide like me you can do all three: lentils, beans and chicken!! February is Heart Health Month, so I am trying to emphasize more plant based proteins in my diet and this recipe has been a perfect fit! Plant based proteins are a great way to get protein in a way that is healthy for your heart. They are packed with fiber which can help lower cholesterol AND have no saturated fat, which is also great for the heart!
You have to try this recipe!
Weeknight Curry
Ingredients:

2 tablespoons coconut oil
1 small onion, diced
1 tablespoon garlic, grated or minced
1 tablespoon ginger, grated or minced
2 tablespoon yellow curry powder
1 can diced tomatoes
13.5 oz. can lite coconut milk
1 lime, juiced (about 2 tablespoons)
1/2 cup dry red lentils
3 cups broccoli florets
1 - 15 ounce can chickpeas, drained and rinsed
Red pepper flakes, salt, and pepper, to taste
Cilantro, for topping
Naan bread and/or jasmine rice, for serving
How to:
In a large pan heat coconut oil over medium heat. Add onion to pan and saute for 2 minutes. Then, add garlic, ginger, yellow curry and stir until onions are coated.
Add diced tomatoes, coconut milk, lime juice, and lentils and let come to a simmer. (If you like a thinner, more soup-like curry, add ½ cup of water at this step.)
Once it reaches a simmer, turn heat down to low, cover, and let simmer for 10 minutes.
Then, stir in broccoli florets and chickpeas and let simmer for 5 more minutes, until broccoli and lentils are tender.
Season with red pepper flakes, salt, and pepper, to taste.
Garnish with cilantro and serve over basmati rice or naan bread. Store any leftovers in an airtight container for up to 4 days.
Note: If you want to use chicken in this recipe, simply replace the 15 ounce can of chickpeas with 1 pound of cubed chicken breast. Ensure the chicken reaches a temperature of 165 degrees before serving.
Nutrition information:
Without chicken: 6 servings, 287 calories, 38g carb, 11g fat, 11.5g protein
With chicken, no chickpeas: 6 servings, 319 calories, 22g carb, 12.5g fat, 30g protein
Oat Pancakes- My Go-To Snack

If you guys haven’t figured this out yet, I am all about snacks!! I love snacks but often find myself in snack ruts, as I know many of you do too. So… I wanted to share one of our favorite go-to snacks!! Kevin created this idea and with plain oats and then we took it to the next level with RXBar Oatmeal!! And just a caveat… we call these patties, I called them pancakes for this blog, but really… I am not sure what to call them!!
Before I dive in, I just want to tell you why this snack packs a punch.
Oats are a complex carb that is high in fiber, so you will find the energy lasting longer
As I mentioned in the point above, oats have a lot of fiber, which is something we all need a decent amount of! Whole grains (including oats) are a great way to get fiber (along with fruits, vegetables, nuts and seed!)
The RXBar Oatmeal has protein added in PLUS you add protein from the Greek Yogurt which makes this a high protein snack
And finally, the number 1 reason why I love this snack… it is delicious!
So here’s how to make them…
Oat Pancakes (patties, or whatever you want to call them)
Ingredients:

1 container of RXBar Oatmeal, any flavor
1 TBSP nut butter
1/2 banana
1/3 cup Greek Yogurt
cinnamon
How to:

Mash banana in a bowl. Take 3/4 of the banana and mix it in with the RXBAr Oatmeal and nut butter
Heat a pan and transfer oats to the pan. Flatten and form into a round disc.
While it is cooking, mix the other 1/4 of the banana with Greek Yogurt and cinnamon.
Once the pancake is browned, flip and cook the other side until that side is browned.
Serve pancake with yogurt mixture.
Note: this can be made with a 1/3 cup normal oats
These can be eaten without the yogurt as a pre-workout snack and with the yogurt as an everyday snack or a post-workout snack.
No Bake Pre-Workout Cookies
Hey y’all!
It’s been a minute, but I’m still here and wanted to share a fun snack recipe with you guys!
Our official training is starting this week for St George 70.3. We are keeping our fingers crossed that the race will happen. I’m sure you’ve experienced this in the last year too… you have to keep unwavering optimism to keep up your motivation to train, or else I find it too easy to just let time pass by!
Anyways, with the start of a new training season, I am always looking for fun pre-workout snacks! You all probably know I am a huge RX Bar fan, but sometime I feel like I just wanna mix it up!!
This recipe is delicious and easy and can be easily stored! It is mainly carbs to give you good and long lasting energy. Everything an endurance athlete needs in a snack :-)

No Bake Pre-Workout Cookies
Makes 24 cookies
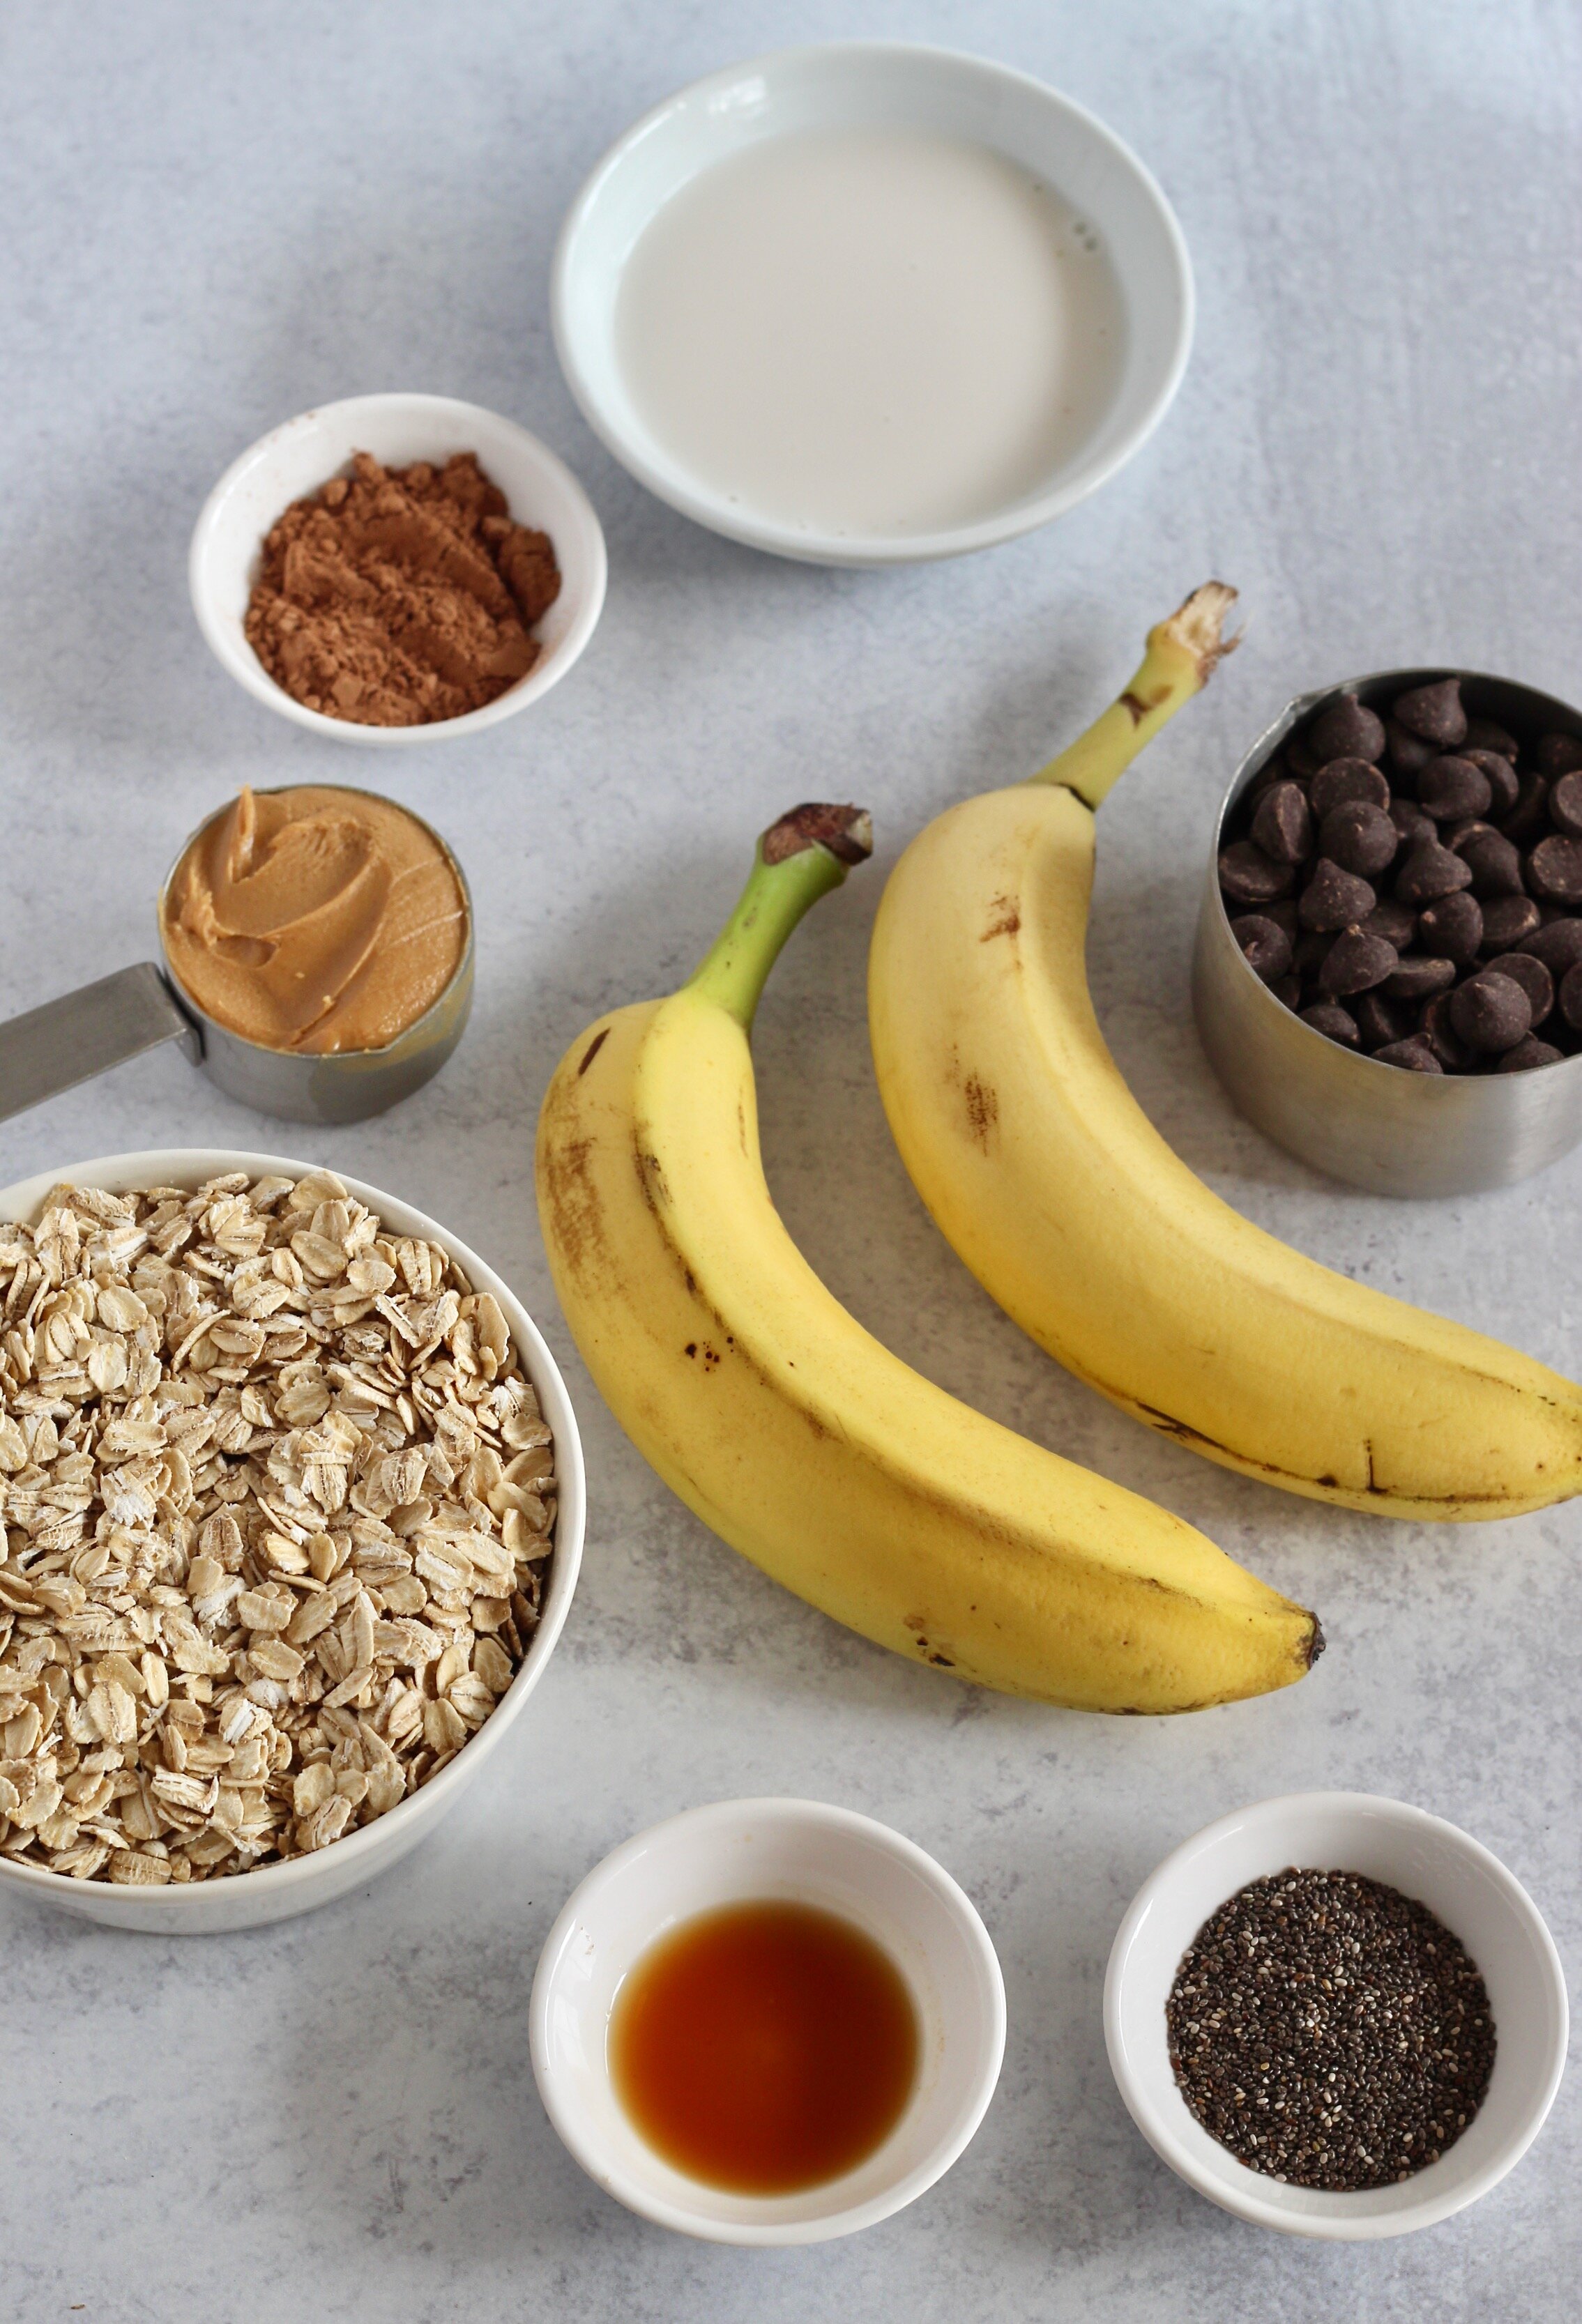
Ingredients:
2 ripe bananas, mashed
1 cup dark chocolate chips
1/4 cup peanut butter
1 TBSP chia seeds
1 TBSP cocoa powder
1 TBSP maple syrup or honey
1/4 cup almond milk
1/8 tsp salt
2 cups rolled oats
How to:
In a medium pan over low heat, combine mashed bananas, chocolate chips, peanut butter, chia seeds, cocoa powder, maple syrup/honey, almond milk and salt. Heat for 2-3 minutes or until melted and just beginning to bubble.
Remove from heat and stir in oats until completely coated.
Spoon rounded tablespoons of dough onto a plate or sheet pan lined with parchment paper. Chill cookies until solid, then enjoy!
Store leftover cookies in the fridge for up to 1 week or in the freezer for up to 3 months.

Nutrient Info: 1 cookie 100 calories, 4.9g fat, 12.6g carb, 2.2g protein
For athletes: this is a great pre-workout snack
For everyone else: to make this an energizing balanced snack, add a protein!
Lemon, Fennel and Olive Tuna

This is one of my FAVORITE summer meals. Not only is it quick to make and perfect on a hot day BUT it is also packed with flavor!!
Here are some unique flavors this meal consists of:
Lemon rinds: what?! Trust me, I thought it was weird too! But if you slice them thin, then the flavor is just right with each bite and not overwhelmingly sour (like citrus rinds can be)!
Fennel: if you’ve never had fennel, this might make you nervous. Don’t be! Fennel has an awesome flavor, similar to licorice (but not really cause I don’t actually like licorice, but I like fennel!!)
Dill and Kalamata olives: you can’t go wrong with either of these ingredients… am I right?!
Okay, so now that we’ve determined this meal is delicious, here’s how to make it:
Lemon, Fennel, and Olive Tuna
Ingredients:
1 lemon
1/2 bulb fennel, stalks trimmed
1/4 tsp salt
30 oz canned tuna, drained
2 TBSP olive oil
2 TBSP capers, drained
1/3 cup Kalamata olives, chopped
1/3 cup dill, roughly chopped
How to:
Slice lemons very thinly. Quarter lemon slices and remove any seeds. Slice fennel bulb in the same way. In a medium bowl, mix together lemon, fennel and salt and let sit for 20 minutes.
In a medium bowl, toss together tuna, 2 TBSP olive oil, 2 TBSP capers, 1/3 cup olives and 1/3 cup dill. Add the lemon-fennel mixture and combine.
Enjoy!!
We like to eat ours with sourdough bread, grapes and green beans!!
The best AND easiest chicken salad recipe
So Kevin and I have been meal prepping for a couple months now. What that looks like for us is making 1 lunch for the week, all breakfasts, and usually 2 dinners to get us through Sunday night through Friday lunch. We usually spend a couple hours on Sunday afternoon making this all happen.
Because of this, I am constantly searching for meals that can be made easily in bulk and taste good throughout the week. That is where this meal comes in… Apricot Almond Chicken Salad. WE LOVE THIS MEAL!! So naturally, I have to share :-)
This can be made with canned chicken, rotisserie chicken or baked chicken. We have been using canned chicken. If you are using one of the other two, you may need to add a little bit of salt to the recipe. I have found the canned chicken tastes fairly salty, so usually don’t add anymore.
You can also use either fresh or dried apricots. If you are using dried, try to find ones without added sugar!
And lastly, you can buy already roasted almonds or roast them yourself in the oven or on the stovetop.
Okay… here are the details!
Apricot and Almond Chicken Salad
Ingredients:

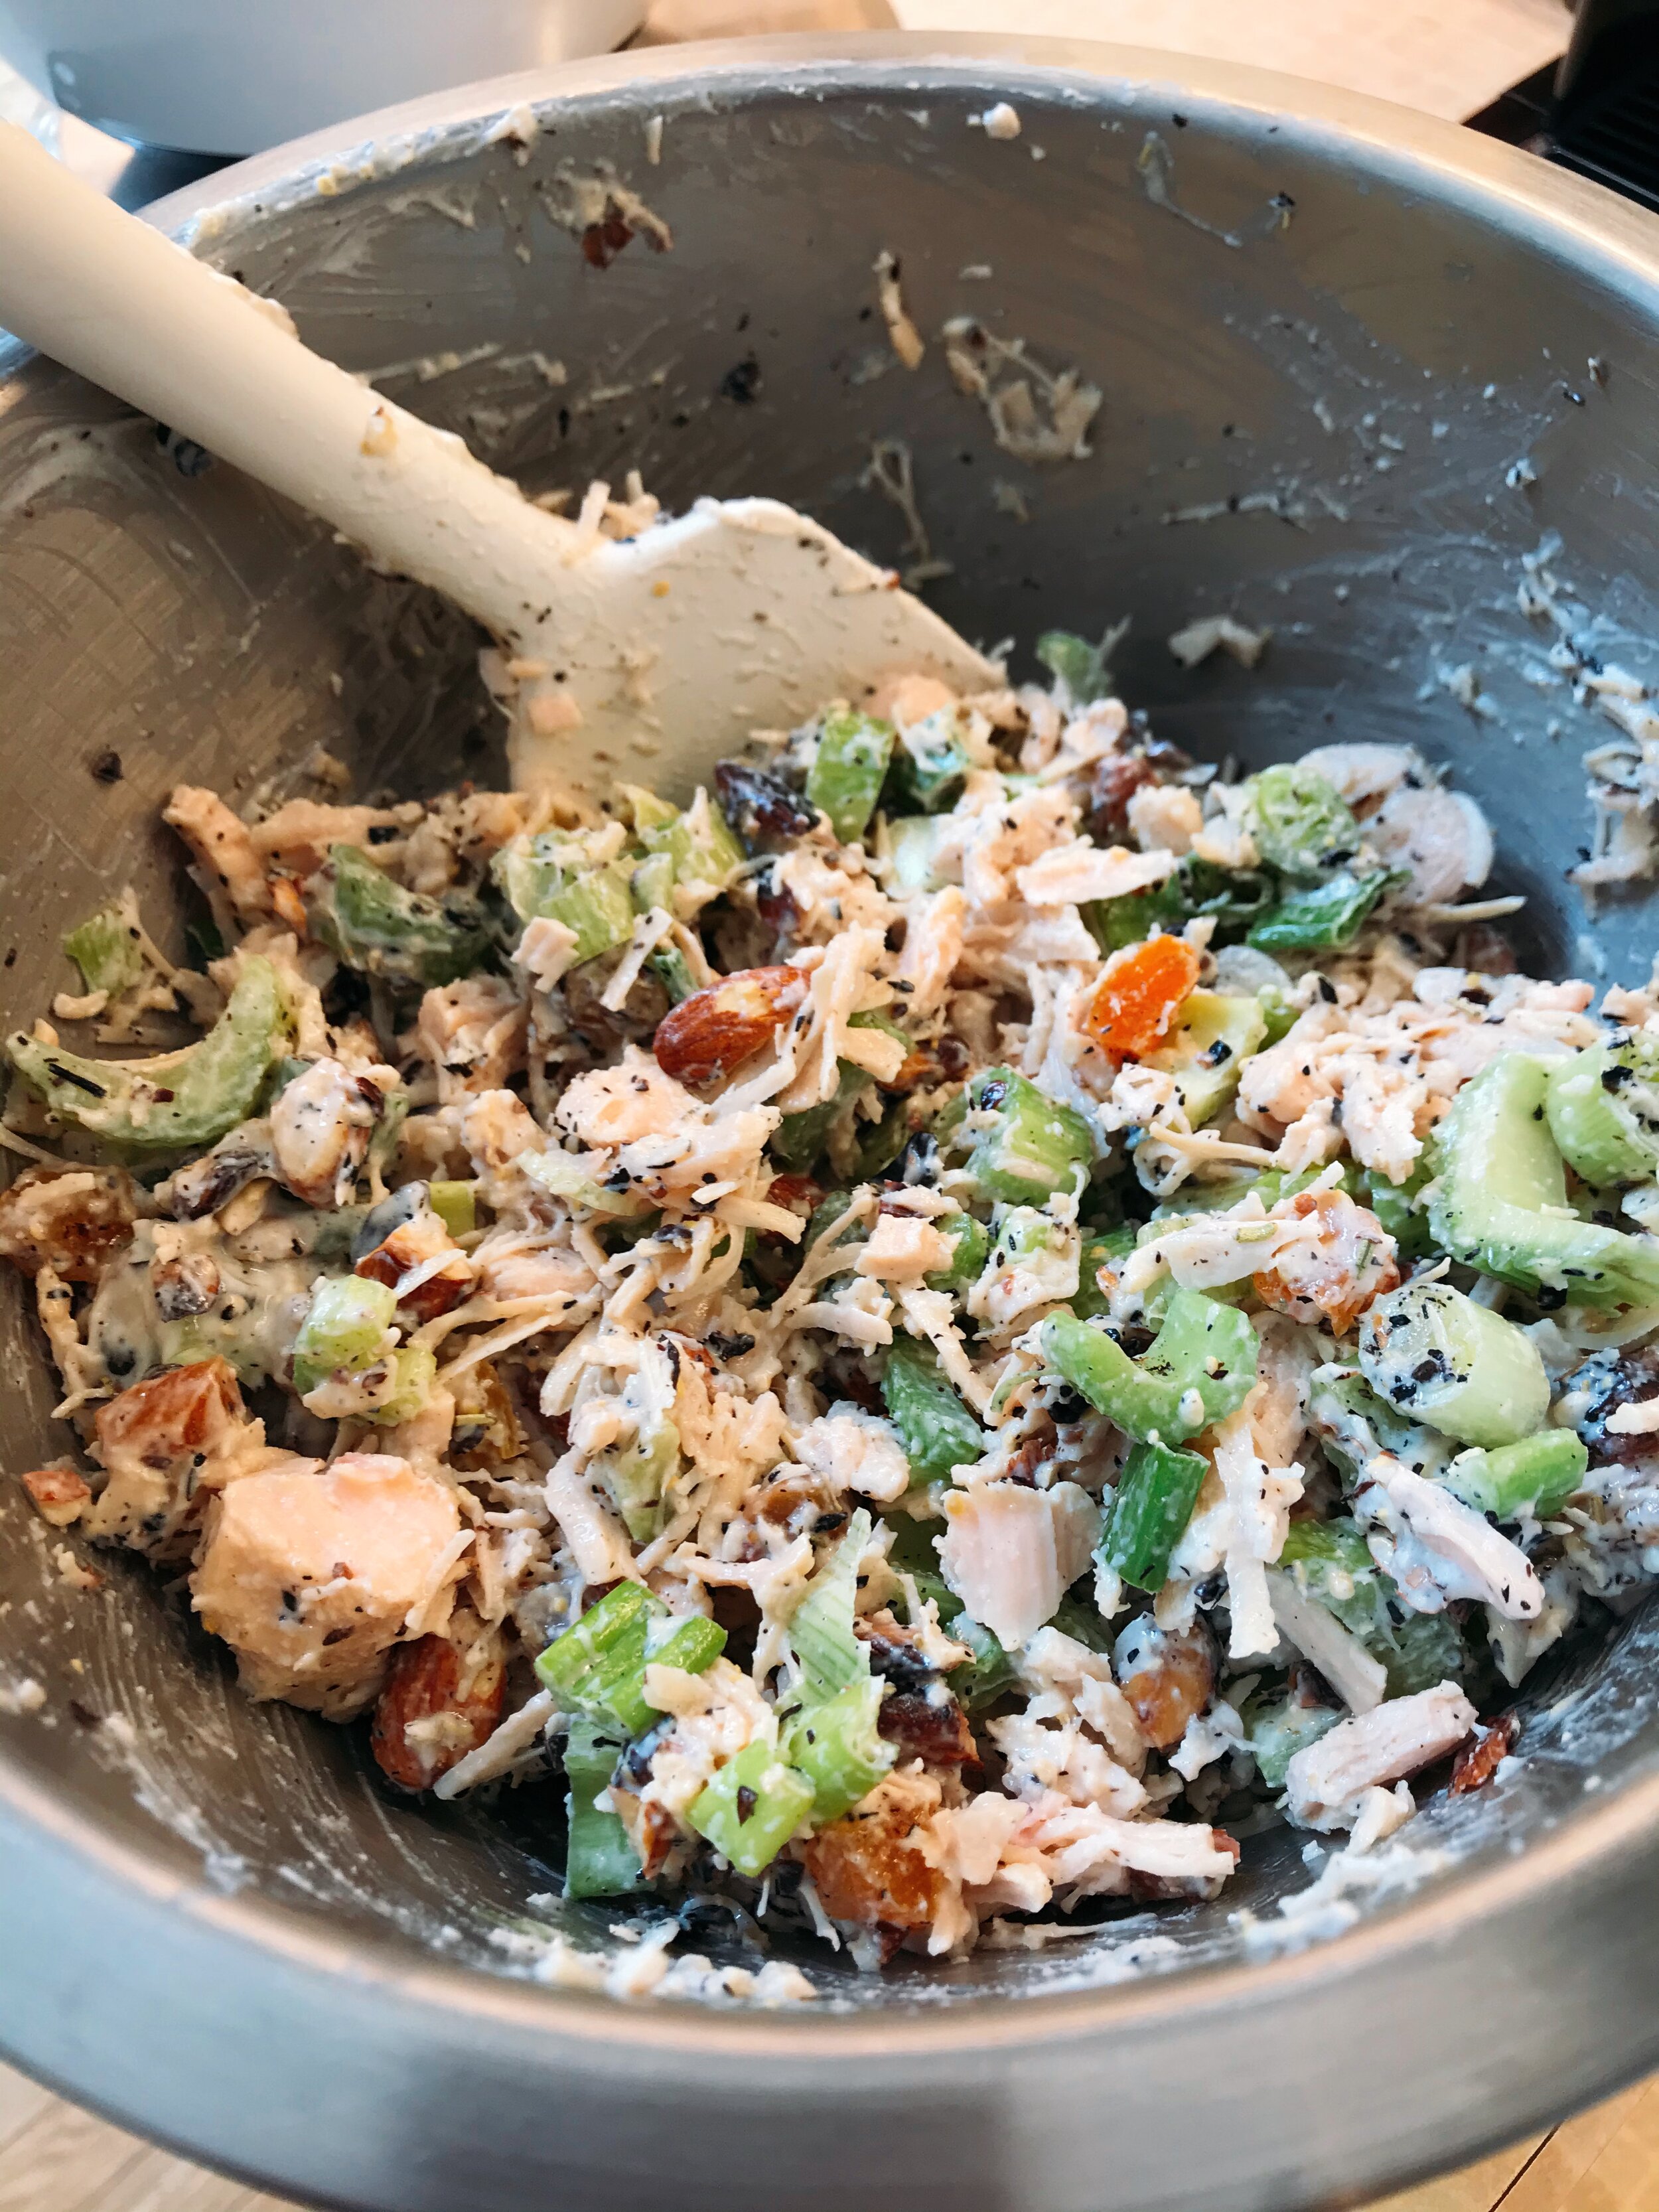
16 oz chicken, shredded
1/4 cup almonds, roasted and chopped
1/4 cup dried apricots, chopped (can also use fresh if they are in season)
3+ green onions, sliced
2+ stalks celery, sliced
1/3 cup plain Greek yogurt
1 TBSP olive oil
1 TBSP dijon mustard
1/2 tsp honey
rosemary and pepper
How to:
Prep chicken (drain if needed). Mix with green onions, celery, apricots and almonds.
Make the dressing by combining Greek yogurt, olive oil, dijon, honey and rosemary and pepper.
Add dressing in with chicken and mix well.
Serve with a starch and vegetables on the side!
We served ours with roasted green beans and homemade sourdough bread!!

Mustard Garlic Pork Tenderloin
I don’t know about you, but pork tenderloin was something we ate only for special occasions growing up. That is the idea that I brought into adulthood. Until I dug a little deeper…
We have found that pork tenderloin is actually cheaper than chicken.
Also, it is a very lean cut of meat, so is not an unhealthy thing to throw into your protein mix!
Pork tenderloin is also generally easy to cook, which is another bonus!!
This is just one of our favorite ways to eat pork tenderloin. It is very flavorful, and like I mentioned, very easy!
Mustard Garlic Pork Tenderloin

Ingredients:
1 pork tenderloin
1 heaping TBSP dijon mustard
1 TBSP olive oil
3 cloves garlic, minced
1-2 TBSP Italian seasoning (or a mix of oregano, basil, garlic power, onion powder, salt, pepper, thyme, rosemary)
1 tsp salt
How to:
Preheat oven to 350F.
Clean and trim the fat from the pork tenderloin.
Mix remaining ingredients together. Spread over the surface of the pork tenderloin.
Place in oven safe dish
Roast for 30 minutes, or until it reaches an internal temperature of 145F. Let rest for 5 minutes and serve.
To make your life easier, serve with potatoes and a vegetables that can all be roasted at the same time!
The Key to Success: Meal Planning
Who is tired of stressing out about what to eat for dinner every night?
During this quarantine season, I can imagine you feel the stress even more without the freedom to go to the store everyday to grab something your forgot. Meal planning can make your life easier, your grocery shopping trips less stressful, save you money, and can help you feel more in control about what you are eating and feeding your family. Not to mention, keep your risk of catching COVID-19 down by limiting your trips to the store!!
I truly believe having a plan is one of the most important ways to eat well. When plans aren’t in place, last minute and convenient decisions are made, which let’s be real… aren’t always the best decisions.
I hear from clients over and over again, that they feared planning food would limit their food freedom. Once they get in the habit, they all say that having a plan gives them more freedom! When you don’t have to stress about what to make for dinner every day, you have more brain power to enjoy and do other things!!
I know, it can be a dreadful process, but once the process is in place it becomes a tool for success, and you will get to the point where you aren’t willing to not utilize that tool… because you know how it will lead to your success.
Here are a couple tips on meal planning:
Think about meals and what is going on around those times:
Will you need to pack food? Have a quick meal? Utilize leftover? Will you feel like cooking?
Be realistic and recognize your time and energy restrictions!!! Thinking through these things can prevent that situation that we’ve all been in… You get home late, had a plan to make a full meal. Then you ran out of time and energy and your left eating PB&J and cereal, feeling like you failed cause you didn’t eat as planned.
Utilize leftovers!
Think about breakfast, lunch and snacks!
I often see that when people meal plan they only think about dinner, which leaves your scrambling for the rest of the day!
Think about fresh ways to use normal ingredients.
I can’t even tell you the amount of different meals we’ve made with chicken and rice! Use spices; look for a cuisine you haven’t tried making before; think about your favorite flavors when you eat out and try to replicate at home!!
Balance your meals, always!
Each meal should include a protein, starch and fruit or vegetable. Plan it that way!
Make a list, and check it!
There is nothing more frustrating than forgetting an ingredient or buying something you already have!! Eliminate this issue by checking what you have and making sure all ingredients you need are on your list.
Meal planning can be so helpful in keeping you and your family eating healthy AND it can save time, stress and money.
Check out these resources to help you meal plan better!
Menu subscription:
Do you feel like you run out of ideas when it comes to fresh meals? Let me help by sending you 3 meals a week that include a complete grocery list and meal prep instructions!!
Meal Plan Guides:
Organize your meal plans! These are 3 templates that I encourage you try out now!!!
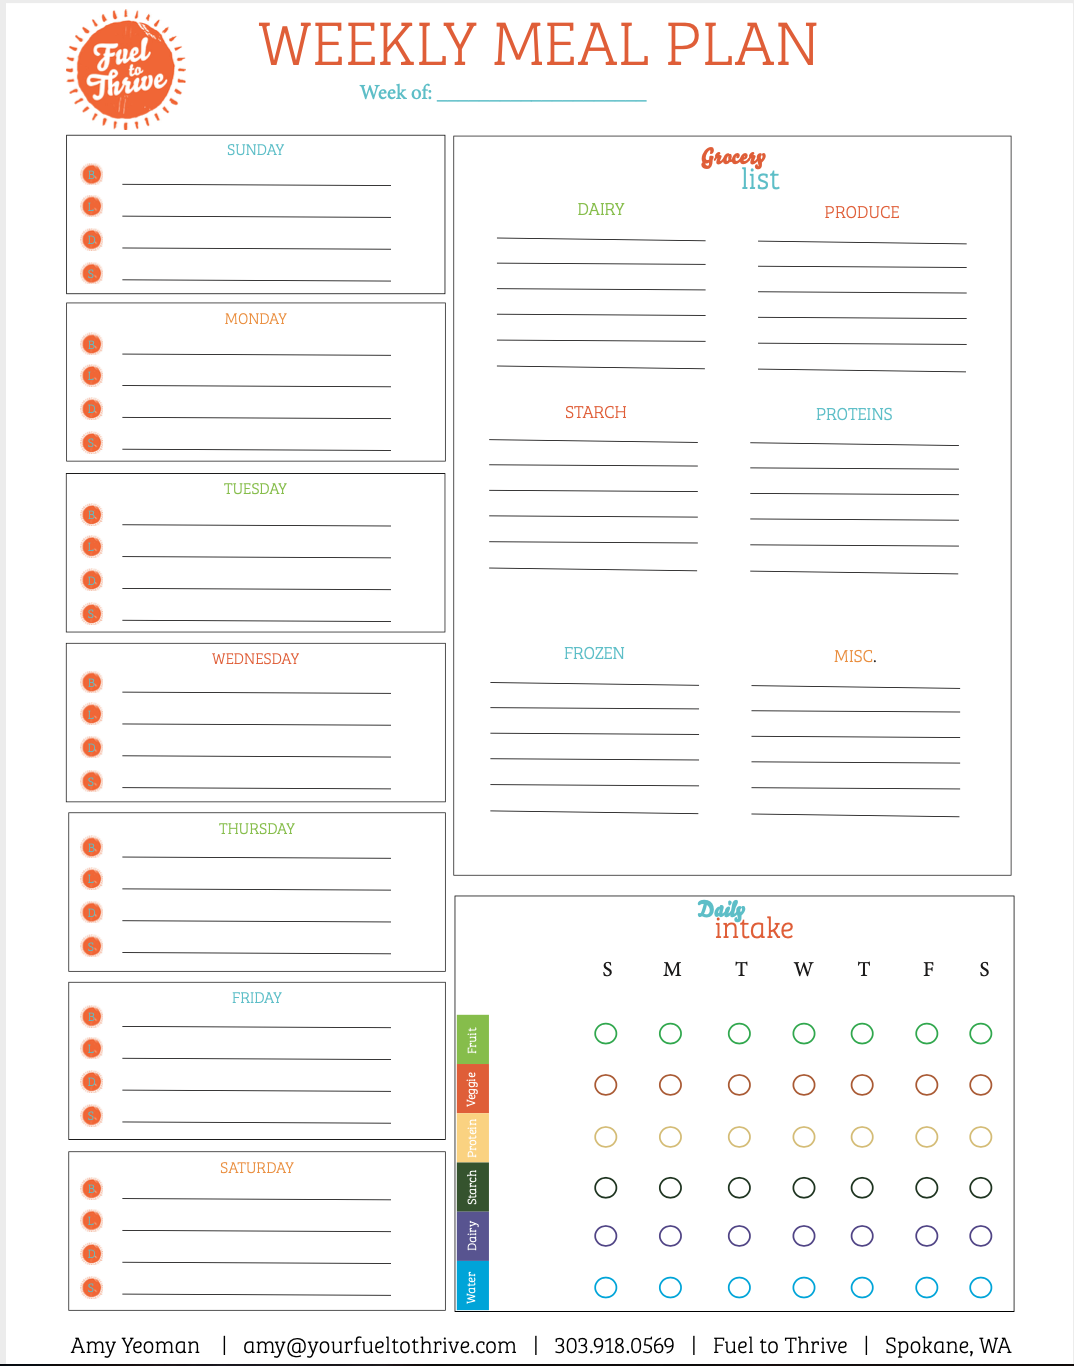
Option 1: This guide will help you keep your week, days and grocery lists all in one place!! It even helps you keep track of your nutrient intake daily!
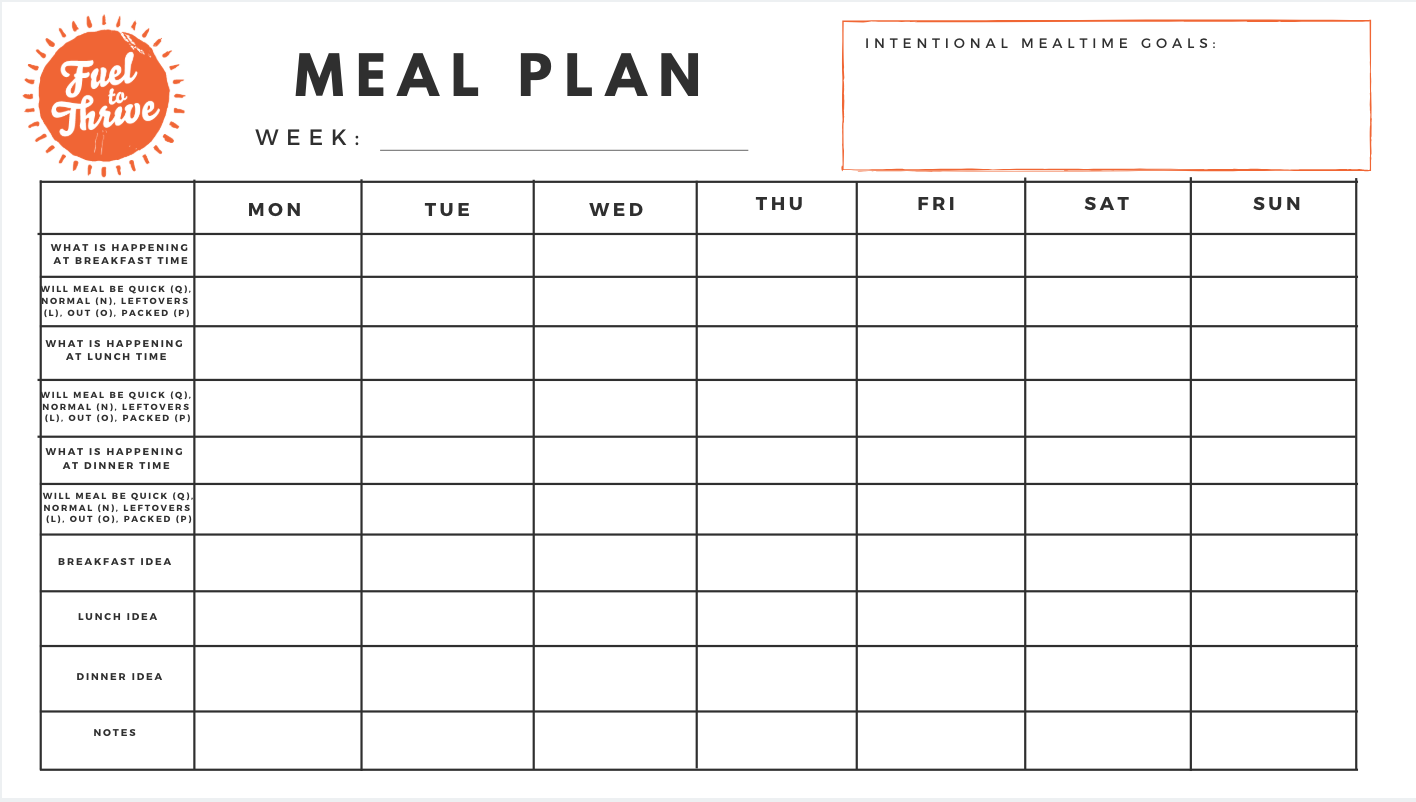
Option 2: This guide will help you think through each meal of the week and plan according based on what is going on around that meal and what type of meal you need to have.
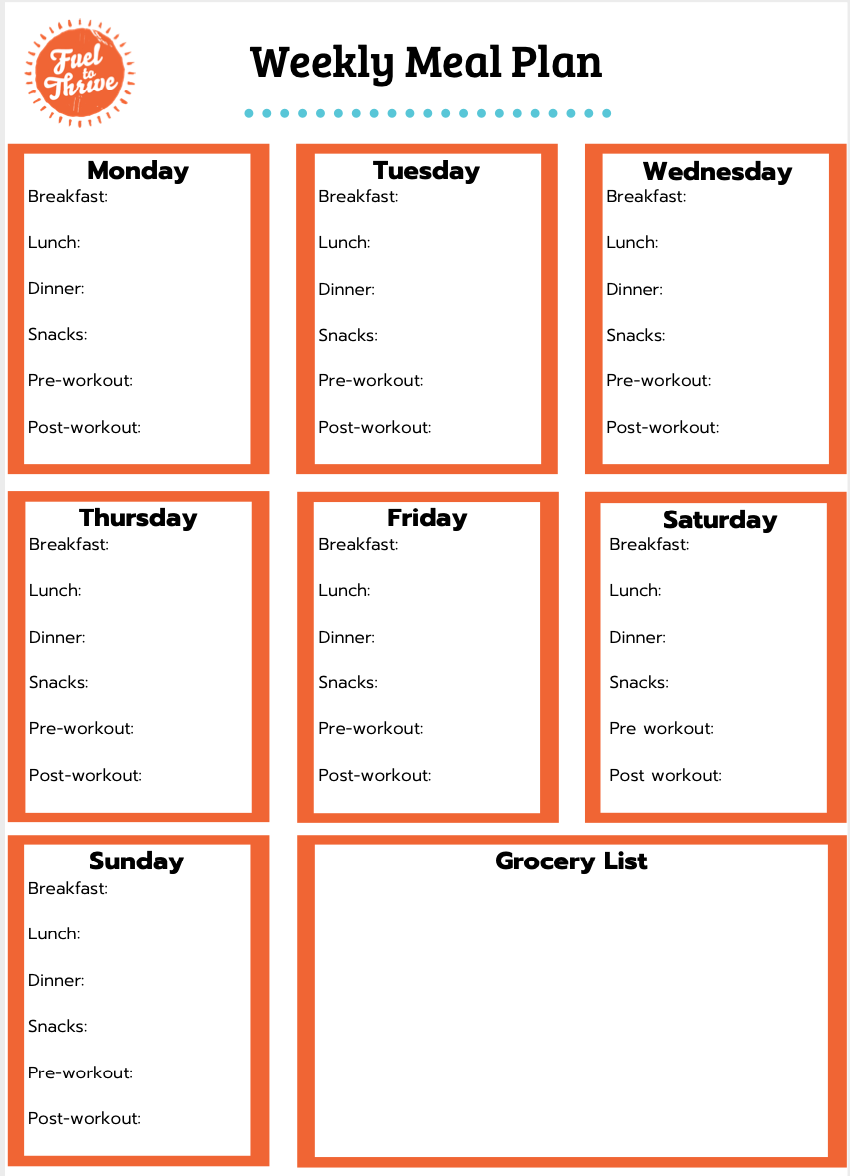
Option 3: This guide is a simple way to help you organize and plan your week!
And I will leave you with this: a goal without a plan is just a dream, so plan your food out!!!
Monster Granola Bars
YUMMMMM! These were fun to make and even better to eat!!! I actually bit into these and thought to myself, these could be a dessert… thats how good they are!! Plus, if you are like me a love to bake, it is a good way to get your baking fix in!
The nutrient breakdown of these make them a great pre-workout snack because of the quick and slow carbs. They also have some fat and a bit of protein which will help the energy last longer.
If you are wanting to utilize them as an everyday snack, pair with a piece of fruit and a hard boiled egg and it will be a well balanced snack that will provide great lasting energy!
Monster Granola Bars

Ingredients:
1/2 cup peanut butter
1/4 cup honey
1/8 cup avocado oil (or melted coconut oil)
3/8 cup unsweetened applesauce
1/2 cup whole wheat flour
1 tsp vanilla
1/2 tsp baking soda
2 cups oats
1/2 cup dark chocolate chips
1/4 cup raisins
How to:
Preheat oven to 350F. Line an 8x8 pan with parchment paper.
Combine peanut butter, honey, oil, applesauce and vanilla in a medium bowl. Mix well.
Add the flour, baking soda, oat. Mix to combine.
Mix in chocolate chips and raisins
Transfer to the 8x8 pan and press down so it is evenly distributed.
Bake for 18-20 minutes, or until golden brown. Let cool before you take it out of the pan.
Remove from the pan and cut into equal portions.
If you will be eating right away, store in refrigerator. If you will be storing them for snacks to grab over the next couple of months, wrap each individually in foil and stir in the freezer.
At Home Workouts: No Equipment, No Worries!
One of the coolest ways I’ve seen the community adapt to this COVID-19 quarantine is the amount of ideas being shared for at home workouts. Kevin and I have been doing at home workouts with very limited equipment. It has been great to get our bodies moving, but sometimes workouts just don’t feel as challenging when done with body weight. I wanted to share some extremely practical ways of making movements more challenging.
Add weight: get creative!! You have heavy things around your house, I know you do! Find ways to make them carry-able… grab a backpack and get creative with what you can throw in it.
I found a Costco bag of rice and textbooks. You can also fill water bottles with water. Bags of dog food are heavy. Cans are heavy. Just find some heavy stuff and throw it in a backpack!

How to utilize for a workout:
Place either on your back or your front to vary the load. You can do squats, lunges, deadlifts, 1 leg deadlifts, push ups, planks, jumping jacks, sprints, step ups, dips and many other movements with this.
Carry it: you can do squat presses, strict presses, farmers carry.
Move it: you can do wallballs, sit ups, kettlebell swings, cleans, toss it back and forth. Whatever you do, make sure the straps are tied in so they don’t whack you in the face.
At home workout:
4 rounds
30 lunges
20 squat press
10 push ups
400 m run (weight on your back)
Jump: jumping adds an element of power and speed, both of which will challenge more than a non jumping movement. Jumping will also get your heart rate up.
How to utilize in a workout: mix in jumping and non-jumping movements into your workout. Movements that can include jumping are: squats, lunges, push ups (for some), jumping jacks, tuck jumps, high jump, broad (frog) jump, speed skaters, and box jump.
Before you add jumping, make sure you feel strong enough in the non-jumping variation (aka a normal squat). Jumping will add more force to your joints and bones, so keep that in mind if you are nursing an injury.
At home workout:
5 rounds: 40 sec work/20 sec rest:
Squat jumps
Plank
Speed skaters
Dips
Jumping jacks
Slow Down: slowing a movement down requires control. Because your muscle is working for longer, it is required to fire more often. This is a great way to make a movement harder with just a little bit of weight!
How to utilize in a workout: You can either move slowly through the whole movement, or pick a part of the movement to move slowly through and use power and speed in the other portion (like the deadlift video). This can be done with squats, lunges, deadlifts, push ups, presses, 1 leg squats and deadlifts, and sit ups.
At home workout:
3 rounds of 12 of each movement:
Squat (lower for 5 seconds, pause at the bottom for 3 seconds, raise up for 1 second)
Deadlift (lower for 5 seconds, pause at the bottom for 3 seconds, raise up for 1 second)
Push up (lower for 5 seconds, pause at the bottom for 3 seconds, raise up for 1 second)
Sit up (lower for 5 seconds, pause at the bottom for 3 seconds, raise up for 1 second)
I was just thinking this morning that the idea of the quarantine has seemed like a fun idea… there has been a sort of novelty around it. If this continues on, I know at home workouts are going to become more and more challenging to stay motivated for. I strongly encourage you to KEEP MOVING! Exercise helps with:
Immunity
Triathlon and running performance
Weight loss and weight maintenance
Mental health
Mood
So yes, your equipment may be limited. But push to find ways to make it more challenging and fun. You post-quarantine self with thank you for it.
If you have questions or need more ideas, please reach out!
Mediterranean Eggplant and Chickpea Ragout
This is one of those recipes that we used to eat a lot and then somewhere along the way we kind of forgot about it. Then, the other day I was with one of my friends at My Fresh Basket and she got a dish that looked just like this. Then I HAD TO MAKE IT! It has such great flavor!!
I got all the ingredients before the chaos of COVID-19, but the good news is, all of these ingredients should still be available!!
One more thing, if you think the idea of eggplant sounds gross, it isn’t. You actually don’t even taste it much in this recipe!!
Here is a healthy dinner recipe to try tonight!
Mediterranean Eggplant Ragout

Ingredients:
1 lb lean ground turkey
1 large eggplant, chopped into cubes
1 tbsp avocado oil
1 yellow onion, diced
1/4 cup raisins
1 tsp red pepper flakes
1 tsp ground cinnamon
1/4 tsp salt
2 cups canned unsalted diced tomatoes
1/4 cup balsamic vinegar
1 15oz can low sodium chickpeas, drained and rinsed
2 TBSP capers
3 oz goat cheese
How to:
Heat 1/2 TBSP avocado oil in a saute pan. Add onion and eggplant and saute for 5-7 minutes, or until eggplant softens.
Add raisins, salt, pepper flakes and cinnamon. Mix to combine. Then add canned tomatoes, 1/2 cup water, chickpeas and capers. Increase heat to a boil. Then reduce to a simmer for 15 minutes, or until eggplant is tender.
Meanwhile, using the other 1/2 TBSP avocado oil, cook the ground turkey. As it is cooking, add salt and pepper and break up into bite sized pieces. Cook until no pink remains.
Once ragout is cooked, add the ground turkey!
Serve with goat cheese and a starch and vegetable! We served with polenta and green beans, but you can serve with any starch and vegetable!!!
Miso Lime Shrimp Bowl
We have started taking meal prepping more seriously and are loving it!!! I know I will always go in seasons with this, but we have started a meal each week for our lunches, we prep our breakfasts and then make 2-3 dinners each week that we eat fresh one night and have the leftovers the other nights. It has like changed our world!!! We have so much more time in our evenings and so much less stress around making dinner. This recipe was so easy and quick to make that I had to share!!!
You may notice that I have a lot of shrimp recipes posted. This is because we often use shrimp as a quick protein. We buy the already cooked (but frozen) shrimp, and then literally just heat it up and throw it in whatever sauce we have made. SO SIMPLE!
If you have never tried soba noodles, don’t be afraid of them! They are buckwheat noodles (meaning they are a good source of whole grains!). You can often find them in the Asain Food Aisle of the store. My one tip is to make sure it is made out of buckwheat… I bought some one time that had yams added, which made them kinda sweet and not as good.
Check this healthy, easy weeknight meal out!!

Miso Lime Shrimp Bowl
Ingredients:
1 lb already cooked frozen shrimp
10 oz green beans
10 oz mushroms
soba noodles
3 TBSP white miso paste
3 TBSP lime juice
3 cloves garlic
1 TBSP fresh grated ginger
How to:
Chop vegetables and saute in a little bit of avocado oil.
Bring a pot of water to a boil. Cook soba noodles for 8-10 minutes, or until they are the texture you desire.
Meanwhile, make the sauce by combining the miso, lime juice, garlic and ginger in a bowl.
When vegetables are done, add shrimp and sauce and mix together. Cook until shrimp are heated through.
Serve with soba noodles!!
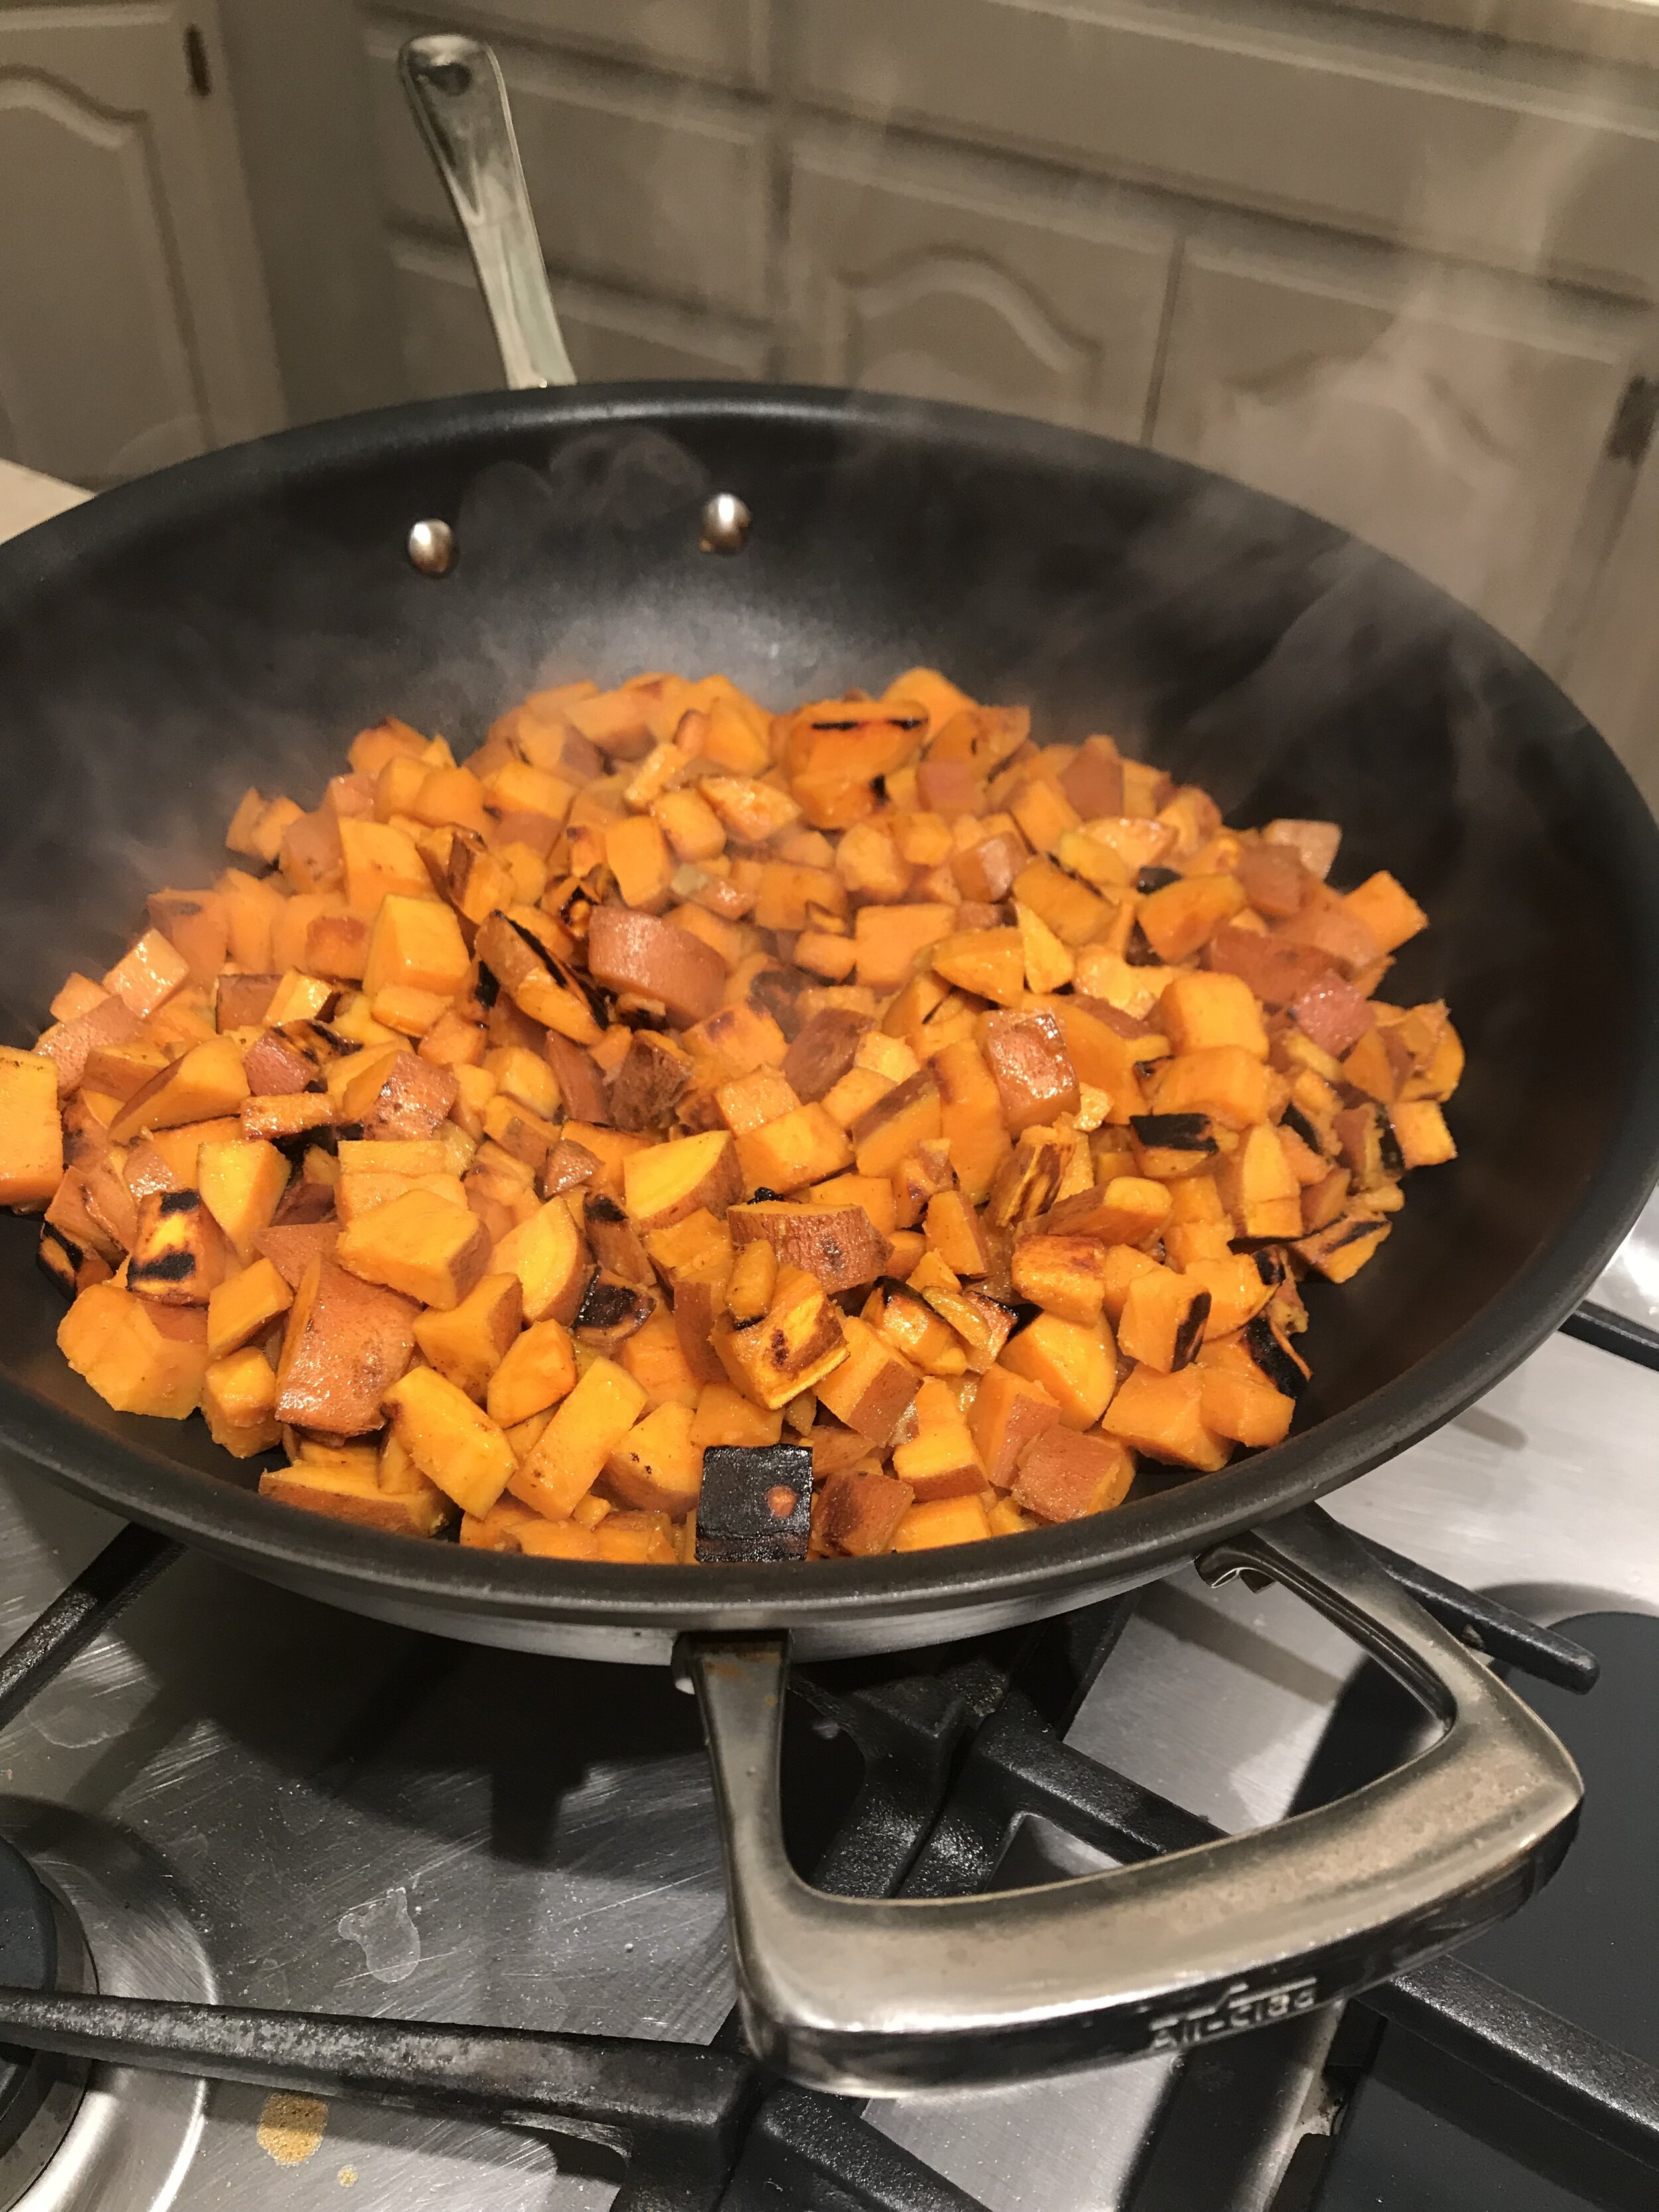
Turmeric Sweet Potatoes
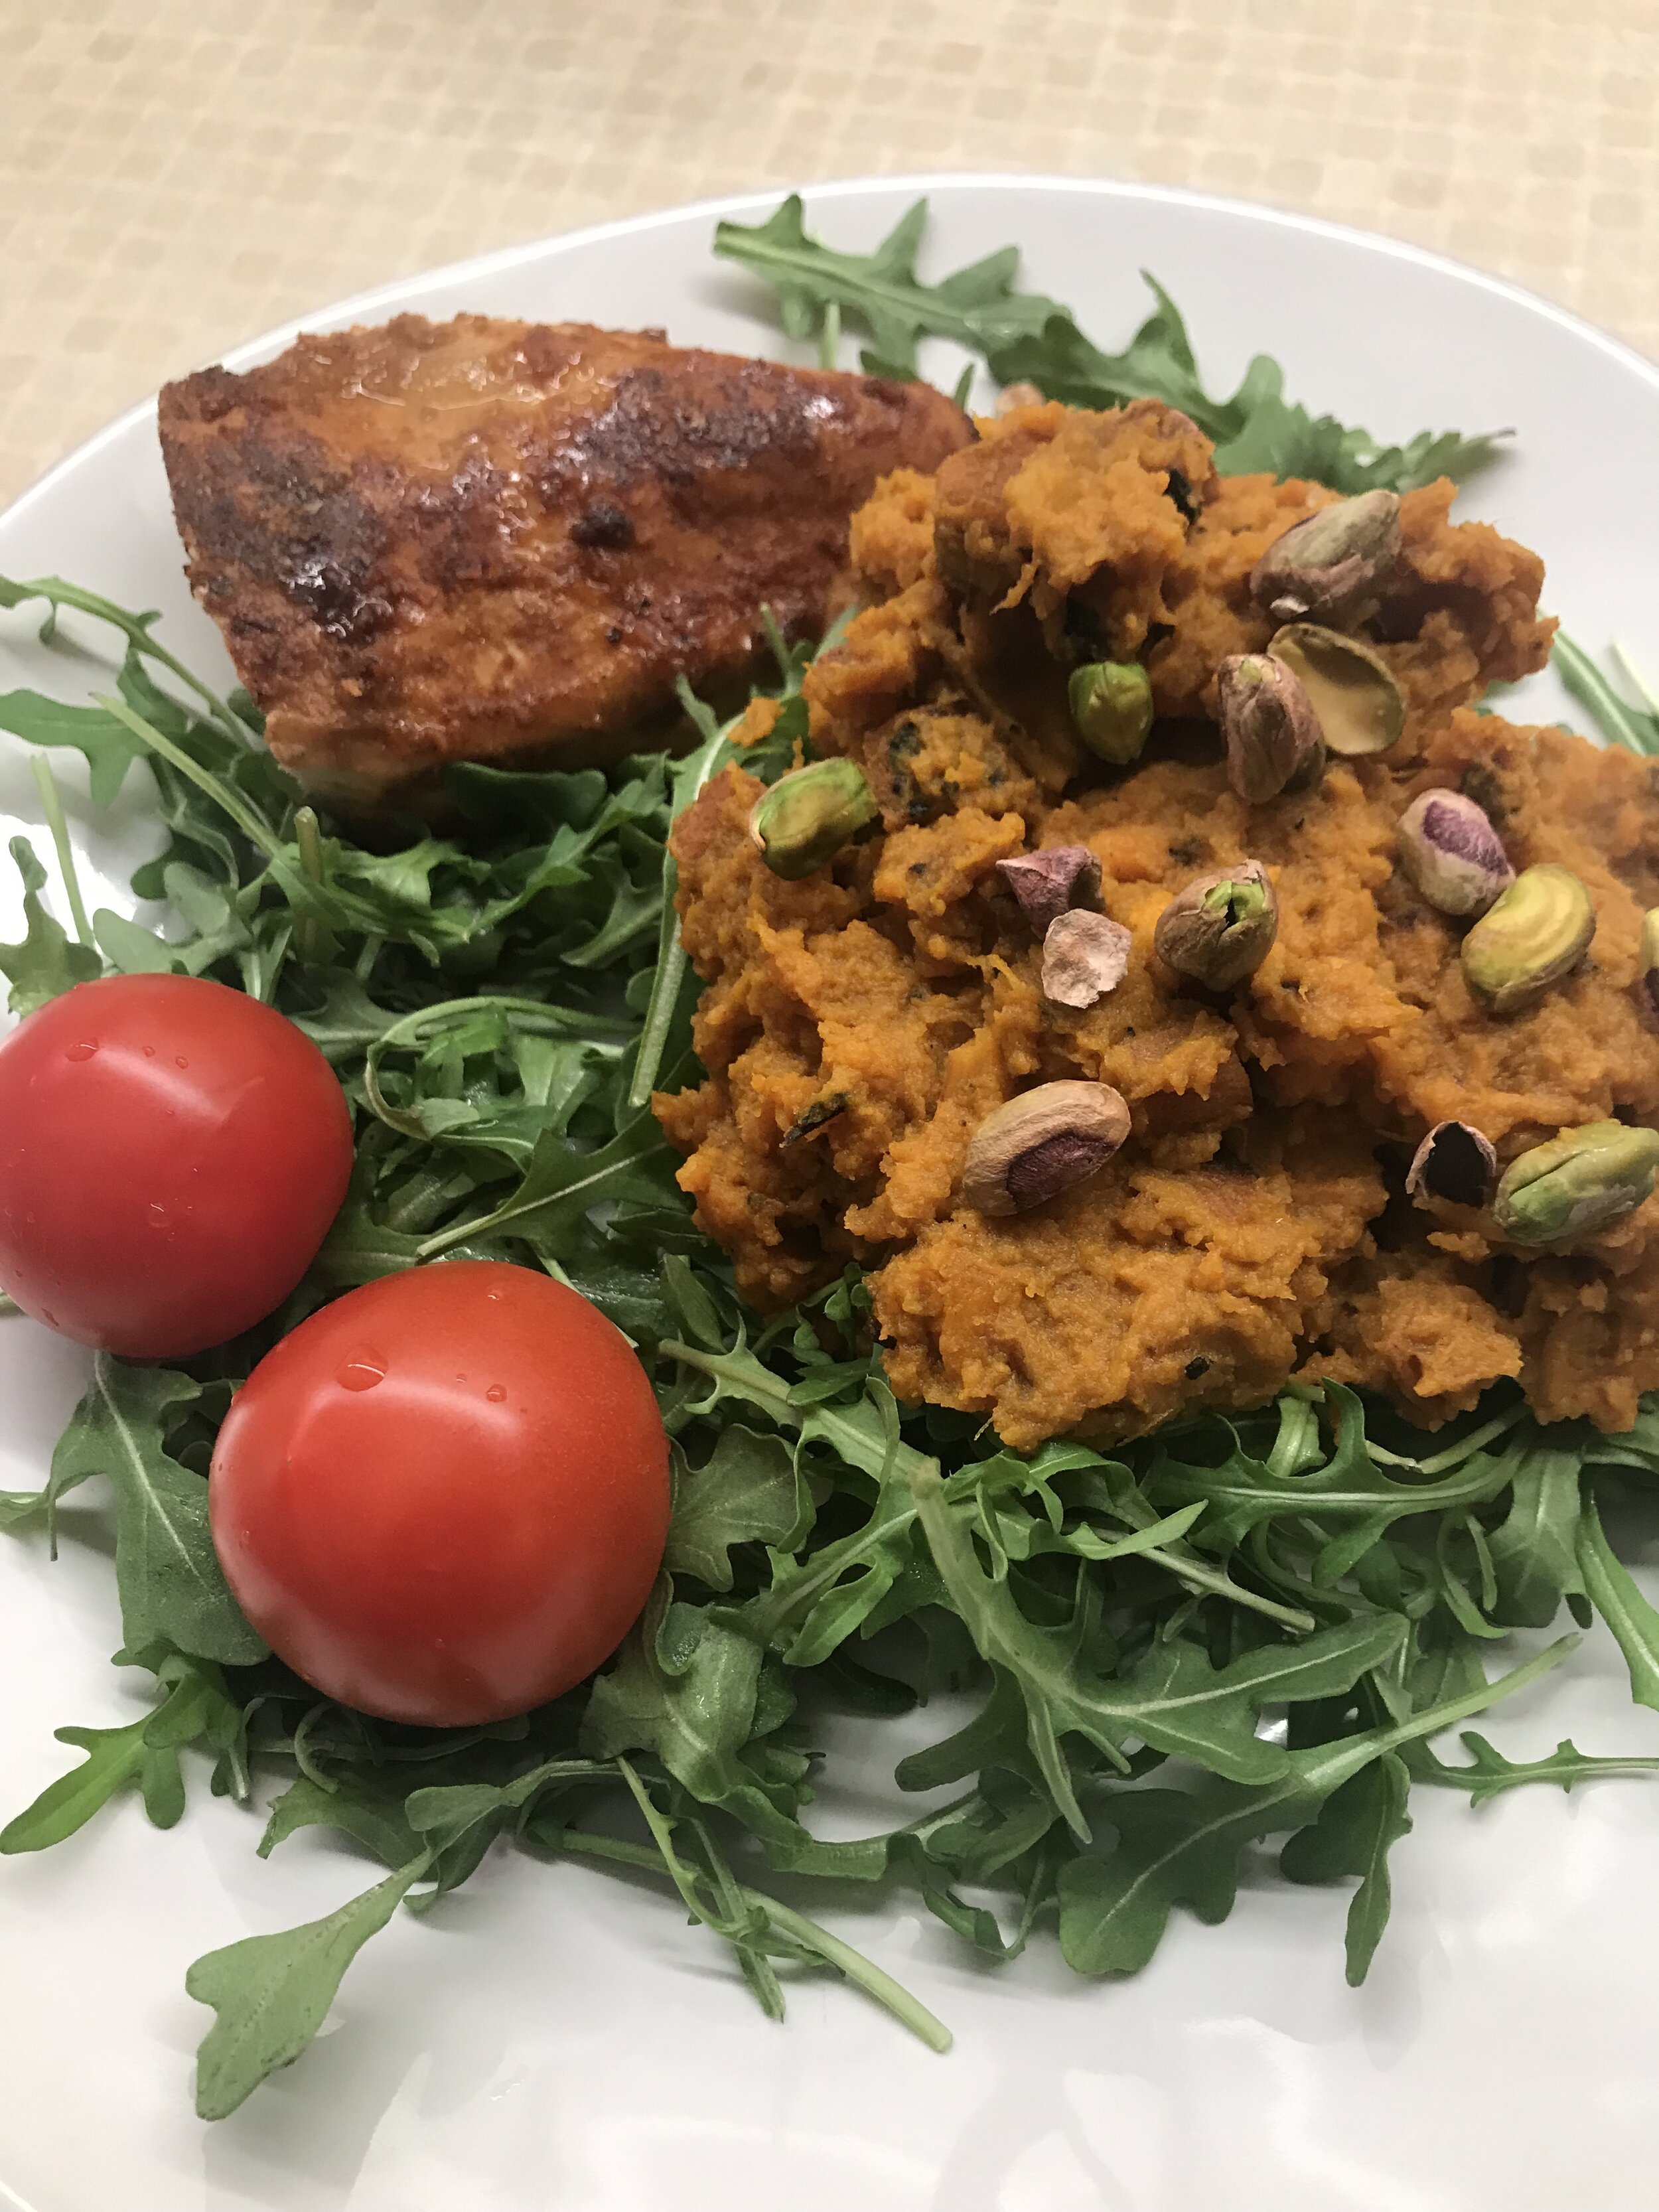
This is one of our favorite ways to make sweet potatoes!!! They not only taste great with all different proteins, they also taste really great leftover. We often serve them with lentils and eggs or with chicken and they taste GREAT with arugula and pistachios on top!! Check ‘em out!!
Turmeric Sweet Potatoes
Ingredients:
3 large sweet potatoes, cubed
1 TBSP turmeric
1 tsp avocado oil
3 cloves garlic, minced
1.5 cup low sodium chicken broth
How to:
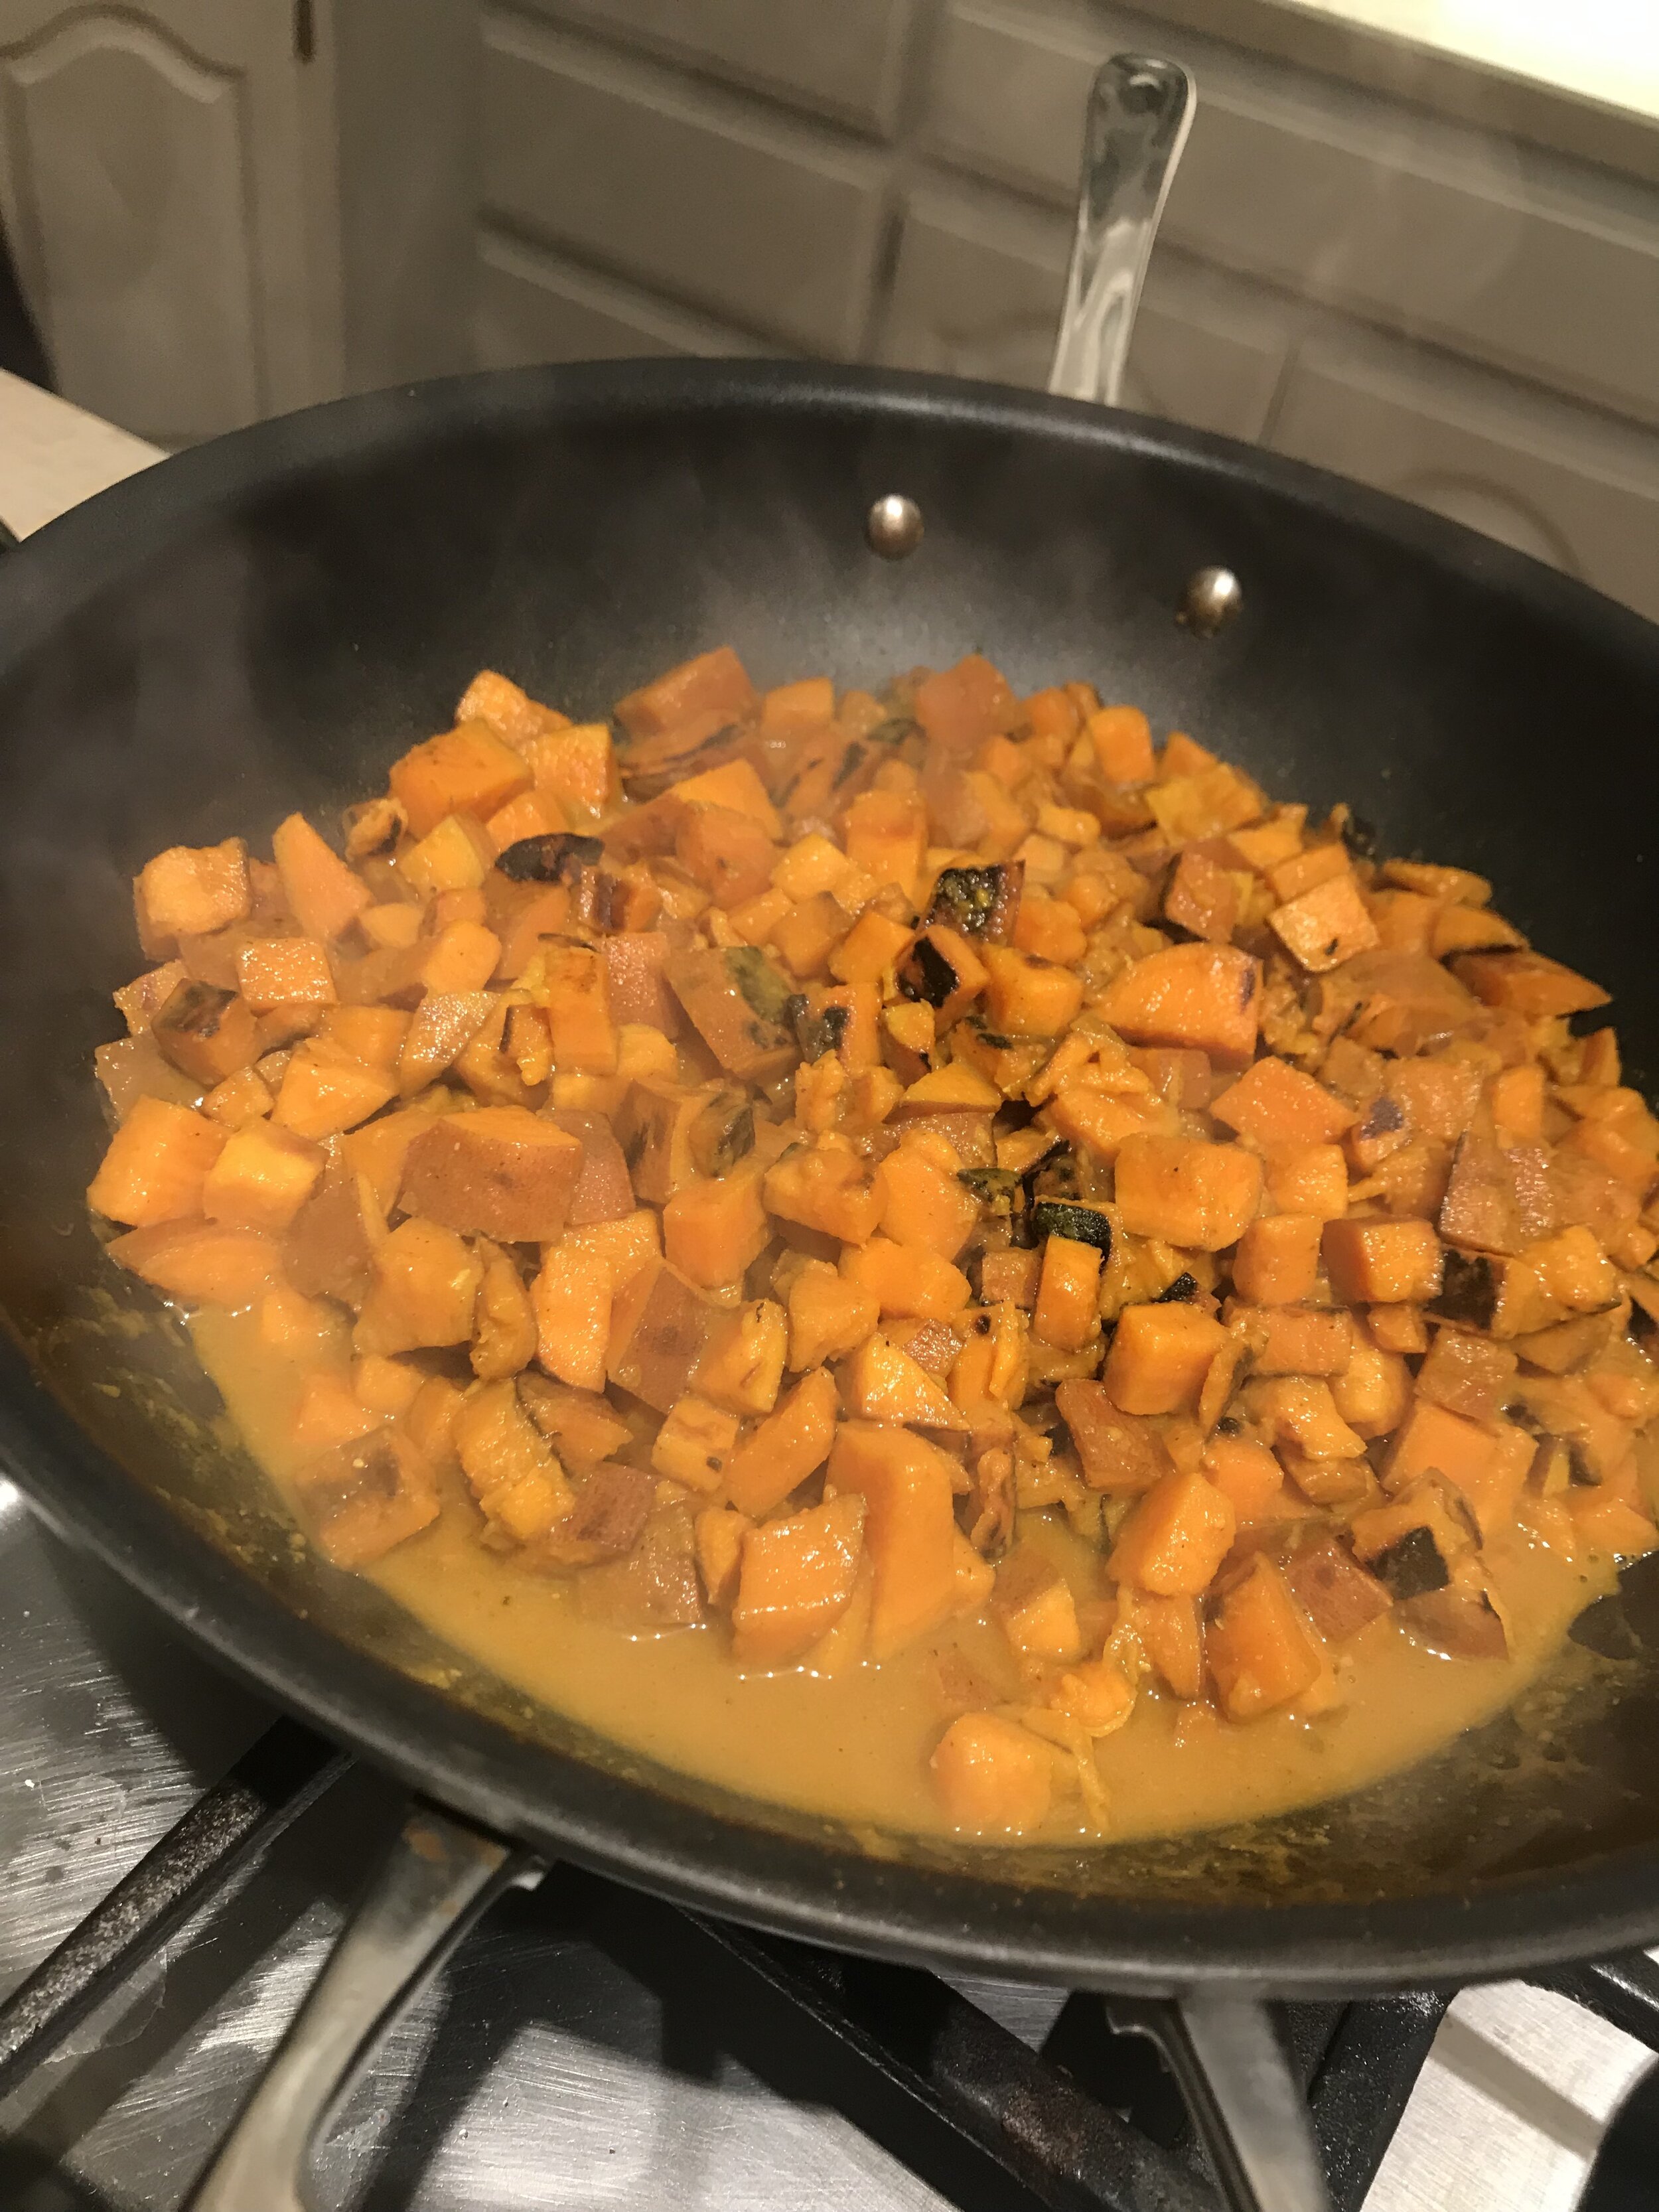
Saute sweet potatoes in a large pan with avocado oil. Let them cook until they brown and get soft.
Add turmeric, garlic and chicken broth.
Let mixture simmer for about 5 minutes, or until the sweet potatoes are really soft!
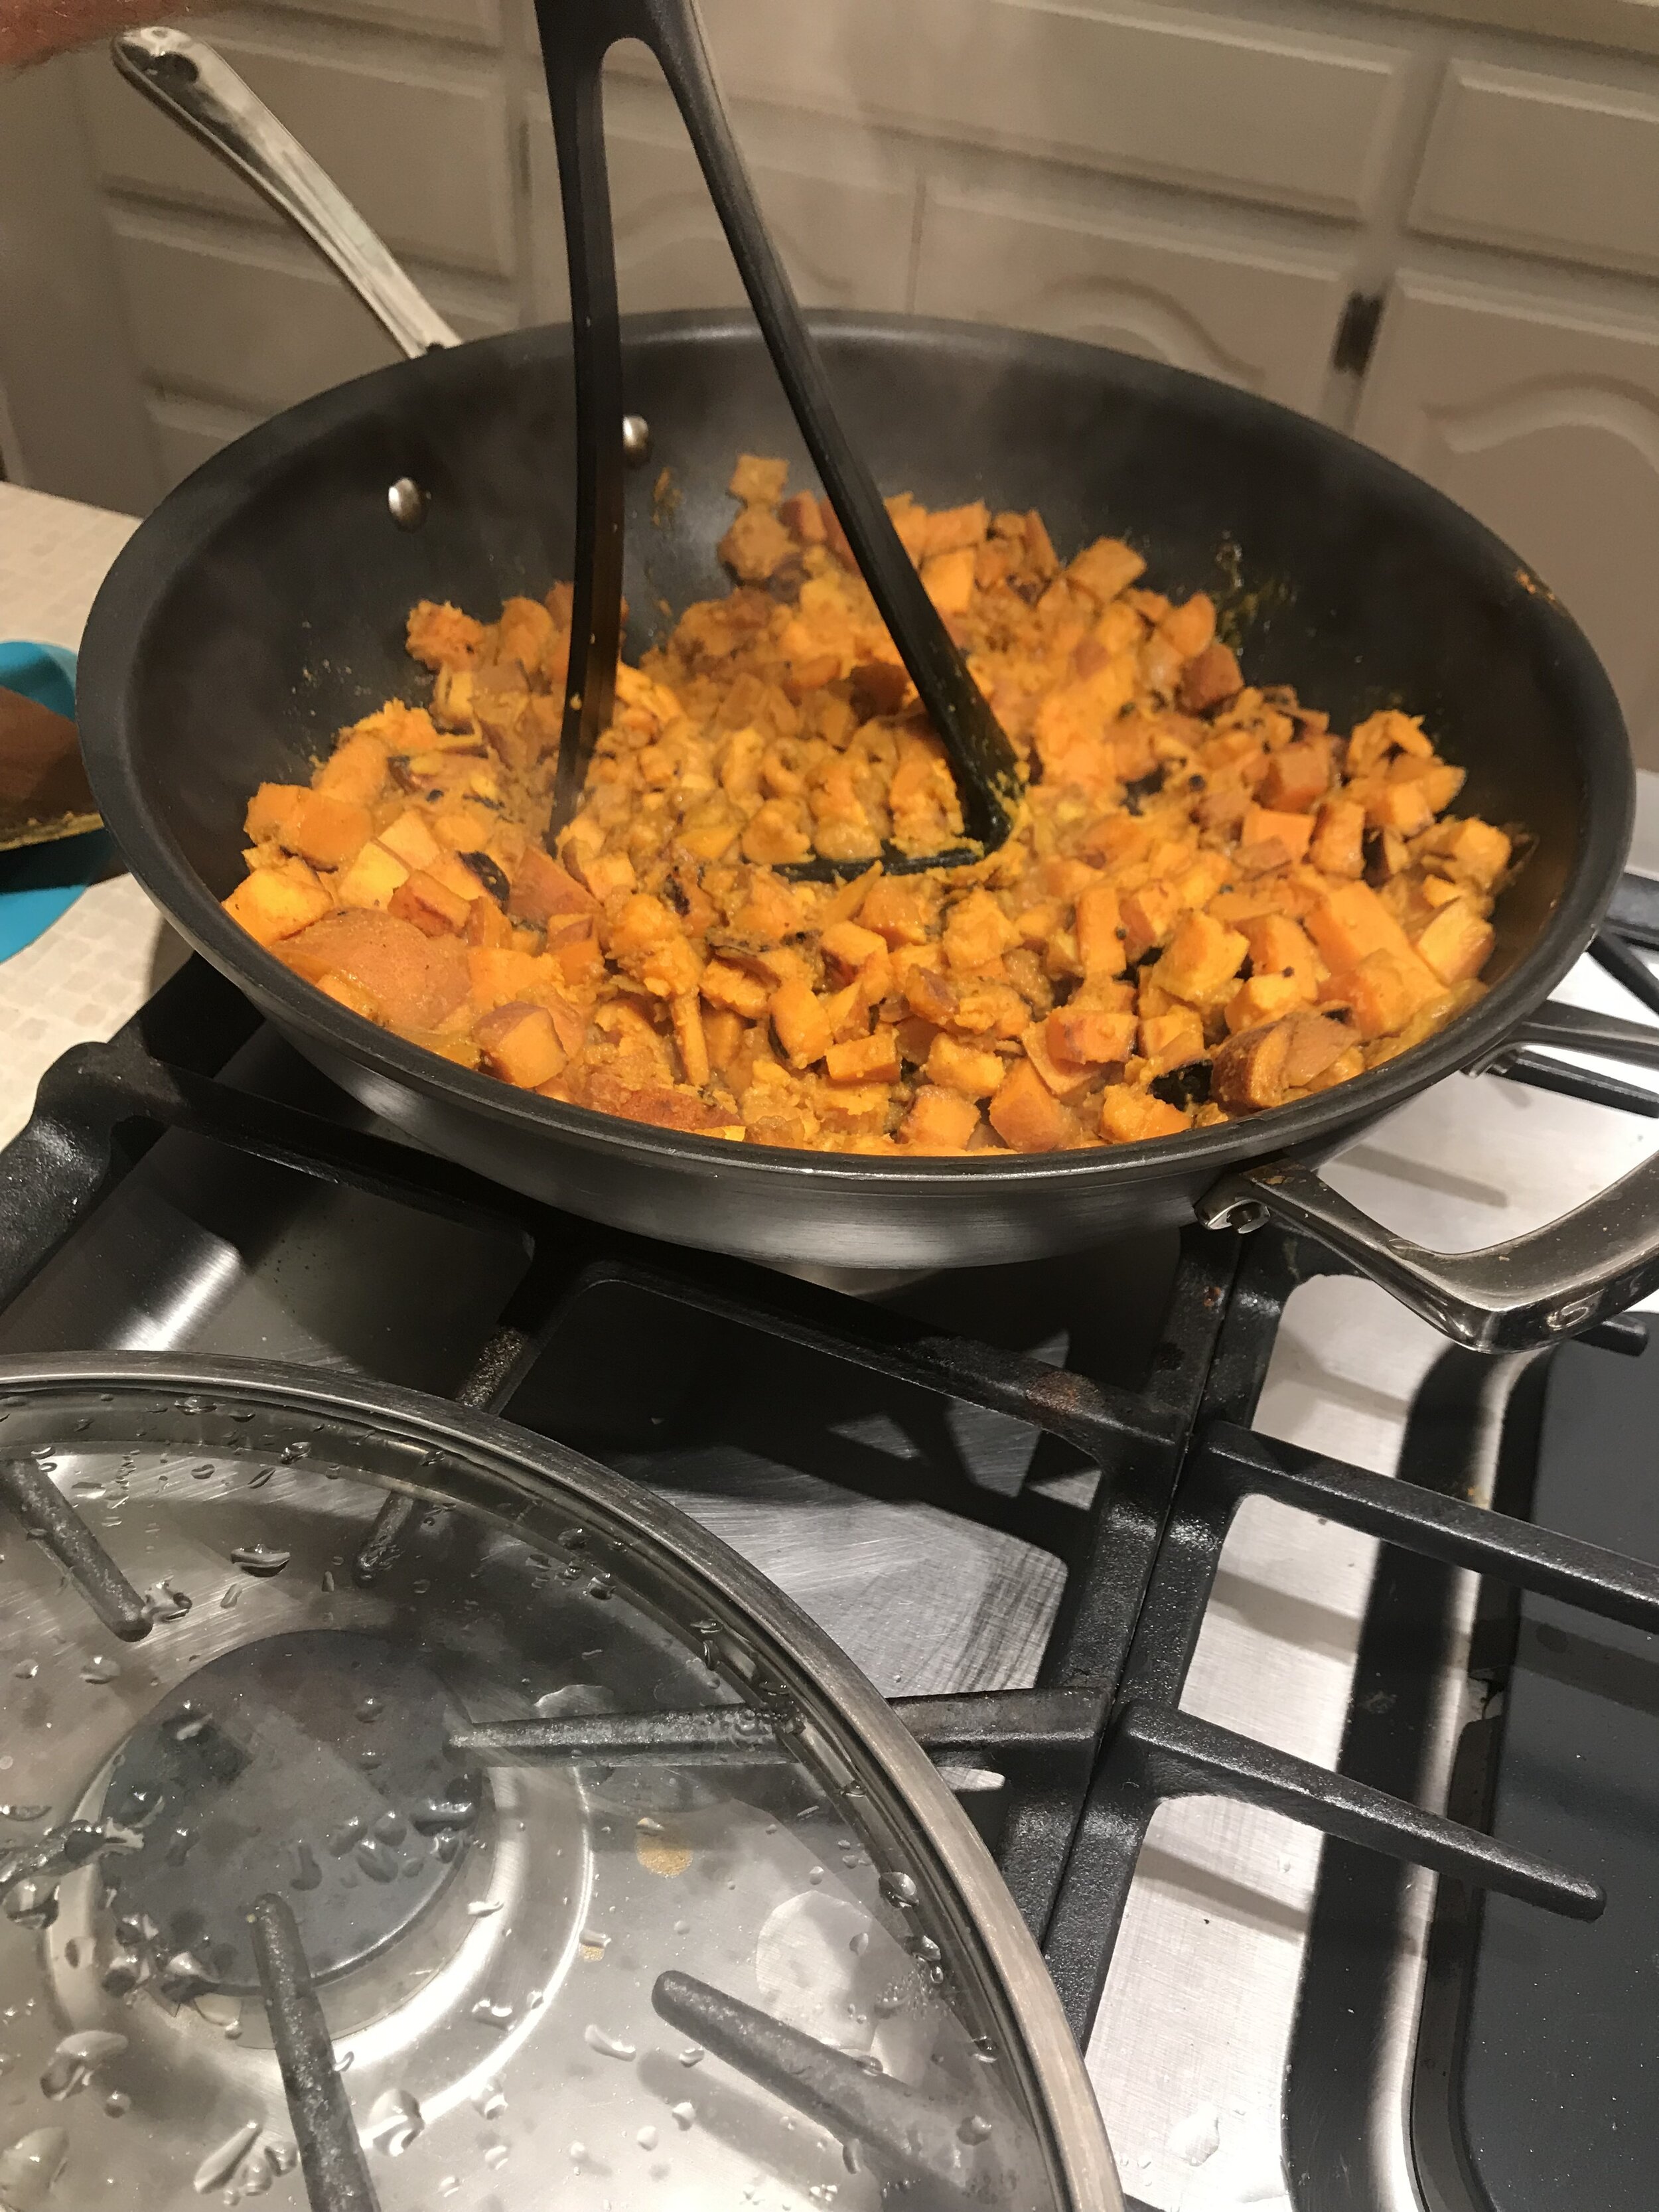
Then, using a potato masher or fork, mash until desired consistency is reached.
Serve with a protein, vegetable, arugula and pistachios!!
Quick Mediterranean Quinoa Turkey Bowl
Kevin was out of town last week for 8 DAYS!!! That is a long time in my world. Anyway, because he usually eats more than me and is willing to eat leftovers for days, I knew I had to be strategic about my meals. I didn’t want to be eating one meal all week AND I wanted my meals to be easy to make and easy to clean up. This turned out to be a great option and will continue to be a quick weeknight meal!

Quick Mediterranean Quinoa Turkey Bowl
Ingredients:
16 oz lean ground turkey
2 tsp avocado oil
1 cup uncooked quinoa
3 medium zucchinis, chopped
1 (15oz) canned diced tomatoes (look for low sodium)
1/2 yellow onion, diced
5 cups spinach
10 oz mushrooms, diced
1 TBSP oregano
1 tsp dried basil
1 tsp rosemary
1/2 tsp salt and pepper
1/3 cup white wine vinegar
1/3 cup water
Shredded parmesan cheese
How to:
Place quinoa in a pot with 2 cups water. Bring to a boil. Cover and reduce heat and cook until water is absorbed.
Meanwhile, heat 1 tsp avocado oil in a skillet. Add ground turkey. Season with salt and pepper and allow to brown. As it cooks, break it up into bite sized pieces. Once cooked through (no pink left), set aside in a bowl.
Add another 1 tsp avocado oil to the saute pan. Add mushrooms, onion and zucchini. Cook until they begin to soften. Add spinach and canned tomatoes.
As spinach is wilting, add seasonings to vegetables.
Mix vinegar with water.
Mix quinoa with ground turkey and vegetables. Add vinegar mixture. (add more vinegar if necessary)
Serve topped with parmesan cheese.
Traveling Nutrition: airplane and hotel meal and snack ideas
The other day we were looking at flights to New Zealand for the 2020 IM 70.3 World Championships and all of a sudden I started freaking out about what we were going to eat on the plane… haha! We won’t even be getting on that plane for more than 11 months and thats where my head goes (#thelifeofadieitian). I know it is all because the last time we traveled across the world I remember getting off the plane feeling like JUNK!! Like I remember my ankles were non-existent and I just felt swollen! Sitting for that many hours, not sleeping well and eating airplane meals is not a recipe for success for me and I am determined to find ways to prevent this feeling as much as possible so I don’t have to race feeling like a balloon!
A few days after I had my freak out moment, I was asked by two completely separate individuals if they had tips for traveling nutrition. And it got me thinking that I should share some information about this because I am sure it is a question that a lot of people face!
And yes, I will figure out how to eat on the plane before our race and yes I will share what I learn with all of you. For now, here are some good tips and ideas for plane/airport nutrition and hotel meals.
Airplane/Airport Nutrition
Things to be aware of:
Gels and liquids: gels and liquids have to be less than 3.4 oz. That means not only all fluids, but also yogurt, nut butters, hummus, guacamole, applesauce pouches and anything else that could even remotely be close to a “gel” like consistency. We had to throw away an entire jar of that delicious freshly ground honey roasted peanut butter once… consider this my warning to you!
Security: I almost always travel with food and get my bag pulled at security probably 25% of the time. It is a possibility, so expect that it might happen. They usually just open my bag, pull out the food, look at it to make sure it is food (they are very respectful about not touching it) and let me go. Literally, I got pulled for having a large carrot in my bag once (I guess it looked dangerous!!)
Smells: For the respect of those around you on the plane, don’t bring something super smelly. Some people are even cautious about nuts and nut butters because of allergies.
Packaging: I will only bring things on the plane that don’t require a container from home. I am not going to carry around a container for my whole trip. Choose packages that you can throw away or bring a container that you don’t mind parting with, just to make your life easier!
Water bottles: make sure you empty your water bottles before security and then just fill them up on the other side! Most coffee shops will do it for you if you are looking for fresh water!
Food During Layovers:

I found an awesome salad bar in the Minneapolis Airport. If you’re at that airport, FIND IT!!!
Look for fresh: Look for proteins and fresh fruits and vegetables. I usually have the best luck at coffee shops. Don’t just settle for the packaged sandwiches and yogurt parfaits. If you have the time, do some searching and try to get creative.
Timing: Know when you are going to get hungry and be prepared. If you aren’t hungry during your layover, but know you will be on your next flight, grab something that you can bring on the plane. If you will be flying over a meal time, make sure that something is a meal and not just snacks.
Meal and Snack Ideas
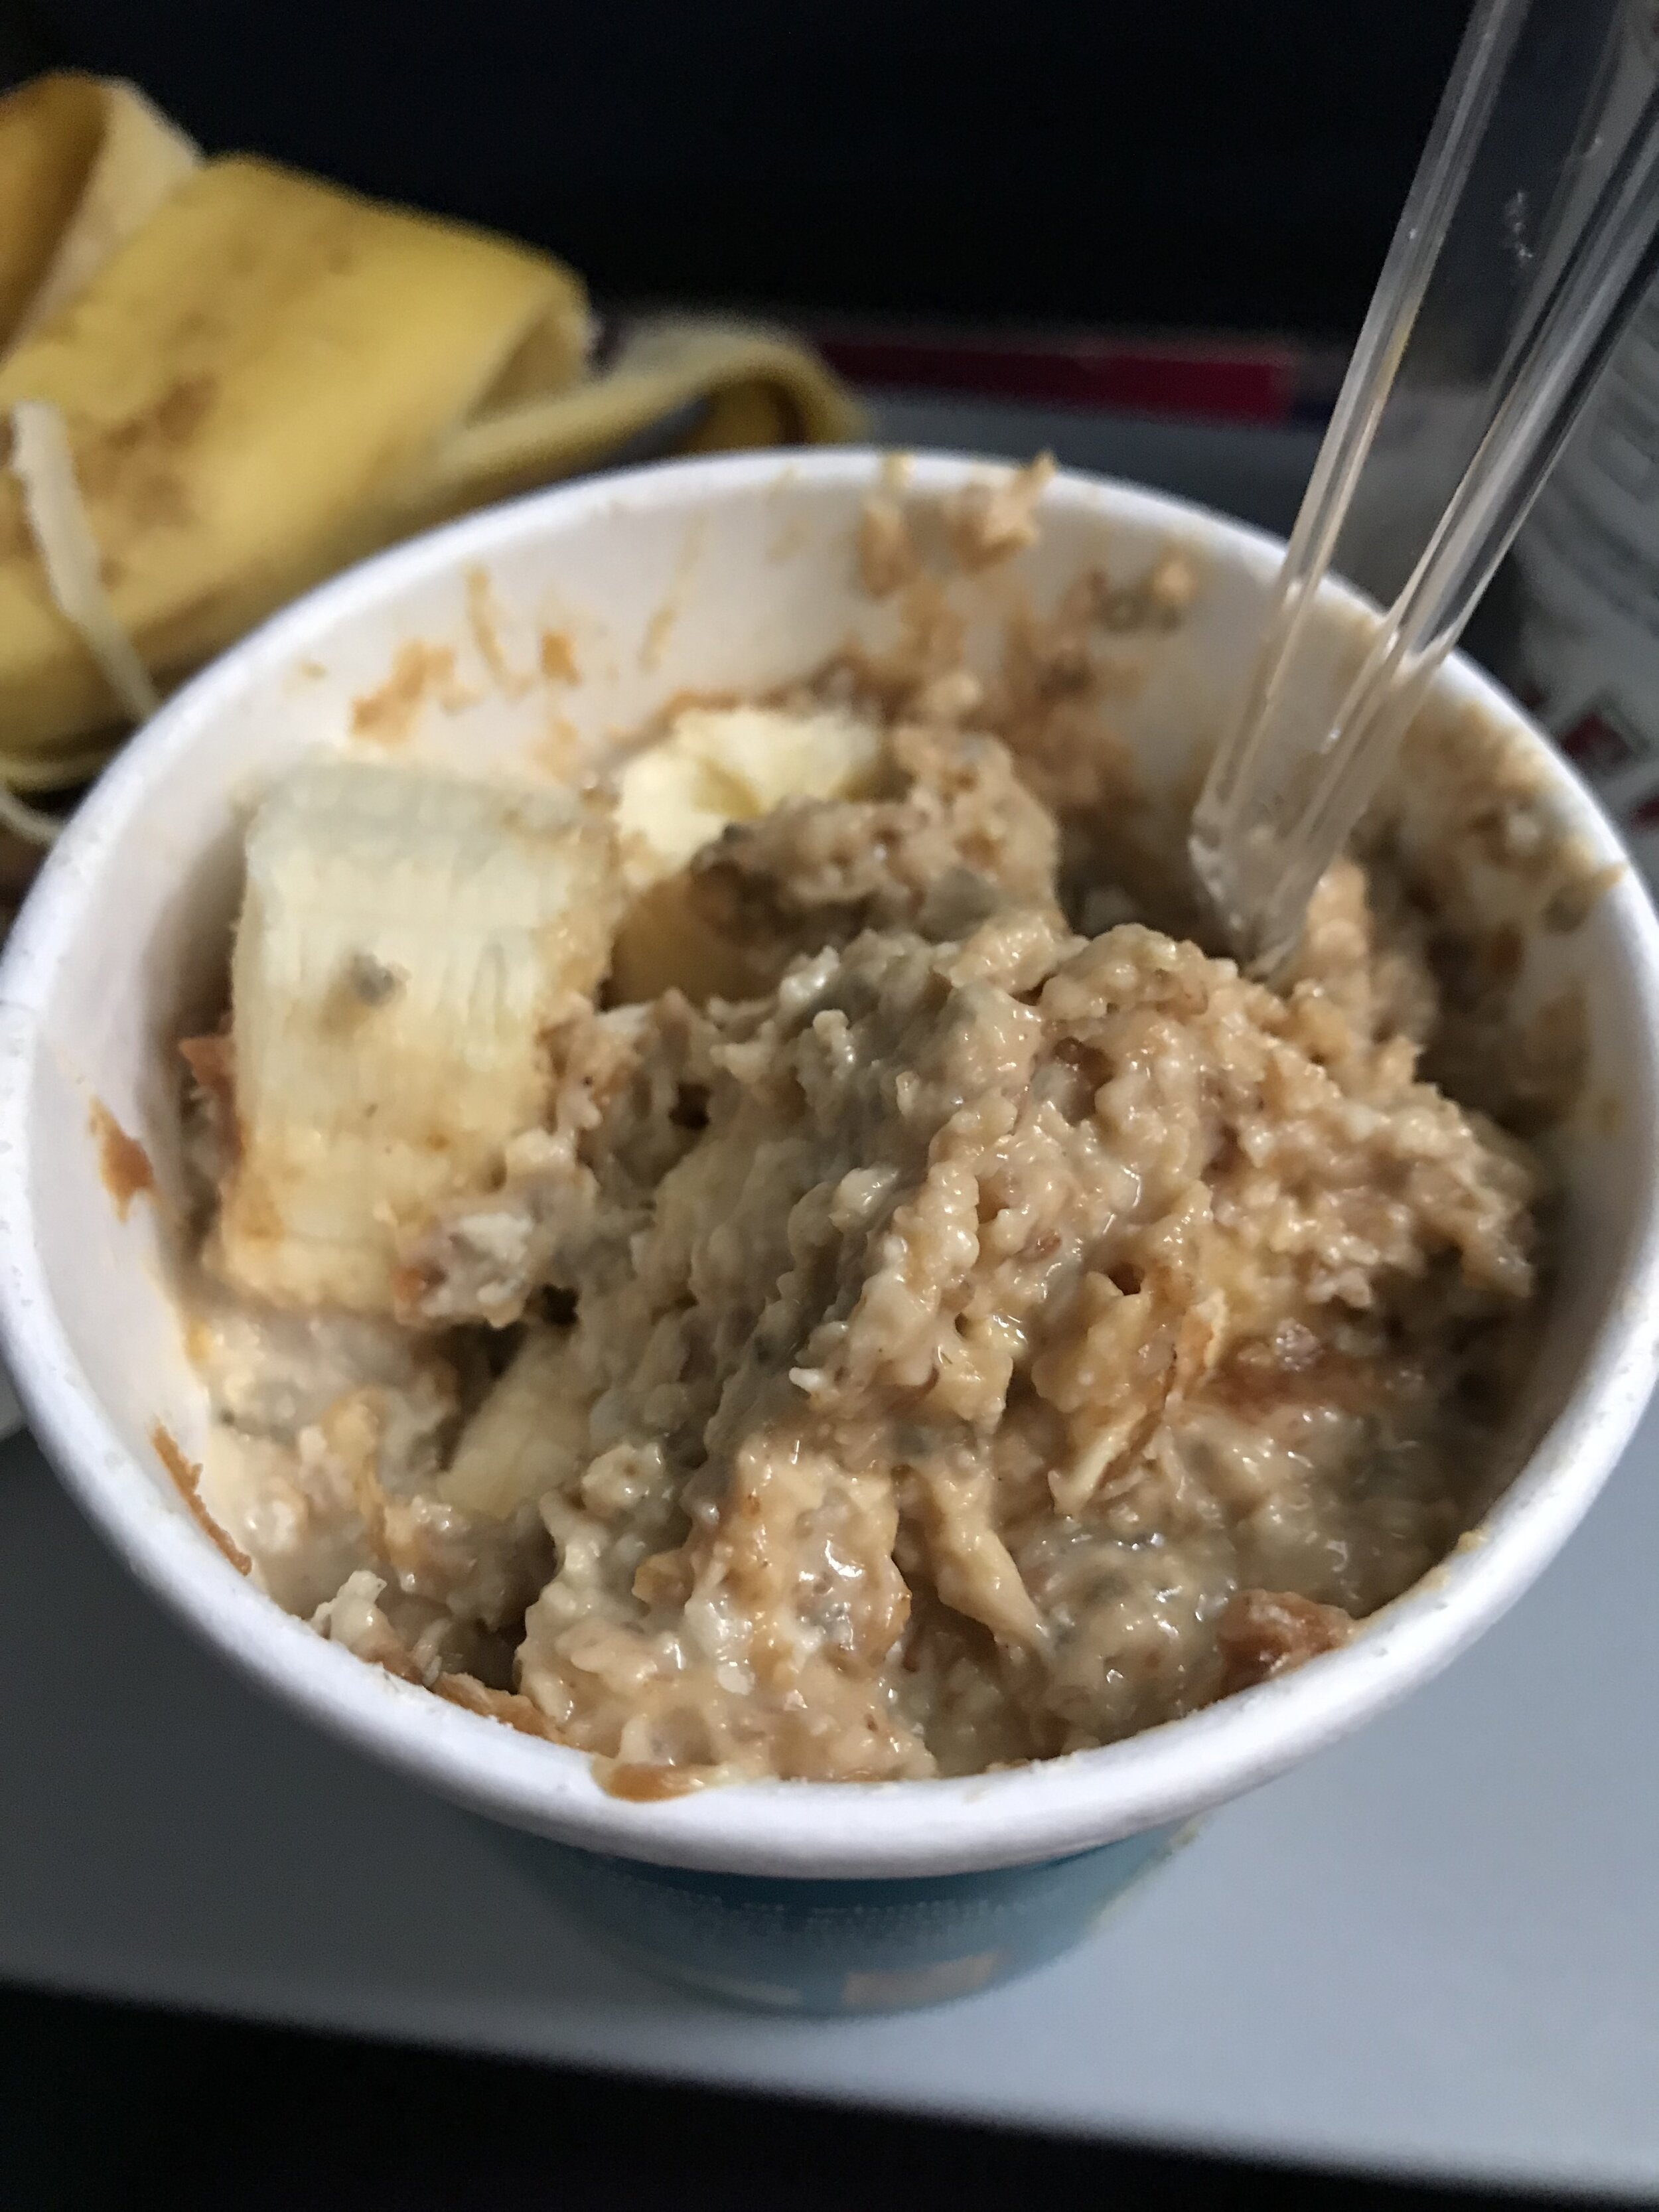
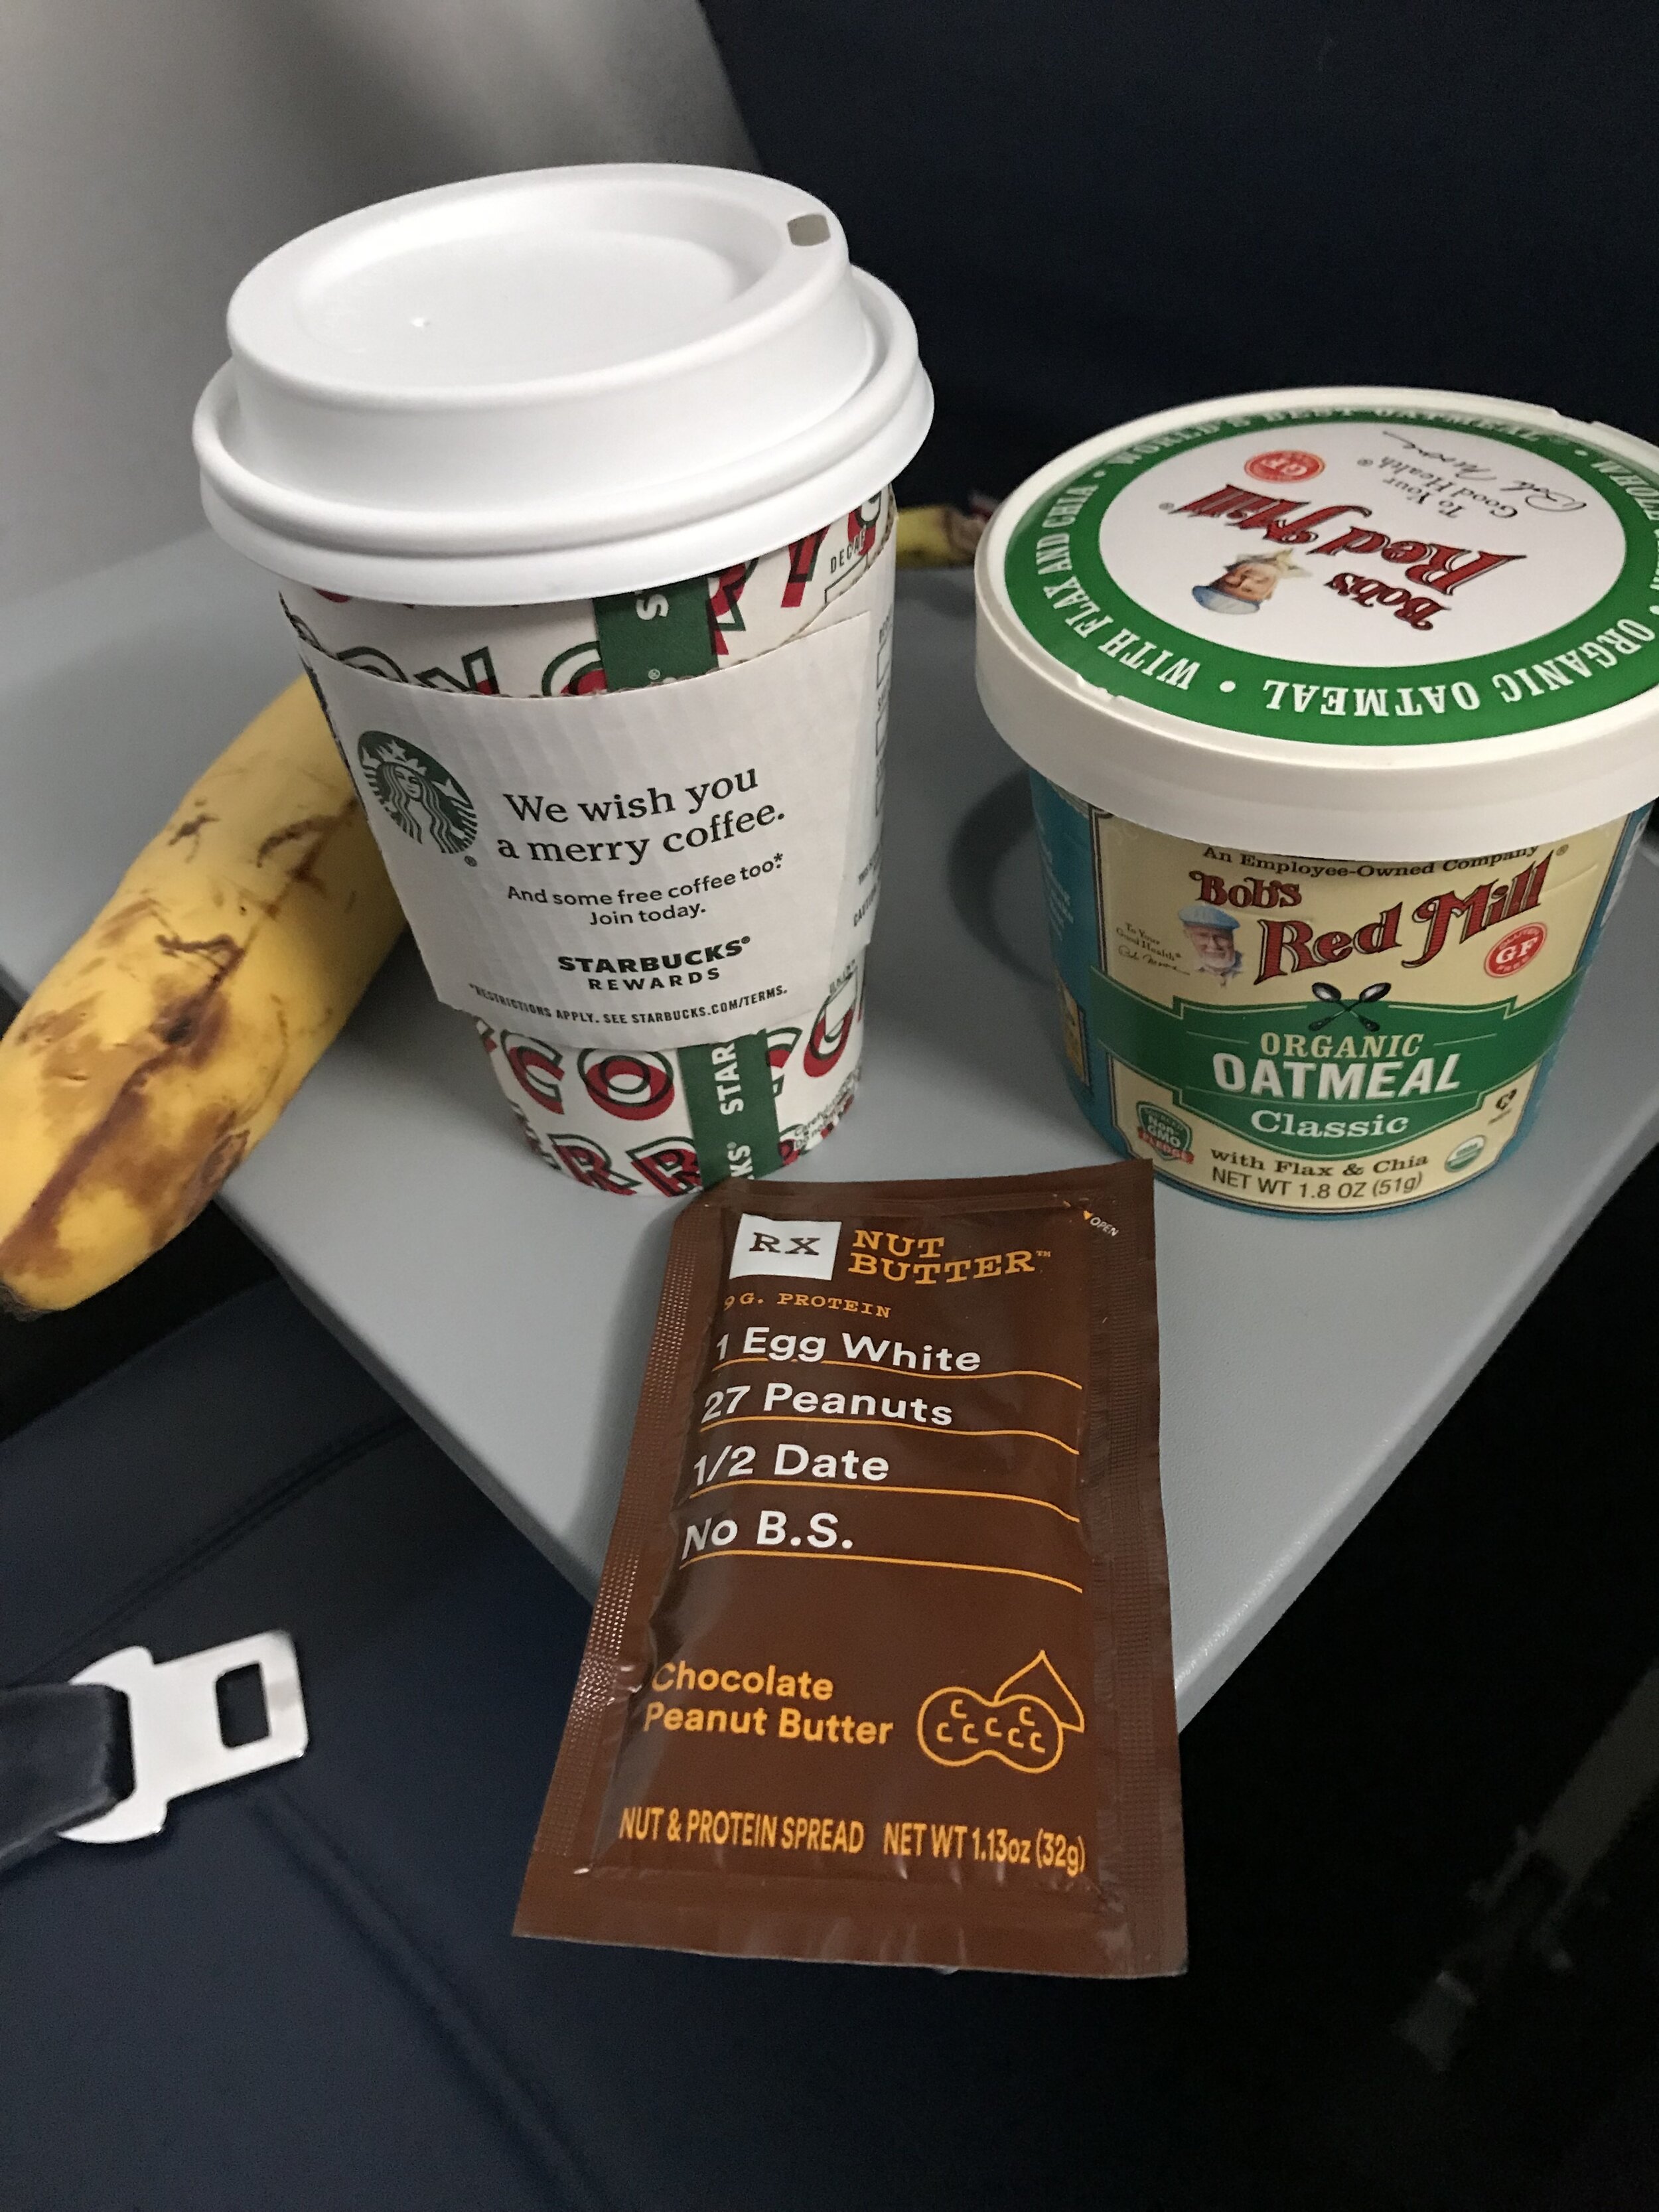
Oatmeal: you can now find oatmeal packaged in cups Quaker, Picky, and Kodiak Cake are just a few brands that do this. Bring a banana and a pack of nut butter (less than 3.4oz). Get some hot water (for free) on the plane or at a coffee shop in the airport. Mix all together and let it absorb. Then enjoy!
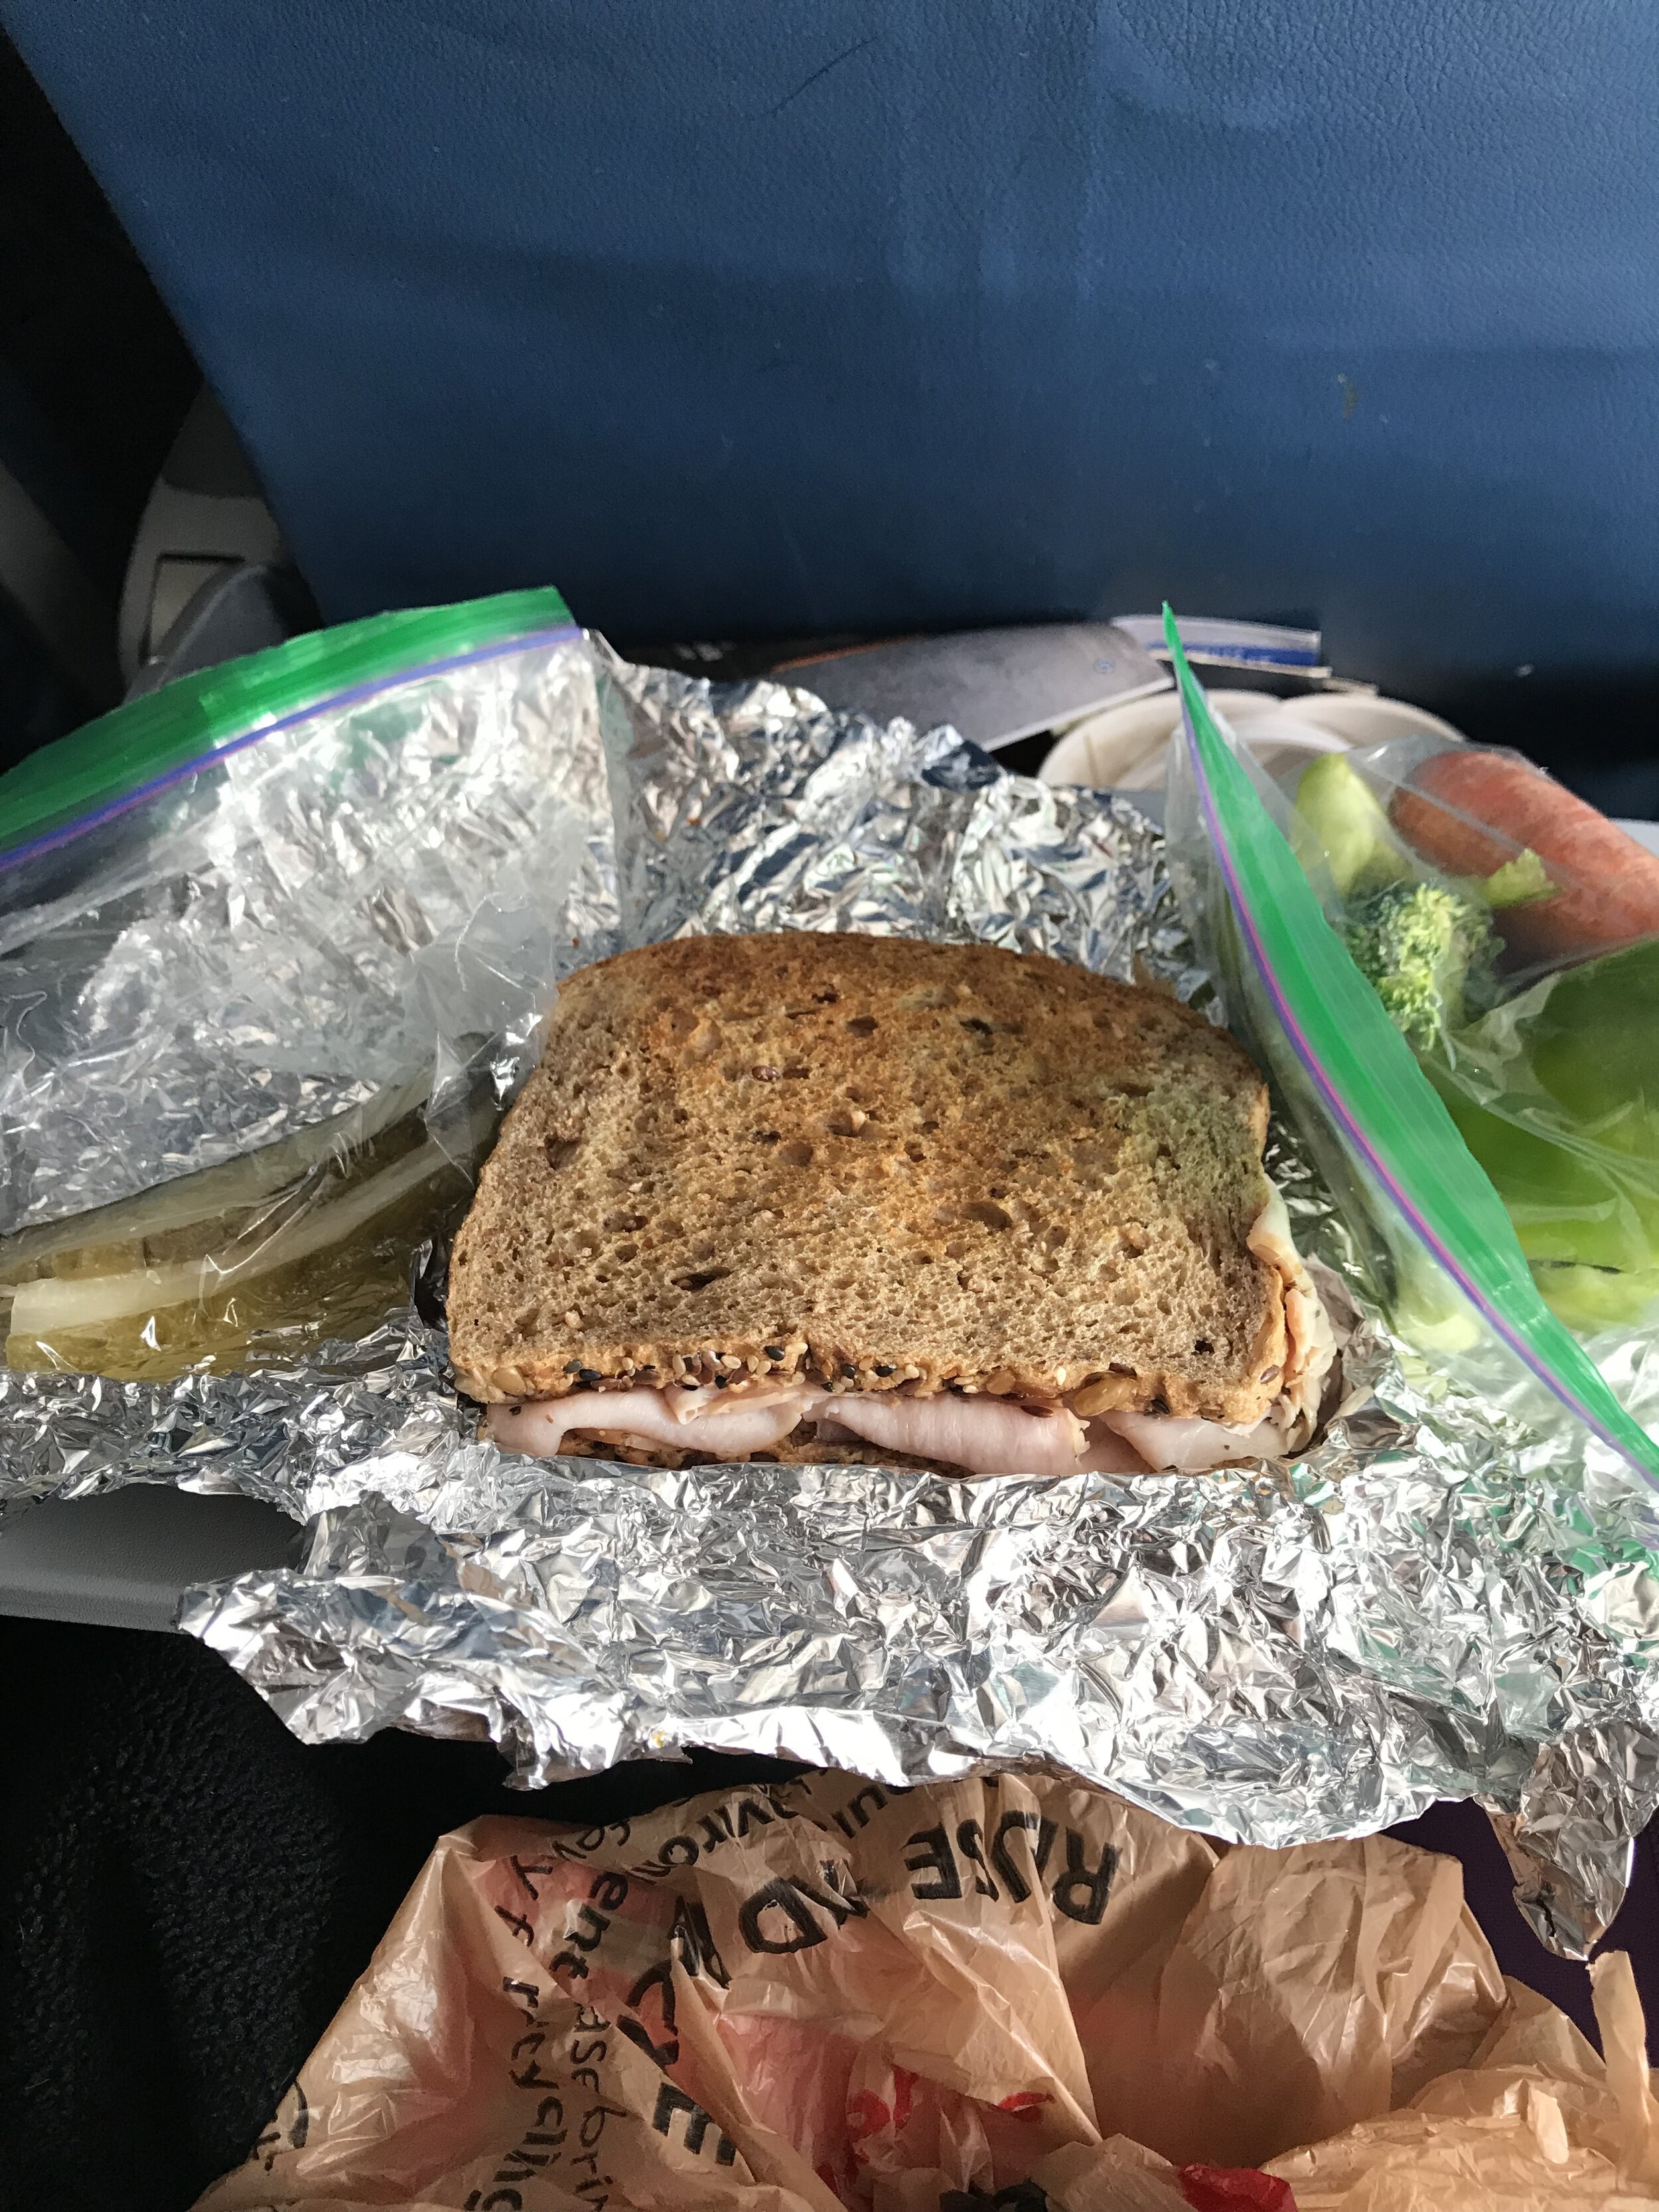
Sandwich: For early morning flights, we usually bring PB + Banana sandwiches. We have also brought turkey sandwiches and PB&Js. (be cautious of bringing tuna because of the smell).
Fruits and vegetables: we always bring all the fruits and vegetables in our fridge that we didn’t get a chance to eat before we left. This way you can have them on the plane and at your destination (if customs is not an issue!)
Bento Box: bring any mix of cheese, crackers, deli meat, vegetables, hard boiled eggs, nuts, fruit for a meal or snack!
Bars: My favorite bars to recommend (and eat) are RX Bars. They also have nut butters with added protein which are under 3.4oz and delicious with fruit or on their own.
Jerky: jerky can be an easy and fun way to get protein. Chomp Sticks and Epic Bars are a couple brands that I suggest!
Kodiak cakes: bring these with fruit and nut butter to make a meal!
Trail mix/nuts: just make sure they are portioned out so you don’t eat the whole thing!!
Tuna packs: This is for layovers (so you don’t stink up the whole plane!) Bring some vegetables and crackers and you have a nicely balanced meal!
Nutrition for your stay:
Tips for eating while at your destination:
Protein and vegetables: My #1 tip!! Look for vegetables and protein, the carbs will be there too! They are the hardest to find, but well worth the search. You can always ask what vegetable side options area available!
Go off of hunger: With time changes and different than normal foods, listen to your body and how hungry it is. Meals out are often naturally bigger and more dense than foods you would have at home. Don’t just eat to eat, but also make sure you have enough to make it to the next meal.
Have snacks available: because meal times and hunger can be off, bring snacks with you just in case you get hungry when a meal isn’t around!
Don’t splurge on every meal: It is tempting to splurge just because you are eating out. Choose a couple of meals that are worth the splurge and then try and choose healthy options for the other meals. You’ll feel better, I promise!
Stop by a store to grab some healthy options: most hotels have a refrigerator. Grab some fruits and vegetables and other fresh snacks and utilize the refrigerator.
Save leftovers: if you are out to eat and don’t finish your meal, stick the rest in the refrigerator in the hotel room. You can eat it for another meal!
Utilize the complementary breakfast: I am the queen at grabbing things at the complimentary breakfast to snack on later!!! There are often options that you can throw in your room refrigerator or even just take to go.
Meal Ideas:
Remember, when you build a meal, look for a protein, starch and vegetable or fruit. This will help keep it balanced. Here are some ideas:
Vegetables
carrots, peppers, celery, cucumber and snap peas all do well with the stresses of traveling
Salad mixes
Salad from salad bars
Frozen vegetables
Starches
whole wheat bread/tortillas
Whole wheat or rice crackers
Rice cakes
Microwaveable brown rice or quinoa
Oatmeal cups
Proteins
Tuna or chicken packets
Hard boiled Eggs
Deli meat
Smoked Salmon
Greek yogurt
Peanut butter
Others
Guacamole packs
String cheese/cheese wheels
Fruit
Meal ideas:
Salad mix + microwaveable brown rice + tuna or eggs
Whole wheat tortillas + turkey and cheese + carrots
Greek yogurt + oatmeal + fruit
Peanut butter and banana sandwiches
Guacamole and hard boiled egg sandwich
Rice cakes + smoked salmon + bell peppers
I hope these ideas can help on your next travel adventure!
High Protein French Toast
French toast is one of those foods that I LOVE but rarely eat. The reason being, when I know if I have a sweet treat for breakfast, I will likely need a nap and be pretty much useless for the day. When I do have it, I make sure I balance it with some eggs, so the sugar doesn’t hit my system so drastically! There is so much to say about a balanced plate!!
So, Kevin came up with this lovely idea for french toast that doesn’t leave me down and out for the rest of day. He was like, what if we use the ingredients we usually use for breakfast and make it into french toast…? Brilliant!!
This french toast is made of our normal whole wheat bread, sweetened with yogurt, berries, banana and peanut butter AND has no added sugars!! If you are looking for a fun a different breakfast to have that keeps you on track with your goals, try this recipe out!!

Everyday French Toast
Ingredients:

Whole wheat bread (5 pieces)
4 eggs, whisked
1/4 cup milk
a splash of vanilla
1/2-1 tsp cinnamon
Dash of cloves and allspice
1/3 cup Greek yogurt
1/4 cup peanut butter
1 cup frozen berries
1 banana
How to:
Whisk eggs, milk, vanilla, cinnamon, allspice and cloves in a flat dish.
Heat a skillet. Soak 1-2 pieces of bread in the egg mixture. Flip so that the full toast is soggy.
Place in the skillet and cook 3-5 minutes on each side, or until toasted and egg is cooked.
Continue steps 2 and 3 until all the pieces are cooked.
Meanwhile, stick the frozen berries in the microwave to 20-30 seconds. Mash with banana. Then mix in yogurt and peanut butter. Mix in more cinnamon if desired!
Top french toast with berry mixture and ENJOY!!!
Loaded Veggie Hummus Dip
This season is filled with parties and potlucks!! This is an awesome appetizer to bring to a party to ensure you are getting vegetables and protein!! You could also make this and keep it around to snack on throughout the week.
One note to make about this recipe is to drain the yogurt slightly before adding it in. After this has sat for a bit, it can get a little watery, but draining the yogurt should help this problem!
Loaded Veggie Hummus Dip
Ingredients:

1 16 oz container of favorite hummus
1 cup plain Greek yogurt, slightly drained
1/4 cup diced chives, divided
1/2 cup sliced scallions
1/2 cup sliced Kalamata olives
1+ cup diced radishes
1 orange bell pepper, diced
1 yellow bell pepper, diced
1 red bell pepper, diced
1 cucumber, diced
1+ cup tomatoes, diced
salt and pepper to taste
How to:
Combine Greek yogurts with 2 TBSP diced chives and refrigerate
Chop all vegetables and olives, and place in a large bowl. Mix and season with salt and pepper.
Layer hummus around the bottom of a pie dish or 9x9 square dish. Place Greek yogurt and chive mixture on top of the hummus and spread into an even layer.
Place vegetables on top of the yogurt layer. Top with the remaining chives.
Serve with whole wheat or rice crackers.
Butternut Squash Risotto
As a dietitian, I get several cool perks, like being an ambassador for companies like Siggis. This recipe popped up on one of their feeds and I couldn’t pass it up!! We adjusted the recipe slightly but are seriously IN LOVE! We made it for the first time last week, but made enough butternut squash that we made it again this week. I am not joking, this is one of those dishes that can be eaten for any meal!!
Here is the recipe:
Butternut Squash Risotto
Ingredients:
1 small butternut squash
1/2 TBSP olive oil
1 tsp cinnamon
1/4 tsp cloves
salt and pepper to taste
10 oz mushrooms, sliced
1/2 TBSP avocado oil/Ghee
1 small white onion, diced
3 cloves garlic, minced
2 cups brown rice
2 cups chicken broth
2 TBSP Siggis Coconut Yogurt (plus some for topping)
Green onion, sliced for topping
How to:
Preheat oven to 425F. Peel and cube butternut squash. Mix with olive oil, cinnamon, cloves, salt and pepper. Place on a baking sheet and roast for 30-40 minutes, or until tender when poked with a fork.
Meanwhile, heat a Dutch Oven or pot with avocado oil. Add mushrooms and onion and cook until softened and browned. Add garlic. Cook 1 minute. Then add rice and broth. Bring to a boil, then cover and reduce heat and cook until broth is absorbed (can add water if more liquid is necessary).
Once squash is cooked, allow to cool. Then puree using a blender, food processor or emersion blender.
Once pureed, add to the cooked rice and stir well. Add yogurt and thyme. (You may have too much butternut squash depending on the size you bought, in that case set aside and use later).
Serve topped with sliced green onion and a dollop of Siggis Coconut Yogurt.
We served ours with pork chops and broccoli the first time and chicken and salad the next :-)
Hope you love this as much as we did!!
Chili and Cornbread
Halloween always means it is time to make chili and cornbread! Here is the recipe I’ve been diggin this year!
Three Been Crockpot Chili
Ingredients:

2 lbs ground turkey or ground beef
1 (28oz) can crushed tomatoes
1 (15oz) can tomato sauce
1 (15oz) can kidney beans, drained and rinsed
1 (15oz) can pinto beans, drained and rinsed
1 (15oz) can black beans, drained and rinsed
1/2 red onion, chopped
2 TBSP red wine vinegar
2-3 cloves garlic, minced
2 TBSP chili powder
2 tsp cumin
1 TBSP oregano
1 tsp basil
2 tsp parsley
1 tsp black pepper
1/2 tsp salt
1/2 tsp chili flakes
1/2 cup shredded cheese
1 tsp ghee/avocado oil
1 1/2 -2 cups water
How to:
Cook ground turkey in a saucepan in 1 tsp ghee/avocado oil on the stove until slightly browned.
Place all ingredients up to cheese in the crockpot. If you need additional liquid, add 1 1/2- 2 cups water. Cook on low for 4-6 hours.
Top chili with shredded cheese and serve cornbread and a vegetable on the side
Cornbread Muffins
Ingredients
1 cup whole wheat flour
1/2 tsp salt
1 TBSP baking powder
1 cup cornmeal
1 egg
1 cup milk
1/4 cup butter
How to:
Preheat oven to 425 F. Sift flour, salt, and baking powder into a bowl of mixer.
Add cornmeal and mix.
Add egg, milk, butter and mix until combined (no more that 1 minutes)
Grease 9 muffin tin slots and fill each evenly with batter.
Bake for 15 minutes, or until browned and toothpick comes out clean when inserted in the middle.
Can also make cornbread squares by using a 8x8 pan and baking for 20-25 minutes.
Serve with honey butter
*Cornbread recipe from Bob's Red Mill cornmeal package.