More Energy Bites
I love making and eating these little bites!!
A couple tips:
buy A LOT of almond butter before you start. Also, make sure you have all the ingredients, because I am prone to realizing I am missing one in the midst of making these.
Freeze them when you are done. They will last longer.
Use applesauce and a little bit of honey, instead of all honey
Pick a protein powder that is unflavored.
You may have to dedicate a chunk of time aside if you want to make all of these, BUT then you’ll be set for snacks for a while!!

Oatmeal Raisin Bites
Ingredients:
2 cups oats
1/2 cup protein powder
1/4 cup chia seeds
1 heaping tsp cinnamon
pinch of salt
1 cup almond butter
2 TBSP honey
6 TBSP applesauce
1 tsp vanilla
1/2 cup raisins
How to:
Heat almond butter and honey in a microwave safe bowl for 20-30 seconds, or until warm.
Mix all ingredients in a large bowl until combined.
Form into 24 balls and place on a plate and then in the freezer. Once frozen, store in an airtight container or bag in the freezer.
Chocolate Coconut Pistachio Energy Bites

Ingredients:
1 cup shelled pistachios
1/2 cup unsweetened coconut flakes
1/4 cup coconut flour (or oat flour)
1/2 cup dark cocoa powder
3/4 cup almond butter
2 TBSP honey
6 TBSP applesauce
1/2 tsp vanilla
1/4 cup protein powder
How to:
Pulse the pistachios in a food processor until chopped into fine pieces.
Mix all ingredients together in a large bowl. It may feel like it won’t mix, but keep working at it and it will all come together.
Make into 24 balls and place on a plate and then in the freezer. Once frozen, place in an airtight container or bag and freeze until ready to eat.
Fig Newton Energy Bites

Ingredients:
15 figs
7 dates
3/8 cup almond butter
3/4 cup oats
1/4 cup protein powder
2 TBSP flax meal
1/2 tsp cinnamon
1 tsp vanilla
How to:
Place all ingredients in a food processor and pulse until it starts to form together.
Form ingredients into 18 balls. You may find that you’ll have to pack the mixture tight to make it stay together.
Place balls on a plate and stick in the freezer. Once frozen, place in an airtight container or bag and stick back into freezer until ready to enjoy!
I hope you enjoy these as much as we do!
The Best Simple Granola You'll Ever Eat
I was on the hunt for a granola with no added sugar, which is extremely hard to come by, BUT I have found one and perfected it. This is something we ALWAYS have in our pantry. We will use it on yogurt, on smoothie bowls, with milk, and sometimes I’ll grab a quick handful if I’m hungry!!
What I love about it:
It is simple and easy to make
It tastes simple, so can be used on a lot of different things
NO ADDED SUGAR!!!
It is a fun way to get a variety of nuts and seeds in
Once you make it, you’ll feel the same :-)
The Best Simple Granola
Ingredients:
1 cup almonds, chopped
1 cup cashews, chopped
1 cup walnuts, chopped
1 cup sunflower seeds
1 cup pumpkin seeds, chopped
1 cup raisins
3 cups oats
2 TBSP cinnamon
1 tsp ginger
1 cup unsweetened applesauce
1/4 cup coconut oil, melted
How to:

Preheat the oven to 350F
Roughly chop almonds, cashews, walnuts, and pumpkin seeds.
Place nuts and seeds in a large bowl with oats and spices.
Melt coconut oil in a microwave safe bowl. Mix into nut and seed mixture with applesauce.
Mix until well combined. Place on a baking sheet lined with parchment paper or a Silpat.
Cook for 35-45 minutes total, mixing every 15 minutes. In the final 15 minutes, mix in the raisins.
Let cool and store in an airtight container.
**You can add the raisins in earlier, we find that they get too hard if they cook the whole time.

Banana Oat Muffins
Okay, if you know me, I am forever obsessed with peanut butter and bananas. You can always make this recipe with almond butter too! These muffins do not have any added sugar and use applesauce for sweetness!!
These muffins could be paired with yogurt or hard boiled eggs to make it a full meal or snack!

Banana Oat Muffins
Ingredients:
2 eggs
1 cup milk/almond milk
2 overripe bananas
1/4 cup peanut butter
1/4 cup unsweetened applesauce
1 tsp vanilla extract
3 cups oats
1 tsp cinnamon
1/2 tsp salt
1/4 cup toasted almonds, or other nut or seed
How to:
Preheat oven to 350F. Spray a muffin tin with oil.
Mash bananas and mix in with other wet ingredients.
Add the dry ingredients and mix until well combined.
Spoon into muffin tins and cook for 25-30 minutes.
Let cool and remove from tins. Store in fridge or freezer until ready to eat.
Chocolate Mint Energy Bites
I am always looking for new snack ideas! I have been making energy bites a lot lately. I have also been wanting chocolate mint EVERYTHING, so decided to channel that craving into a fun snack!
When I make these energy bites, I make a couple swaps to the ingredients to decrease the added sugar and increase the protein- making them a more balanced snack. I generally sub out unsweetened applesauce for most of the honey. The consistency of the applesauce helps bind the ingredients- which is one of the purposes of the honey. I also generally add protein powder. Protein powder is tricky and usually I am not a huge fan, but I do tend to use it in snacks like this and smoothies. I don’t have a favorite kind, but I do look for brands that don’t have a lot of added ingredients. And for instances like this, getting a powder that doesn’t have a sweetener or flavor is good too. This time, I used Trader Joe’s Pea Powder.
I morphed this recipe from a recipe I already make for chocolate coconut pistachio energy bites, so you can totally take the basics of this recipe and make it your own too!

Chocolate Mint Energy Bites
Ingredients:
1 cup almonds
1/2 cup unsweetened coconut flakes
1/3 cup oats ground to make 1/4 cup oat flour
1/2 cup cocoa powder
3/4 cup almond butter
2 TBSP honey
6 TBSP unsweetened applesauce
1 tsp mint extract
1/4 cup protein powder
How to:
Grind oats in a food processor until they become a flour like consistency. Place in a large bowl.
In the food processor, pulse almonds to chop into small-ish chunks (you can also hand chop)
Mix everything in a large bowl. I usually mix with my hands, because without fail, every time I don’t believe it is going to mix fully. Just keep mixing, and everything will eventually stick together.
Make into bite sized balls. I try to make 24 per batch.
Store in fridge for a couple days or freezer if you’ll have them around longer.
Eat Seasonally: December Edition

Here we are… the last Eat Seasonally post of 2018!
December’s list of seasonal produce is short, but sweet! Many of the foods are literally sweet. All citrus is prime during this season, as well as pomegranates AND parsnips, squash and celery root are all in season, which I would say are pretty sweet for being vegetables.
This month’s recipe focuses on oranges and pomegranates. Both of which are full of antioxidants. Some other notable facts:

Oranges: We all know oranges have vitamin C, which makes them great for immunity boosters. Which, (not ironically) helps out with the seasonal cold and flu. Oranges also have a low glycemic index, which make them a great food for weight control. Oranges have also been shown to help prevent cardiovascular disease because they have potassium, folate and and vitamin C which all help with lowering cholesterol and preventing stroke and arrhythmias.
Pomegranates: Pomegranates have been shown to help with memory and brain health. Also, studies have shown that a consistent consumption of pomegranate can help lower cholesterol.

Pomegranates are a funny fruit. The seeds are not necessarily easy to “harvest,” but are so worth it! My tips are to cut the pomegranate in quarters, and use your thumb to push out the seeds into a bowl. Then sift through the bowl and pull out all of the extra white pulp. If that seems too hard, you can always buy the seeds already picked out. You can usually find them in the produce area, often by the pre cut and packaged fruit.
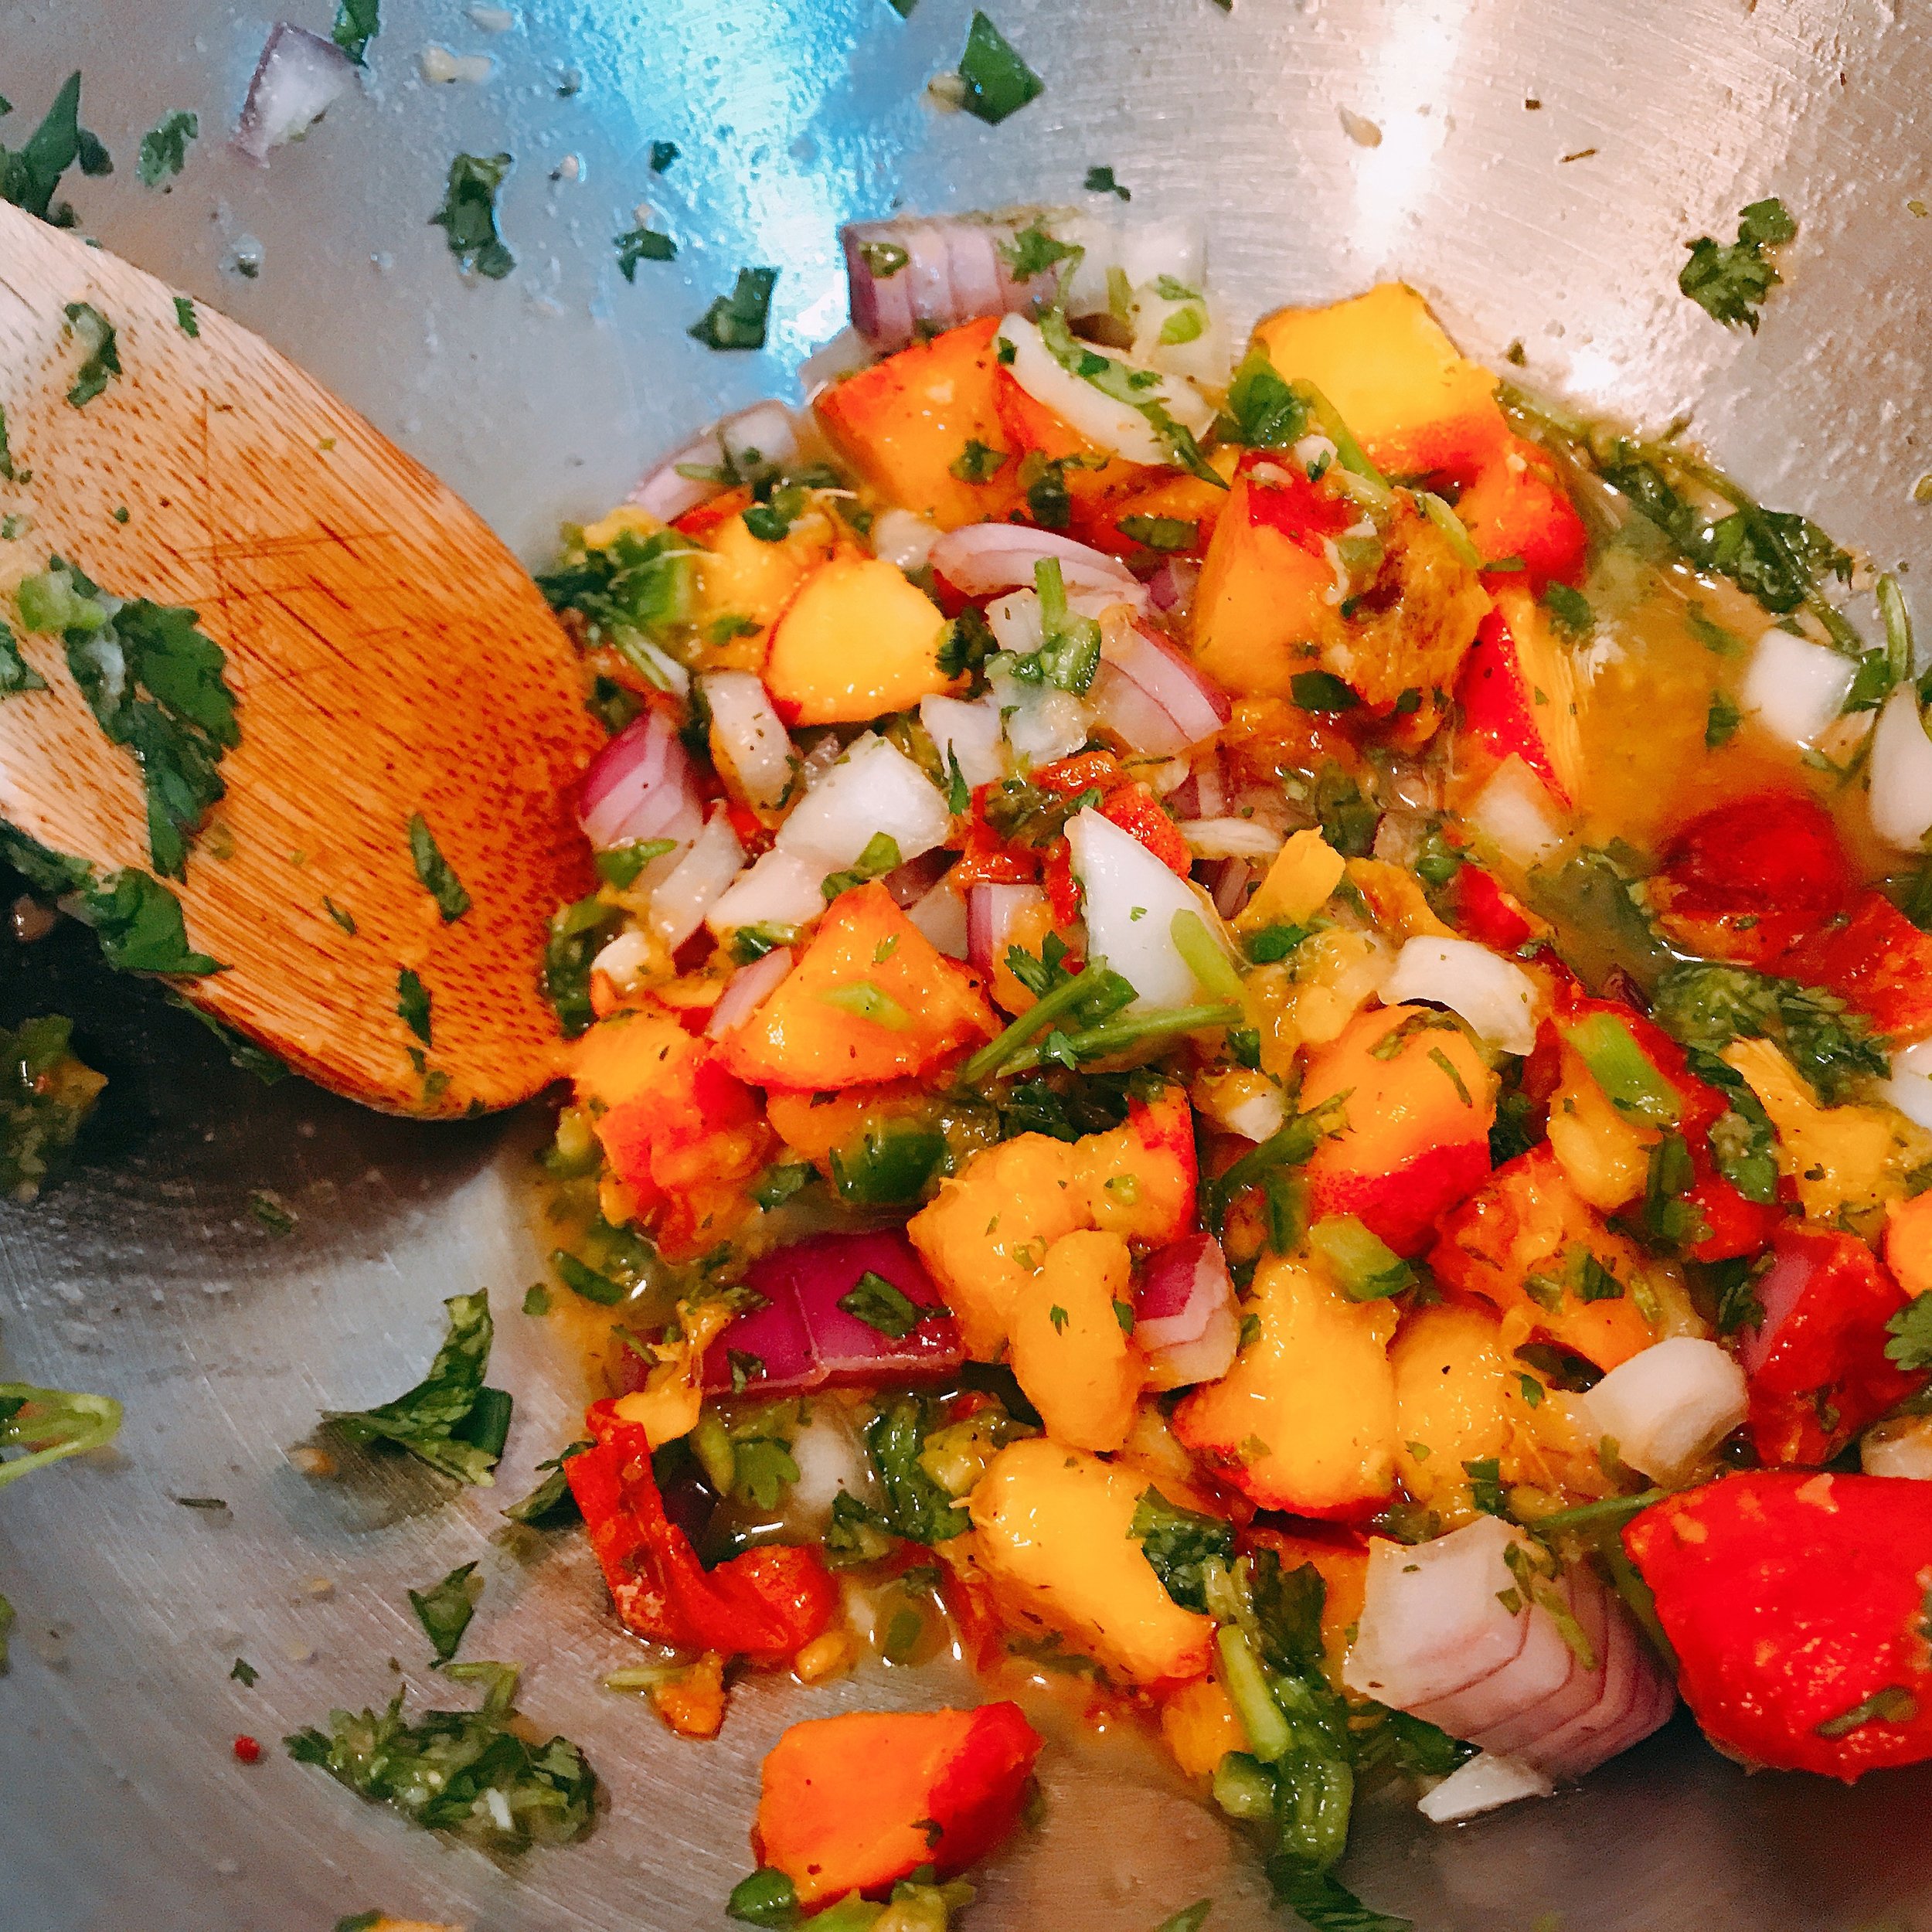
Salmon with Pomegranate Orange Salsa:
Ingredients:

1 lb salmon
1 tsp garlic powder
1/2 tsp cayenne
1 tsp fennel seed
2 TBSP lime juice, divided
5 TBSP white wine vinegar, divided
1/2 tsp salt
1/2 tsp pepper
1 tsp Ghee/avocado oil
1 cup pomegranate seeds
2 oranges, peeled, segmented and chopped
1/2 onion, diced
1/3 cup cilantro, chopped
1/2 jalapeno, seeded and diced
1 tsp cumin
2 TBSP olive oil
How to:
Mix garlic powder, cayenne, fennel seed, salt and pepper. Season outside of salmon with spice mix.
Heat 1 tsp ghee/avocado oil in a saute pan over high heat. Add salmon. Sear each side for about 1-2 minutes each. Reduce heat, pour in white wine vinegar and lime juice. Cook salmon until cooked through.
Meanwhile, make salsa by combining pomegranate seeds, oranges, 1 TBSP lime juice, onion, cilantro, jalapeno, cumin, and 2 TBSP olive oil. Mix together and set aside.
Serve salmon with salsa on top
We served this salmon with quinoa and sautéed green beans!

Eat Seasonally: November Edition

So… squash is obviously a popular seasonal food during this time of the year, but I wanted to highlight some other November beauties!! This soup contains fennel, leeks, apples, and walnut. Each of those foods have a list of positive health benefits, so this month I am going to highlight one really cool thing about each of them:

Fennel: contains a special phytonutrient called anethole WHICH has shown over and over again to reduce inflammation and reduce risk for cancer. Fennel has a very unique and distinct flavor!
Leeks: contain a nutrient called kaempferol that has been shown to protect against damage to your blood vessel lining and also may be important in the release of nitric oxide which helps your vessels expand to get more blood and oxygen through.
Apples: YUM! Apples contain a nutrient called cholorgenic acid which helps keep blood sugars low. The apple sweetens this soup wonderfully!
Walnuts: contain melatonin! Melatonin help regulate your circadian rhythm and helps with sleep which is always good!
So this soup will help with inflammation, your heart health, blood sugar control AND sleep!! Cool, huh?!
Leek, Fennel, Apple and Walnut Soup
Ingredients:

4 leeks, sliced
1 ½ tsp dried thyme
1 fennel bulb, chopped (reserve frons)
1 medium apple, chopped
2 tsp turmeric
3/4 cup walnut halves, roasted
4 cups low sodium chicken or vegetable broth
2 tsp Ghee/avocado oil
How to:
Heat Ghee/avocado oil in a large soup pot or Dutch oven. Saute leeks and thyme for about 4 minutes. Then add fennel and apples and stir.
Add turmeric and stir until everything is coated evenly. Saute for another 3 minutes. Add ½ cup walnuts and broth.
Bring pot to a boil and let simmer for 12-15 minutes, or until vegetables are soft. Remove from heat.
Using a hand blender or large blender, blend soup until smooth. (we found a kitchen blender was easier). If you choose a kitchen blender, remove the cap from the lid and cover with an oven mitt leaving a little space for steam to escape. Also, work in batches so it doesn’t explode on you.
Serve the soup with toasted walnuts, fennel fronds and pepper on top.
*The color of this soup isn’t the best BUT the taste is!! We served it with chicken and sourdough bread!!

Thanksgiving Side Dish
Happy Thanksgiving!
The holidays are such an interesting time in the food world because there is such a stigma around gaining weight and overindulging during the season. I love that food brings people together! But I hate that people feel stressed all season long about what they can and can’t eat.
So, here is my golden holiday eating advice: if it is worth the splurge, then splurge BUT you better allow yourself to enjoy it. If it is not worth the splurge, then choose a better option.
For example, I LOVE desserts but know I can go without the alcohol. So, I generally choose to indulge in a good dessert and drink water instead of alcohol. But, that is just me. There is no right way to do it, but it does take some forethought to think about what your non-negotiables are over the holidays.
I did want to share this awesome sweet potato stuffing. If stuffing is not your thing over Thanksgiving, give this one a try. If it is your thing, you enjoy your traditional stuffing :-)
Sweet Potato Stuffing
Ingredients:
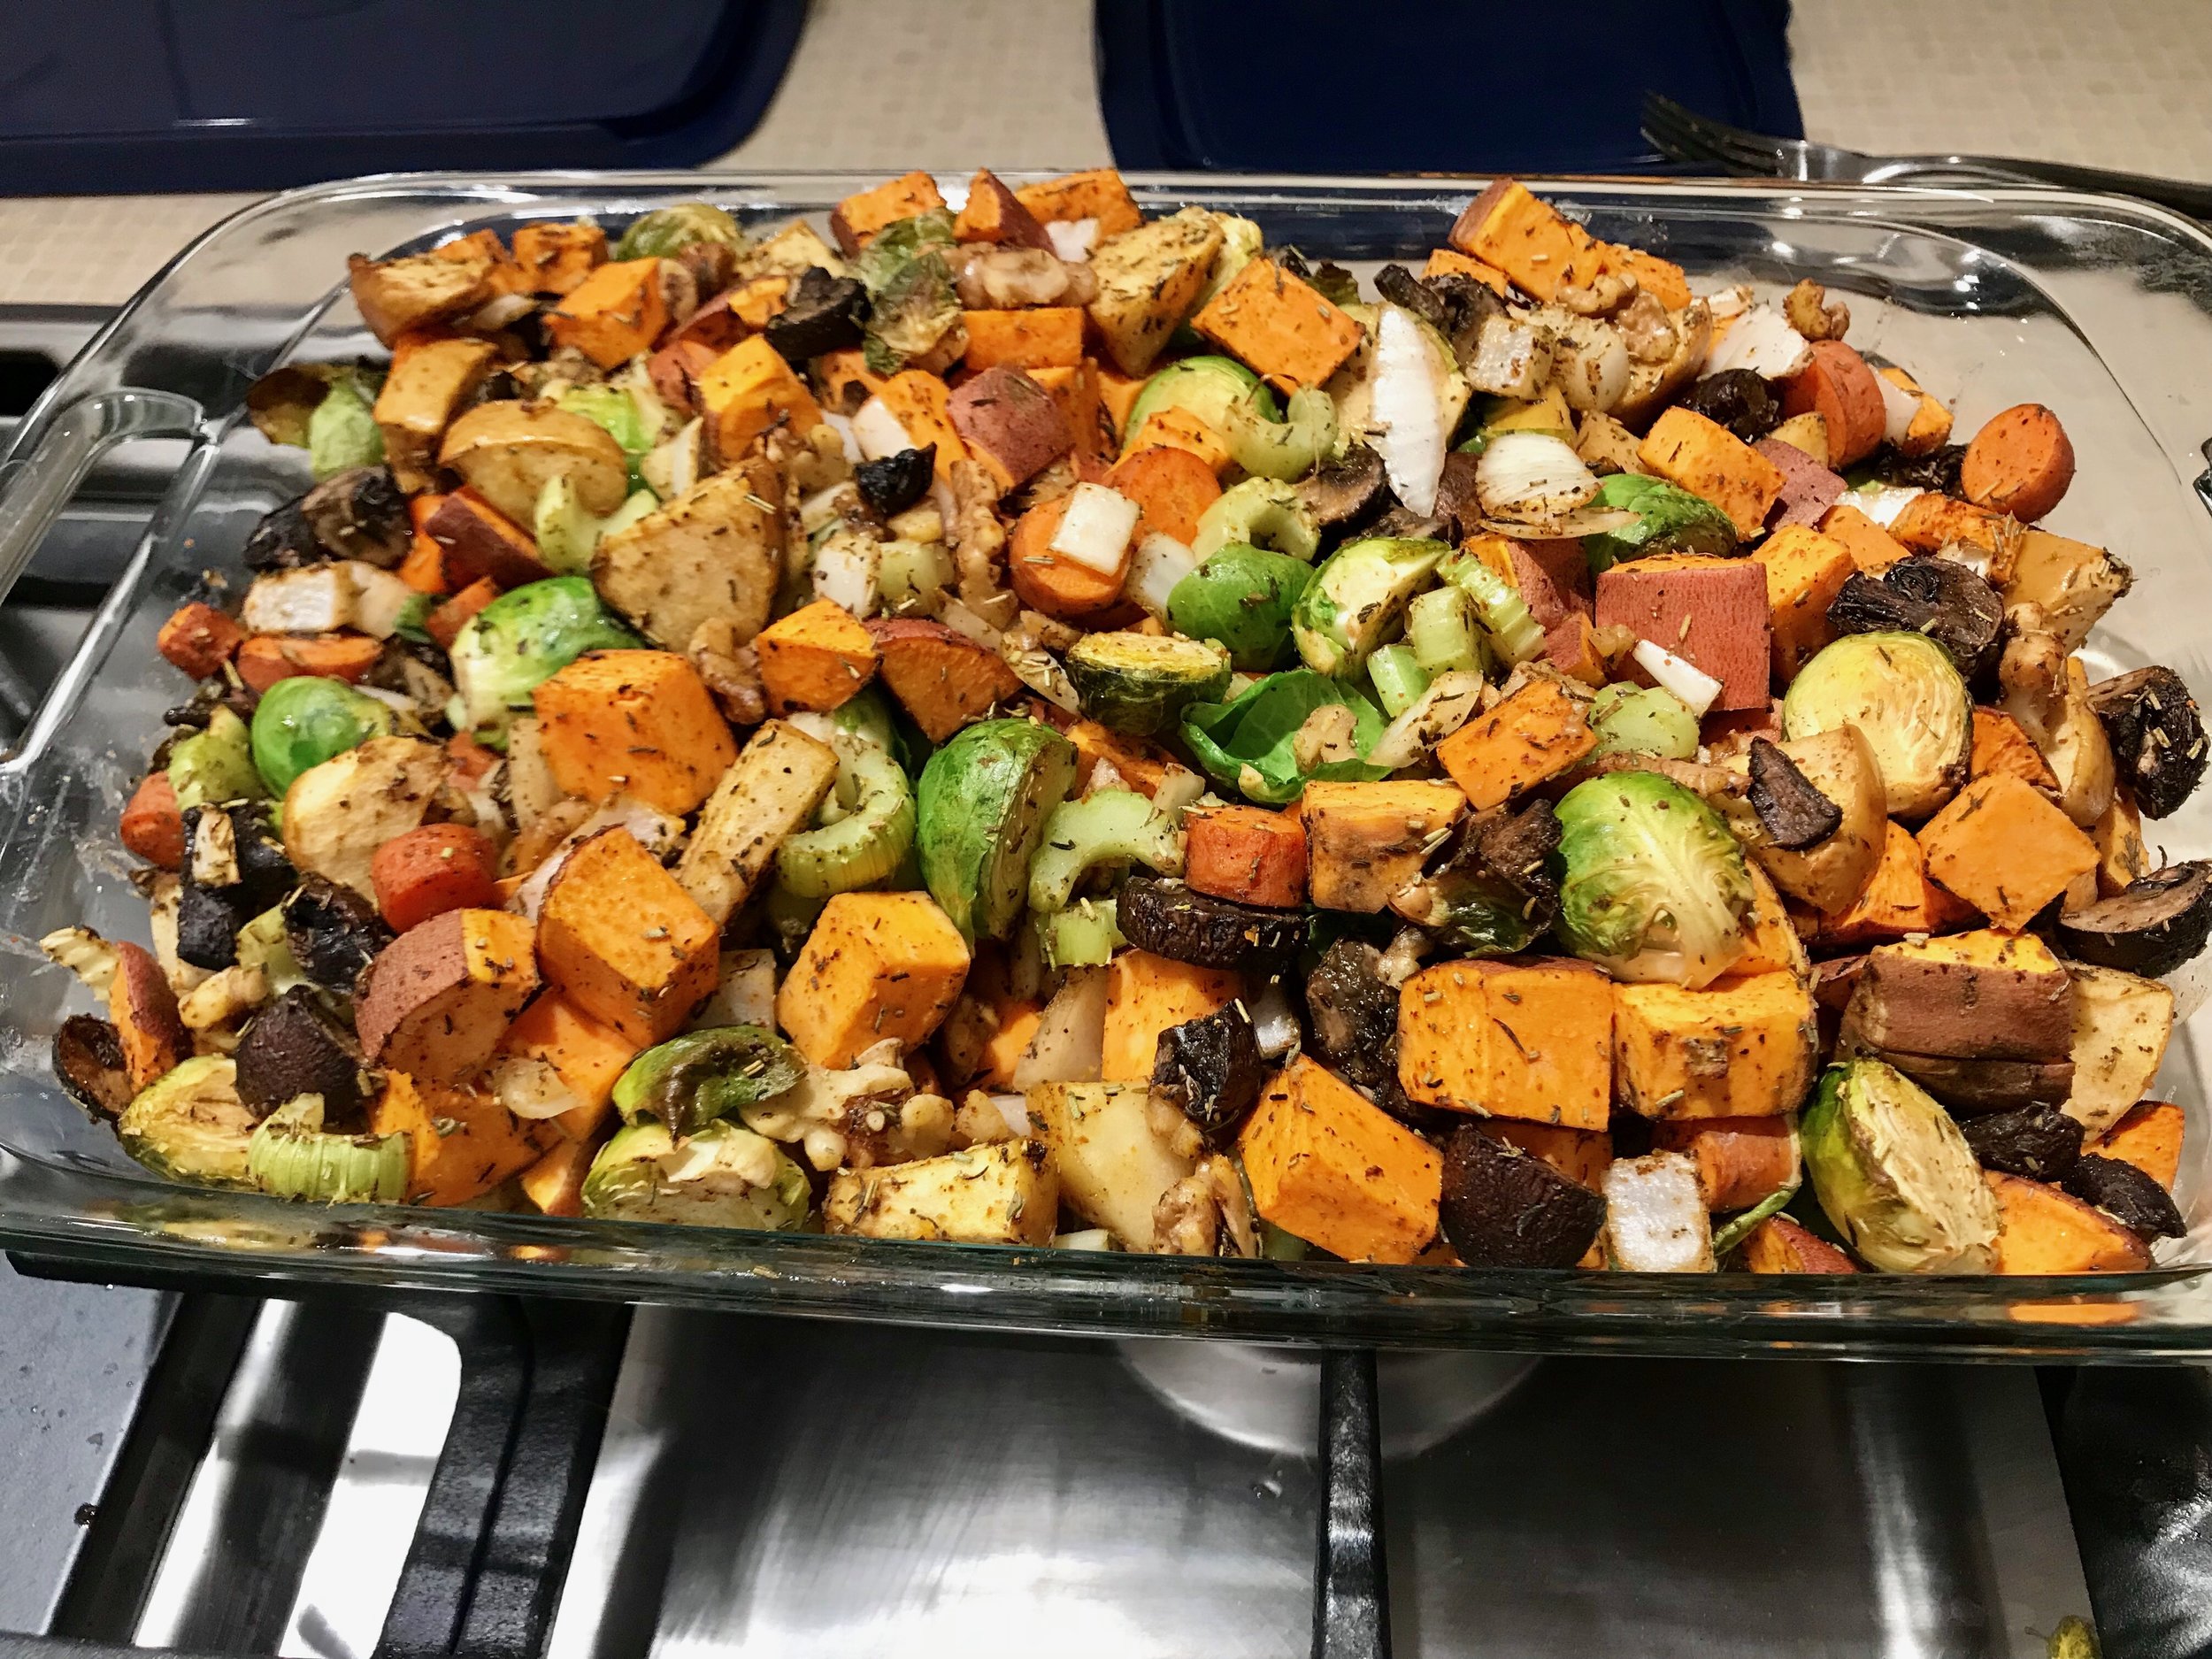
2 sweet potatoes
2 cups halved Brussel Sprouts
3 large carrots, sliced
3 celery stalks, sliced
1/2 medium yellow onion, chopped
6 oz mushrooms, sliced
3 cloves garlic, minced
1 medium apple, chopped
2 tsp thyme
2 tsp rosemary
1 tsp chili powder
3/4 tsp salt
3/4 tsp pepper
1/2 cup dried cranberries
1/3 cup pecans, chopped
2 TBSP olive oil
How to:
Preheat oven to 425F.
Combine all ingredients in a large bowl and toss with olive oil
Transfer to a baking dish and cover with foil. Cook for 45 minutes. Remove foil and cook for an additional 20 minutes, or until sweet potatoes are cooked through.
Enjoy!
Eat Seasonally: October Edition

I love fall foods! It seems to be the one season that has very well known and well loved produce! There are a lot of wonderful options from the list above that I could have chosen to highlight this month, but I decided to focus on the obvious… PUMPKIN!!!
Pumpkins contain all sorts of good nutrients. Just 1 cup contains 200% of your daily needs of Vitamin A! This is important in immunity, eye health and bone health. Pumpkin also contains Vitamin E, which is a nutrient that can easily be missed in people’s diets. Pumpkin is considered a starchy vegetable, which means it has a greater amount of carbohydrates than its non-starchy friends- which means it provides a significant amount of energy for a vegetable!
The best ways to eat pumpkin are to either roast your own (sugar pumpkin) OR to to buy canned pureed pumpkin. Avoid the pumpkin pie mix, especially for this recipe!!
Pumpkin Sage Sausage Pasta

Ingredients:

12 oz whole wheat noodles
1 lb chicken sausage (Italian or Sicilian)
1/2 white onion, diced
2 cloves garlic, minced
2 tsp ground sage
1/2 tsp nutmeg
1/4 tsp red pepper flakes
1/4 tsp salt
1/4 tsp pepper
dash of cinnamon
1 cup low sodium chicken broth
1 (15oz) can pumpkin puree
1 TBSP tomato paste
2 cups spinach
2 oz parmesan cheese
How to:
Bring a pot of water to a boil.
In a saute pan, cook sausage until browned. Set aside. In the same pan, add onion and garlic. Cook until onion is translucent.
Add 2 tsp sage, ½ tsp nutmeg, ¼ tsp red pepper flakes, ¼ tsp salt, ¼ tsp pepper and a dash on cinnamon. Cook for about 1 minute.
Add low sodium chicken broth, pumpkin puree, and tomato paste.
Cook noodles in boiling water for 9 minutes. Then drain.
Mix noodles and sausage into the pumpkin sauce. Add 2 cups of spinach and mix until spinach wilts.
Serve pasta topped with parmesan cheese.
We served ours with sautéed Brussel sprouts and mushrooms.
I hope you enjoy this cozy Pumpkin Sage Sausage Pasta!

Eat Seasonally: September Edition

I didn’t know it until I moved away from Colorado, but hatch green chile salsa is like A THING in Colorado. Probably because it is more southwest than any other state I’ve lived in and these lovely chiles are grown in New Mexico. Also, probably because Spokane Washington isn’t known for its phenomenal Mexican food!! Anyways, I saw these at the store at the beginning of the month and knew I had to make some salsa. The recipe is to come, but first, lets talk about hatch green chiles and why they are so awesome.

Chiles are vegetables, which means they contain a lot of nutrients for a little amount of calories. Some of the nutrients these chiles contain are:
Vitamin A: all green peppers contain vitamin A, which help with eye health and immunity.
Vitamin C: is a precursor in collagen growth as well as an antioxidant.
Capsaicin: this is what gives peppers their spice. The more heat a pepper has, the more capsaicin in contains. Capsaicin can help reduce pain because the heat/spice increases blood flow. This has been shown to help internally, for example with headaches. Capsaicin also comes in cream form, as it can also help if applied externally to sore joints and muscles. Hatch chiles aren’t known for their heat, but they do still contain a bit of capsaicin.
Now for the recipe!!
Hatch Green Chile Salsa

Ingredients:
4 cloves garlic
1/2 white onion
2 green onions, diced
1 jalapeno, deseeded
1 1/2 lbs tomatillos, shells removed and roughly chopped
5 hatch chiles, seeds removed and cut lengthwise
1 TBSP olive oil
1/2 cup cilantro
2 TBSP lime juice
1 tsp cumin
2 TBSP white vinegar
1/2 tsp salt
1/2 tsp pepper
How to:

Turn oven to broil. Clean and prep garlic, jalapeno, tomatillos, and hatch chiles. Cut them all into large chunks for roasting.
Mix tomatillos and hatch green chiles with 1 TBSP olive oil.
Place all vegetables on a baking sheet or two. Arrange them so they are spread out a bit.
Broil in oven for about 10 minutes, or until vegetables are slightly charred.
Remove from oven and add to food processor or blender. Add cilantro, white onion, green onion, lime juice, cumin, white vinegar, salt and pepper. You may have to work in batches depending on how big your blender is. Blend until smooth.
Serve and enjoy!
We made hatch green chile burgers:
Turkey burgers with pepper jack cheese, spinach, avocado and A TON of salsa :-)

Eat Seasonally: August Edition

It's August which means it is tomato season! If you have never gotten the pleasure of eating a home-grown tomato (not one from the grocery store), then you, my friend, are missing out. Tomatoes are good, but homegrown tomatoes will blow your mind!
So... the great debate... are they vegetable or fruit? Technically tomatoes are fruit BUT everyone counts them as vegetables, including me. The way they grow makes them a fruit, BUT nutritionally, their caloric composition is more similar to that of a vegetable. So my vote is.... they are vegetables!
Tomatoes also make up 80% of the lycopene consumption in the US. This is mostly because of high consumption of pasta sauce and ketchup. That doesn't take away from the fact that tomatoes are a great source of lycopene which is a carotenoid that is linked to lower prostate cancer, reduction in oxidative stress, eye health, heart health and skin health. Lycopene is better absorbed with a fat source, which is one reason why this recipe ROCKS!!

Avocado Toast with Basil, Heirloom Tomatoes and Balsamic Reduction:
Ingredients:
Whole wheat bread
1/4-1/2 avocado
2-4 slices heirloom tomato
basil, chopped
1/4 cup balsamic vinegar
salt and pepper
eggs
bacon
How to:
Place balsamic vinegar in a small saucepan over medium heat. Bring to a boil, while whisking. Reduce heat and let simmer for 10-15 minutes or until it is thick enough to coat the back of a spoon. Be careful, it will burn easily and tastes pretty awful when it's burnt.
Cook your eggs and bacon.
Toast the toast. Top with mashed avocado, tomato slices, chopped basil and balsamic reduction. Sprinkle on some salt and pepper.
Serve with eggs and bacon on the side.
Eat Seasonally: July Edition

Okay.... I am late to the game with July's recipes BUT these ones are totally worth the wait!
This months seasonal foods are peaches and blueberries!! Here in Spokane, we are so lucky to have Greenbluff so close. Picking my own fruit is like a novelty because we never had anything like that in Denver where I grew up. So, I LOVE going to pick my own fruit. One of the best parts is that they actually tell you to eat while you pick... for free! UMM yes please!!!
Before I dive into the recipes, let me tell you about these gifts from God!

Peaches:

Just like with all the fruits and vegetables that I have posted about, peaches help prevent chronic diseases which can be a blanket statement for all fruits and vegetables. These little gems are high in vitamin C which helps with collagen formation. So all you thinking about taking a collagen supplement- my advice to you is to eat your vitamin C, and your body will build its own collagen. Peaches also have vitamin A and beta-carotene to help your vision and skin!!
Blueberries:

Blueberries are like a staple child for fighting inflammation. They have a low glycemic index score and a bunch of antioxidants which help them be a strong shield against inflammation. Blueberries also contain calcium for you bone health... so thats cool too!
Now to the yummy part!! This month I picked Salmon Burgers with Peach Salsa and a Corn and Blueberry Salad on the side.
A few notes about these recipes:
I used canned salmon which is not the most appealing when you open it up. But, we have a hard time justifying putting a nice fillet of salmon in a food processor. Canned salmon is also cheaper, and contains a good amount of calcium because the bones are still in the fish. Here is my tip: take it out of the can and try and think about anything else except the fish. Peel off the skin and move on!
If you are using canned or non-canned salmon, look for wild salmon, not farm raised.
Each portion of this recipe calls for jalapeno, onion, and cilantro- chop all of it at once and separate it into the different parts of the meal. (2 jalapenos, 1 cup cilantro, 1 large red onion).
If you are like me and have skin that can't stand jalapeno, use medical gloves while you handle the jalapeno. If you don't have any, use the inside of a produce bag.
Salmon Burgers with Peach Salsa
Ingredients:
1 lb salmon (we used 2 cans canned salmon)
1 TBSP chili powder
1 tsp cumin
1 tsp salt
1/4 tsp cayenne
1/4 cup red onion, chopped
1/2 red bell pepper, chopped
1/2 jalapeno, chopped
1/4 cup cilantro, chopped
1/3 cup cooked quinoa
1 TBSP lime juice
1 egg
1 TBSP Ghee/avocado oil
For the Peach Salsa
3 large peaches, chopped
1/4 cup red onion, chopped
1 clove garlic, minced
1 jalapeno, chopped
1/4 cup cilantro, chopped
1 TBSP lime juice
dash of salt and pepper
How to:
Place 1/4 cup quinoa in a saucepan with 1/2 cup water. Bring to a boil and cover and reduce heat and cook until cooked through.
If you are using a salmon fillet, put it in the food processor and pulse until it resembles ground meat. If you are using canned salmon, place it in a bowl and mix it up until it has flaked apart.
Add 1 TBSP chili powder, 1 tsp cumin, 1 tsp salt, 1/4 tsp cayenne, 1/4 cup onion, 1/2 bell pepper, 1/2 jalapeno, 1/4 cup cilantro, 1/3 cup cooked quinoa, 1 TBSP lime juice, and 1 egg.
Mix together and form into patties. It may be easier to place the patties in the refrigerator for a while to allow to bind.
Meanwhile, combine the peaches, 1/4 cup onion, 1 clove garlic, 1 jalapeno, 1/4 cup cilantro, and 1 TBSP lime juice and salt and pepper in a bowl and set aside.
When ready to cook, place 1/2 TBSP Ghee/avocado oil in a saute pan. Place patties in the pan and cook 3-4 minutes on each side. You will likely work in 2 waves. If so, add more Ghee/avocado oil to prevent sticking.
Corn and Blueberry Salad
Ingredients:

3 ears of corn
1 cup blueberries
1 small cucumber, sliced
1/4 cup onion, chopped
1/4 cup cilantro, chopped
1/2 jalapeno
2 TBSP lime juice
2 TBSP olive oil
1/2 tsp cumin
1/2 tsp salt
How to:
Bring water to a boil. Cook corn for 8-10 minutes. When it is cool, cut the corn off the cobb.
Combine the corn with 1 cup blueberries, 1 small cucumber, 1/4 cup chopped onion, 1/4 cup chopped cilantro, 1/2 chopped, jalapeno, 2 TBSP lime juice, 2 TBSP olive oil, 1/2 tsp cumin, 1/2 tsp salt.
Mix to combine and enjoy!!

Eat Seasonally: June Edition
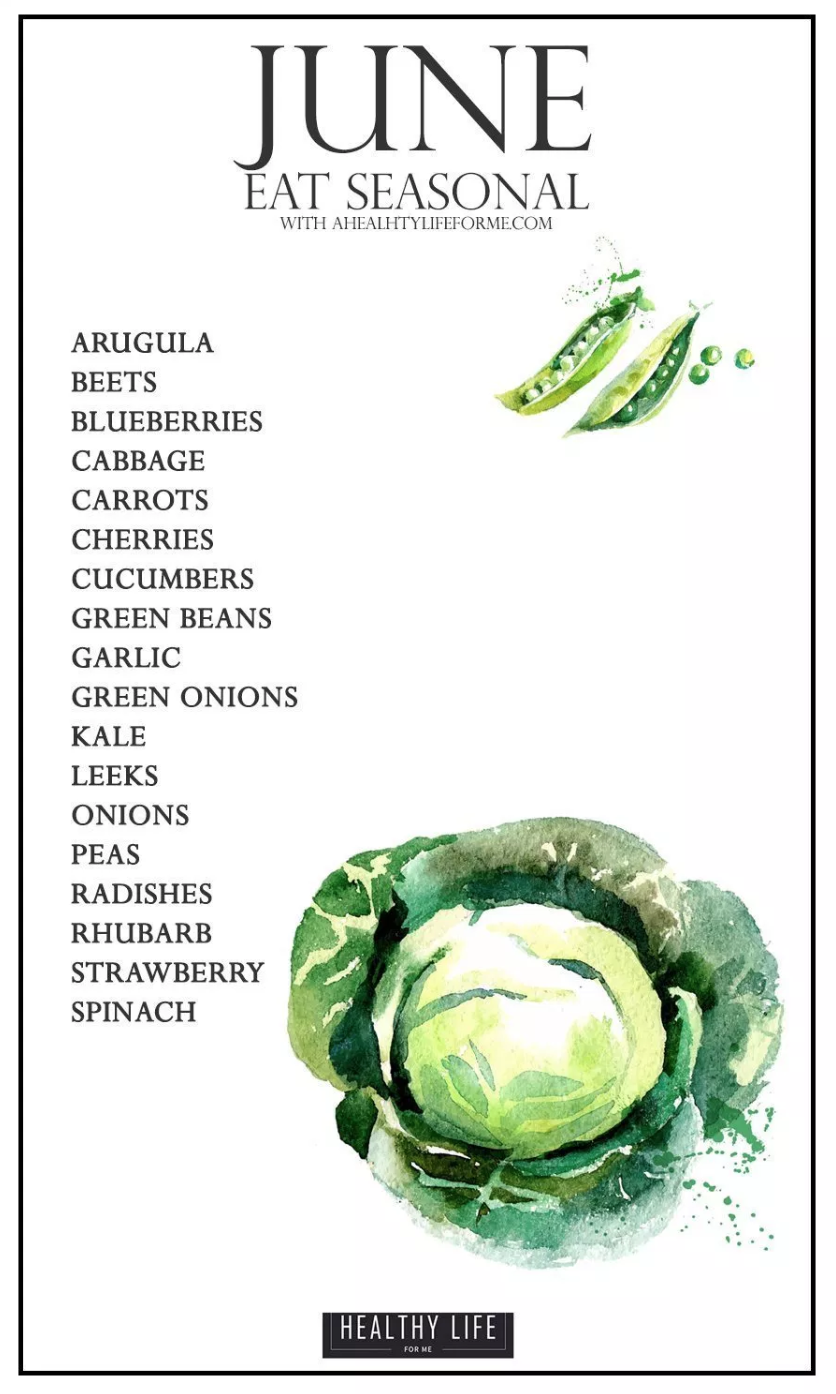
We were at the Perry Street Farmers Market trying to decide what seasonal food we were going to buy for this month's post. As we were walking around the weather turned in an instant and all of a sudden we found ourselves in a downpour, so we quickly grabbed beets and ran...but paid for them first ;-)! We grabbed beets because there is so much fun stuff to do with beets! I grew up thinking beets tasted like dirt BUT as I experimented with them more I realized how sweet they actually are. So with this month's post, you get beets 3 ways!! But first- a little about beets:
Beets contain a ton of good nutrients, but nitrates are one in particular. Nitrates are converted into nitric oxide in the body. Nitric oxide works to relax and dilate blood vessels. This benefits:
Blood pressure: if there is more room in the vessels for the blood to flow, there isn't as much pressure making it easier for the blood to flow
Brain function: if there is more blood flowing to the brain, it will in turn work more sharply
Endurance: Again, more blood can flow with less resistance in the vessels means more blood to your muscles making you perform better
We often make a beet smoothie (recipe below) after our Wednesday bike rides and I have definitely experienced the nitrates effect on my blood pressure. Exercise also releases nitric oxide, so when I exercise and have beets, I sometimes feel like my blood pressure is too low! It is kind of cool to be able to feel what science says should be happening :-)

The three recipes this month are
Beet Green Pesto
Beet Smoothie
Beet, Fennel, Apple Slaw
Beet Green Pesto

The root itself it great for you, but so are the leaves attached!
Ingredients:
4-5 cups washed beet greens
1/3 cup toasted pine nuts or walnuts
3 cloves garlic
1/4 cup parmesan cheese
1/4 tsp salt
1/4 tsp pepper
1/4 cup olive oil

How to:
Place all ingredients through pepper into a food processor.
Pulse until finely chopped
Add olive oil and continue to pulse until it reaches your desired consistency
Enjoy!
Beet Smoothie (makes 3-4 servings)
This is a go-to around our house! Vegetables are something I often don't get in for breakfast, so this is a fun way to incorporate vegetables at the beginning of my day!
Ingredients:

3 beets (cut in quarters, steamed and refrigerated)
1 orange, peeled
1 banana
1 cup frozen berries
1 LARGE handful spinach
1 cup milk (any kind)
1/2 cup Greek yogurt
1/2 cup oats
*optional to add protein powder
Your favorite granola
How to:
Stick all ingredients (except granola) in a blender and blend until smooth
Serve in a bowl topped with granola

Beet, Fennel and Apple Slaw
Ingredients:
2 medium raw beets, cut into matchsticks
1 fennel bulb, cut into matchsticks
1 tart apple, cut into matchsticks
1 cup flat leaf parsley, chopped
3 TBSP olive oil
1 TBSP lemon juice
1 orange, zested
1/2 tsp salt
1/2 tsp pepper
How to:
Combine chopped beets, fennel, apple and parsley in a bowl.
Whisk olive oil, lemon juice, orange zest, salt and pepper in a small bowl
Pour dressing over salad and mix together
Eat Seasonally: May Edition

Can you feel it? The abundant fresh produce will be here SO soon! For now, if you have visited any of the local farmers markets, you have likely seen a lot of greens and radishes and seed starts. May is the in between month where the markets don't have too much, but you can get excited by the fact that more is coming!!
This month's recipe is a Cauliflower and Roasted Chickpea Salad with Radishes, Avocado and Apples!
Some seasonal highlights of this recipe are:
Cauliflower is a Brassica crop, which is known to help prevent chronic diseases such as cardiovascular disease, neurodegenerative disorders, and diabetes. It is high in vitamin C and vitamin K.

Radishes are great for your liver. They are also high in vitamin C which is a precursor to collagen formation. Which is good for your tissues and skin! Radishes have a notable amount of folate, which can be hard to get for individuals who don't eat a lot of grains. Folate is very important in pregnancy and fetal development.
Avocados are one of my favorites! Yes, they are high in fat, but they contain monounsaturated fats, which are healthy healthy healthy!! They are also high in fiber. Between the fiber and the amount of fat they have, avocados can be a great food to eat to help you feel full and satiated!
Chives also have many healthy characteristics. One to note is that they are good for digestion and can help get rid of bad bacteria, fungus and yeast in your GI tract to help it function as it should.
So yea... this salad is packed with a punch and has many health benefits!
Here's the recipe:
Ingredients:
1 (15oz) can chickpeas, drained and rinsed
4 TBSP lime juice + zest of 2 limes
1/2 cup olive oil
chili powder, to taste
2 TBSP Dijon mustard
1 head of cauliflower, core removed (or cauliflower rice)
8 radishes, thinly sliced
1 cup parsley, chopped
4 mint leaves, chopped
4 green onions, diced
1/4 cup chives
1 1/2 crisp apple, diced
1 ripe avocado
1/3 cup sunflower seeds, toasted

How to:
Preheat the oven to 400F. Mix chickpeas with 1 TBSP olive oil, chili powder, salt and pepper and place on baking sheet. Roast until slightly crispy, about 15 minutes.
Whisk together lime zest, lime juice, olive oil, salt, pepper, mustard and 3 TBSP water. Set dressing aside.
In a food processor, place cauliflower and chop until it is in small granules- like rice. You may have to do this in batches. Place in a large bowl.
Place radishes, parsley, mint, chives, green onions, apples and sunflower seeds in the bowl with the cauliflower. Add the chickpeas. Mix to combine and add 1/2 of the dressing from step 2.
Serve the salad topped with avocado and add dressing as needed.
*We served ours on a bed of spinach and added salmon and quinoa to make a complete dish!

Eat Seasonally: April Edition


Spring is officially here which means we have busted out the grill! This month's vegetable is artichoke, and yes, we decided to grill it!
Artichokes always take me back to one of the first years Kevin and I were dating. He came with us to a family friends house for a fairly fancy dinner event and artichokes were on the menu. He had never eaten an artichoke before and proceeded to stick the whole leaf in his mouth. About 5 minutes later, I realized he was still chewing and was struggling to get the leaves down. I had to signal to him how to eat the properly eat the artichoke without brining too much attention to us and he had to figure out how to get rid of the leaves that he had been trying to eat for the last 5 minutes! We then had to fight the laughter- which I know you all know that feeling of trying not to laugh, so then you just laugh harder- yea... that was us. It still makes me laugh just thinking about it. All that to say... if you're eating artichoke for the first time- DO NOT EAT THE WHOLE LEAF! There is "meat" at the bottom of the leaf that you use your teeth to peel off. As you get to the center of the artichoke, you can peel away all the leaves and the fuzzy stuff and find the heart- which is my favorite part!
This vegetable is unique to say the least, but it does have many health benefits. Artichokes have been shown to help digestive tract irritation and aid in creating a healthy gut environment. They have been used to treat high cholesterol because they increase the production of bile which helps to decrease excess cholesterol. This bile production also aids in the health of your gut by improving gut flora and reducing inflammation and irritation of your digestive tract. They are also full of antioxidants which help all sorts of functions in your body.
Artichokes are also full of fiber, B12 and vitamin K. Overall, this vegetable is full of health benefits!
So, here is how we cooked them!
Grilled Artichokes:
Ingredients:

2 artichokes (one artichoke per person)
One pot full of boiling water
1-2 TBSP olive oil
Salt and pepper
1+ TBSP butter, melted
How to:
Chop the artichokes in half lengthwise
Boil in water for 15 minutes. Meanwhile, preheat the grill.
Drain water out of artichokes and mix in a bowl with olive oil, salt and pepper until well coated.
Place on grill for about 5-10 minutes, turning as needed.
Serve with melted butter to dip the leave in. Once you have peeled the "meat" off of the leaf, discard the leaf.
As you reach the center, peel off remaining leaves and wash the fuzzy part off. This will leave you with the heart. Dip in butter and enjoy!
We served ours with grilled pork chops, sweet potatoes and tomatoes.

Greek Nachos

Okay... here's the story: Kevin has been wanting nachos for weeks which has been so funny to me because it isn't something we eat often... or like ever... But he kept telling me we would make them more topping and less chip, so I was starting to be on board with the idea.
On Sundays we try to mix it up and do something different and fun for dinner, so we were trying to think of what, and of course nachos were suggested. I knew we had leftover pitas that we had to use...so the idea of Greek Nachos was born! We made pita chips out the of the pitas and created Greek Nachos!

Here's the recipe:
Pita Chips:
Ingredients
pitas
olive oil or avocado spray
salt, pepper, garlic powder
How to:
Preheat the oven to 400F
Cut the pitas into chip sized pieces
Place chips on a baking sheet and lightly spray the pita chips with oil. Season with salt, pepper and garlic powder
Cook for 5-7 minutes on each side or until they are crunchy
Falafel:
How to:
Preheat oven to 400F
Combine all ingredients in a food processor and process until it becomes a paste
Let the paste sit in the refrigerator for at least 15 minutes
Using 1/4 cup, scoop and form into patties and place on a baking sheet
Bake for 20 minutes on each side
*forming and flipping the patties will be a lot easier if the paste has more time to cool in the refrigerator
Ingredients:
2 cans chickpeas, drained and rinsed
1/2 red onion, diced
1/2 cup parsley
4 cloves garlic
1/4 cup lemon juice
1 TBSP cumin
1 tsp salt
1 tsp ground coriander
1 tsp baking soda
1/4 tsp cayenne
1/2 tsp pepper
1/4 cup flour
Meat:
How to:
Mix ingredients into meat and cook in a saute pan until cooked through. Break it into pieces as you cook the meat.
Ingredients:
1 pound lean ground beef
1 tsp garlic powder
1 TBSP fresh mint OR 1 tsp dried mint
1/2 tsp onion powder
dash of salt, pepper and cayenne
Greek Salad:
How to:
Combine all ingredients in a bowl and mix well
Ingredients:
1/2 red onion, chopped
2 bell peppers, chopped
1 cucumber, chopped
1 pint cherry tomatoes, chopped
1/3 cup Kalamata olives, pitted and chopped
3 TBSP lemon juice
3 TBSP olive oil
Dash of balsamic vinegar
1 tsp thyme
salt and pepper
Tzatziki Sauce:
How to:
Combine all ingredients in a bowl
Ingredients:
1/3 cup Greek yogurt
2 tsp lemon juice
1 tsp dill
1 clove garlic
salt and pepper
To make the nachos:
Combine vegetables and meat and top with falafel and tzatziki sauce. Top with feta. Enjoy with pita chips.
Eat Seasonally: March Edition

March is always an odd month. You never know what the weather is going to be and deep down you are anticipating the nice weather and sunshine coming but still getting hit with random cold weather and snowstorms... or at least that has been my experience here in the Northwest. I feel the same odd tension with food choices- I still crave the warm comfort foods from winter but also want to turn on the grill and start exploring salads and warm weather foods.
This month's recipe contains a bit of both winter comfort and fresh warm weather vegetables. The comfort comes from the bacon- YUM! And the vegetables highlighted this month are peas, asparagus, and sugar snap peas. I have decided this salad will be my new go to for potlucks and parties because it is definitely a crowd pleaser.
Here is some fun information about the vegetables:
Asparagus: is full of various phytonutrients and antioxidants. One to mention is called asparagusic acid which causes the asparagus smell to show up in your urine. Everyone metabolizes this in various ways, so not everyone can smell the resulting chemical in their urine. The breakdown of this chemical also plays a roll as a cofactor in aerobic metabolism. Plus its delicious!
Peas: peas are a part of the legume family. Research has shown that peas contain all sorts of antioxidants. One in particular is called coumestrol- which has shown to benefit our stomach health and specifically reduce the risk of stomach cancer. Peas also have a high amount of protein for a vegetable (8-10g per cup). They are full of fiber and actually contain omega-3 fatty acids as well! All of these attributes make peas a strong fighter against inflammation and other chronic diseases.
Sugar Snap Peas: are unique in the fact that they provide a significant amount of iron for a vegetable. Iron is better absorbed with Vitamin C, which sugar snap peas also contain a significant amount of. This means you'll get more bang for your buck in iron absorption when choosing sugar snap peas!
Okay now for the recipe:
Asparagus and Peas with Warm Tarragon Vinaigrette:
Ingredients:

2 cups peas
1 pound sugar snap peas, cut in thirds
1 bunch of asparagus, bottoms trimmed and stalks cut in thirds
5 pieces bacon
3/4 cup shallots (1 large shallot), diced
3 TBSP fresh tarragon, finely chopped
2 TBSP white wine vinegar
1 tsp Dijon mustard
1/2 tsp salt
1/2 tsp pepper
zest of 1 lemon
How to:
In a large saucepan, bring water to a boil. Chop sugar snap peas and asparagus. Once water is boiling, place vegetables in water fro 3 minutes. Drain and rinse under cold water and set aside.
Meanwhile, cook the bacon in a saute pan. Once cooked, set aside. Pour off all but 1 TBSP of the bacon grease.
Add shallots to the saute pan and cook until they begin to brown. Add vinegar, mustard, and tarragon. Quickly mix and then add vegetables to pan. Mix until coated. Then place in a bowl.
Mix in salt, pepper and lemon zest. Break up the bacon into bits and mix in. Enjoy!!

We served ours with grilled steak seasoned with Spiceology's Cowboy Crust Seasoning and farro.

Eat Seasonally: February Edition
Whew! February has come and gone pretty quickly! I wanted to add a post highlighting February's Seasonal Produce and a favorite seasonal vegetable: cauliflower!!

This cauliflower recipe was a new one for us. It was inspired by a local restaurant- Wandering Table- who makes buffalo cauliflower bites that literally will leave you dreaming for days! When highlighting a vegetable I usually like to keep it simple, so if you are trying that vegetable for the first time, you can taste the food for what it is. BUT.... this month I couldn't resist hopping on this one. The beauty of this recipe is if you don't like cauliflower, I almost 100% believe you will like this. For parents out there- this is a great way to get your kids to eat some vegetables too!
Cauliflower is very nutritious and helps fight oxidation and inflammation. It is high in vitamin C, vitamin K, B6, folate, and choline. Folate and choline are two nutrients that American's often don't get enough of. Also, because of the vitamins and minerals, cauliflower may help fight many kinds of cancer and reduce oxidative stress. Eating cauliflower when it is in season ensures the richness of these nutrients. So... eat your cauliflower!
Heres the recipe:
Buffalo Cauliflower Bites

Ingredients:
1 head cauliflower
2/3 cup whole wheat flour or oat flour
1 cup water
1/2 tsp garlic powder
1/2 tsp salt
1/4 tsp pepper
Frank's buffalo hot sauce
How to:
Preheat oven to 450F
Create batter by mixing flour, water, garlic powder, salt, and pepper. This should be the consistency of pancake batter. If it isn't, add more water until it is.
Cut the cauliflower into florets and mix into the batter.
Place on a baking sheet and cook for 25-30 minutes or until crispy.
Place in bowl and pour buffalo sauce on the cauliflower until coated to your desired amount.
*An important note: we also tried this recipe without that batter. This was still delicious, but a little less crispy tasting. If you are wanting to do this, skip the flour & water, and instead mix the cauliflower with a little bit of olive oil, salt, pepper, and garlic powder before roasting. Below are pictures of roasted and battered- so you can see the difference.
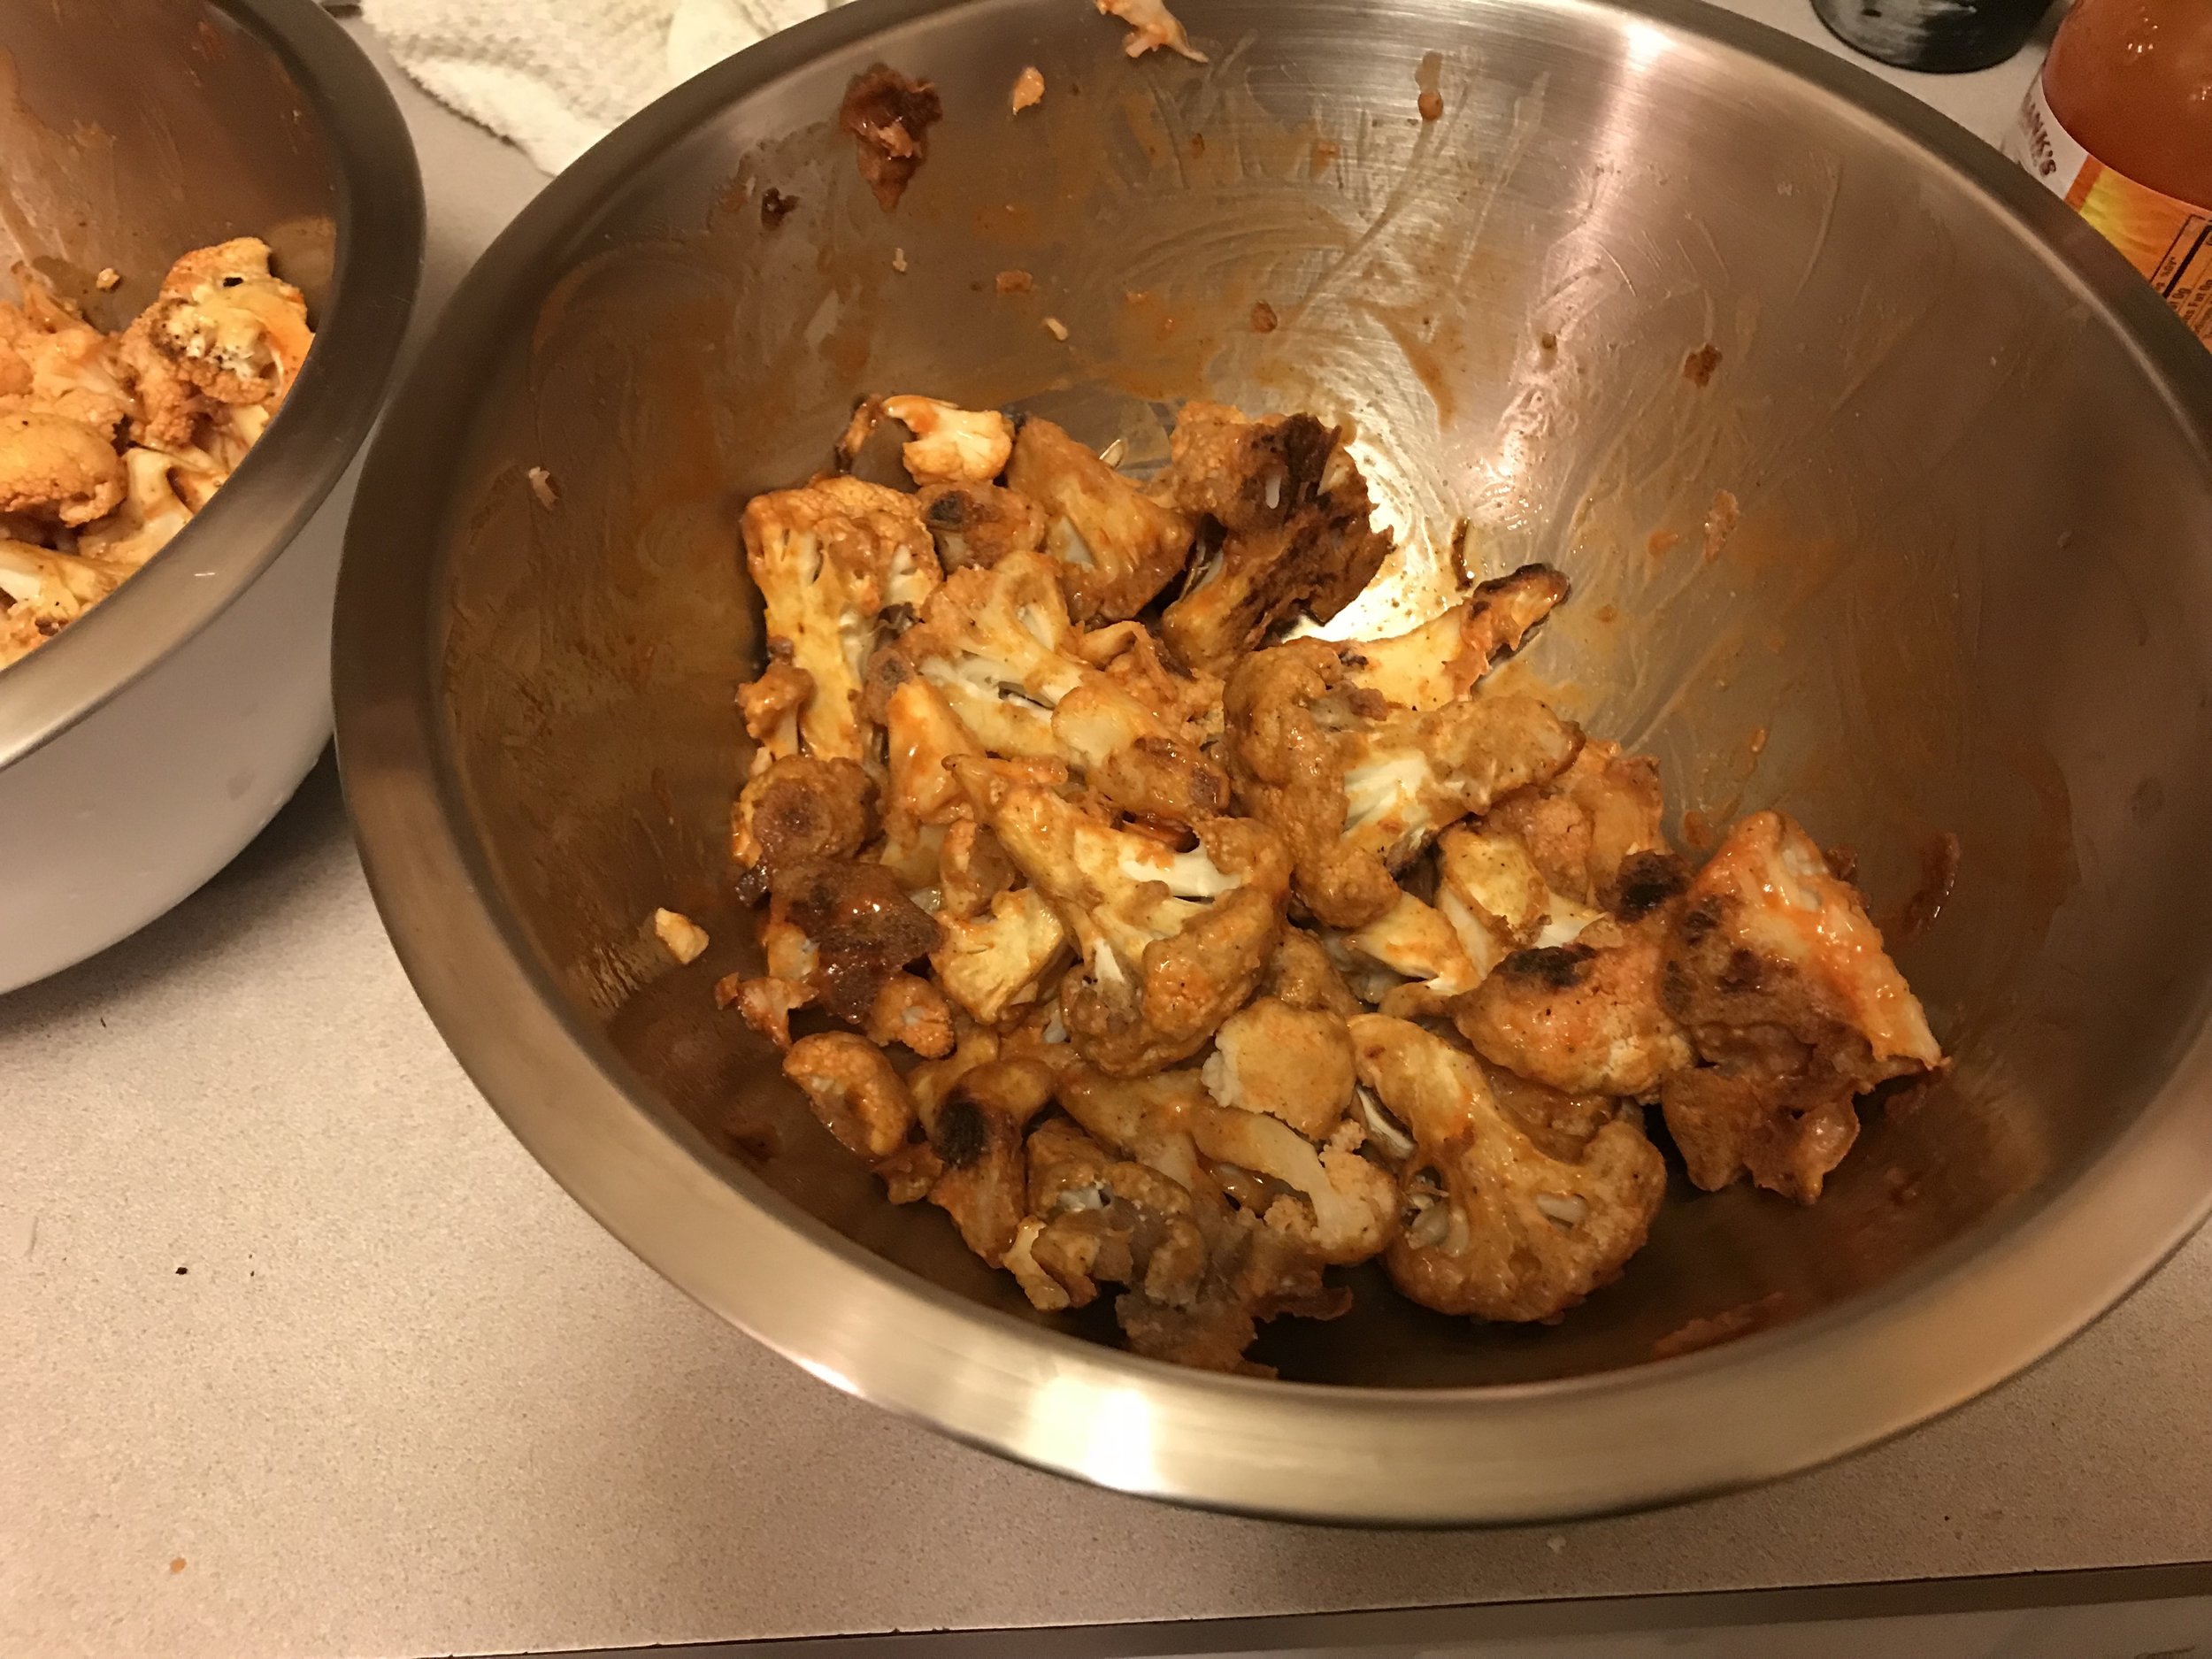
Battered
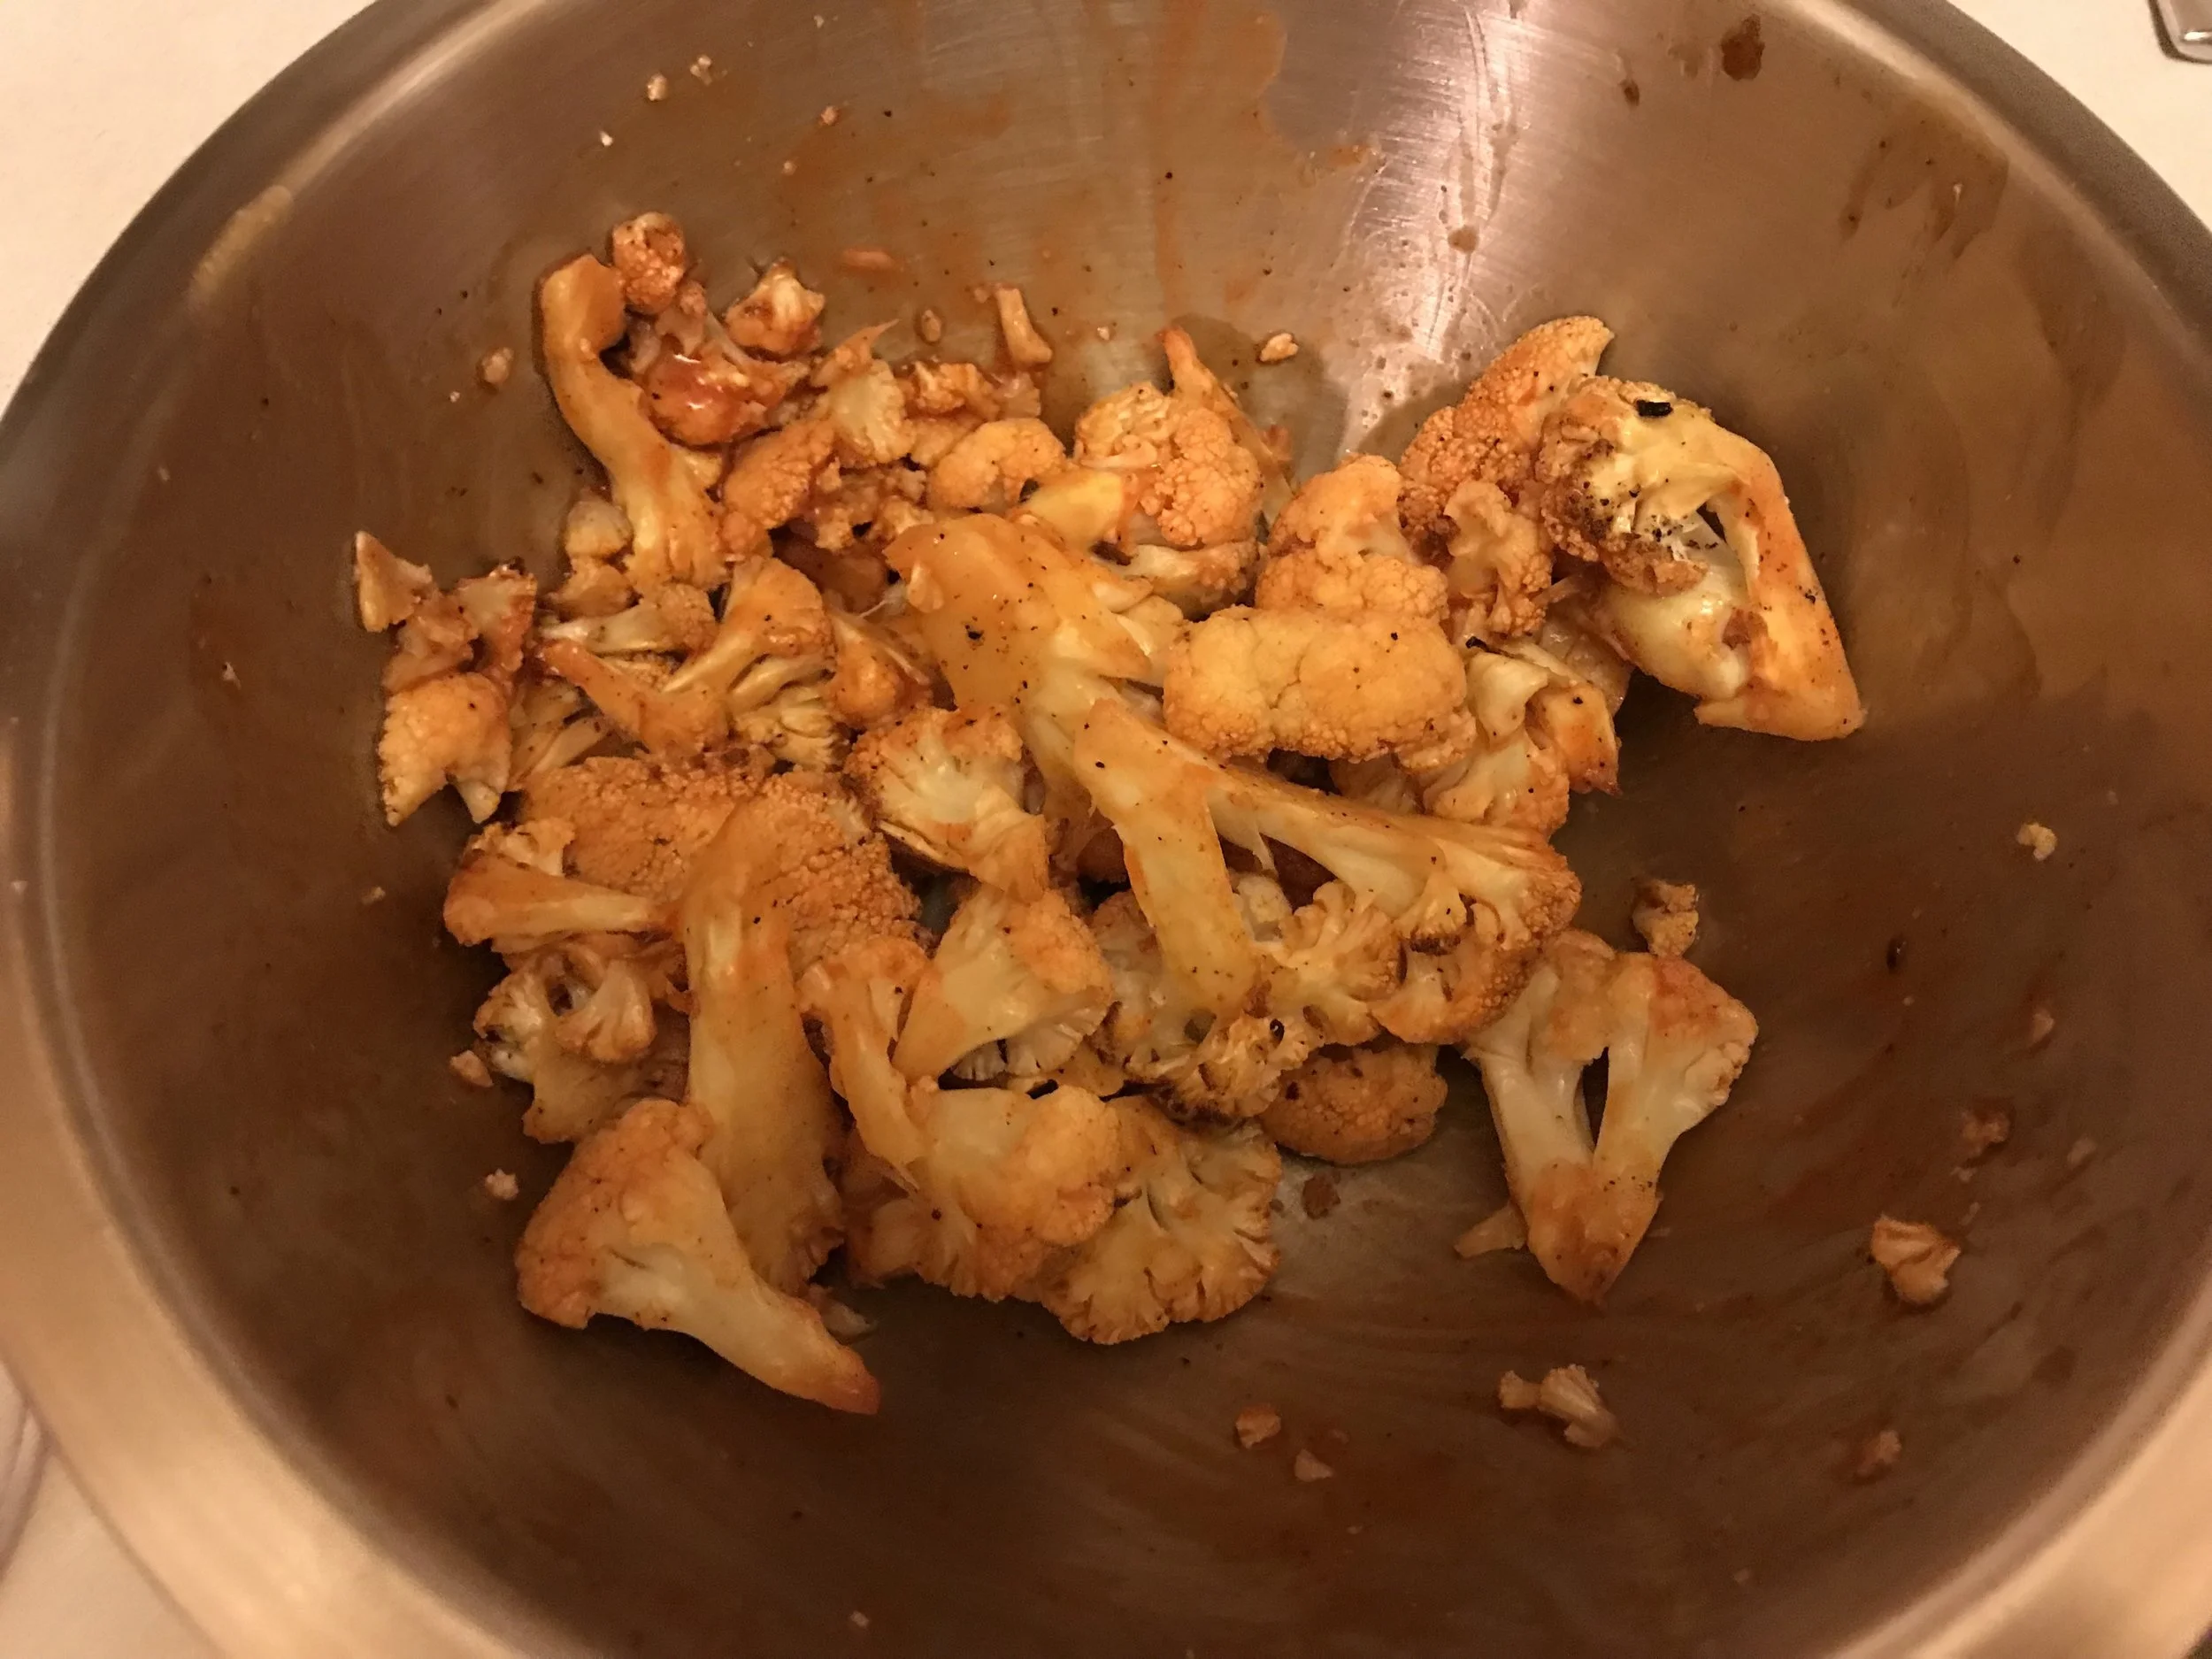
Roasted
Eat Seasonally: January Edition
I know January is almost over, but I found this really cool list of seasonal foods and wanted to share one of our favorite recipes using a few vegetables you may not have ever heard of: rutabaga, parsnips, & turnips.
First off, I want to talk about a few of the benefits of eating seasonally:
1. You are eating the food in its prime state:
This means it is ripe and loaded with vitamins and minerals. It hasn't been stored in a gas filled vacuum for months- like a lot of non-seasonal food. This also means... it tastes better!
2. Seasonal produce is generally cheaper:
When it is abundant, prices are low. Simple supply and demand concepts.
3. Seasonal produce can match the needs of the season:
You will notice the winter fruits contain a lot of citrus- which is beneficial in boosting your immune system and helps to fight off colds and flus. Winter vegetables are generally more starchy which works well in warm soups and stews and some of our favorite comfort foods.
So, here is January's list: (you can eat these in February too!)

Most of January's vegetables grow in the ground so they can withstand the harsh climate of winter. They are generally more starchy, so can take that role on when you are building meals with them.
One of our favorite easy recipes is roasted rutabaga, turnips, parsnips and carrots. These are probably vegetables you have 1. never heard of before or 2. have horrifying childhood memories of your parents threatening to make you eat them. The second reaction probably only happened because their names are weird, because they are actually all very sweet and delicious! Here is what they look like:
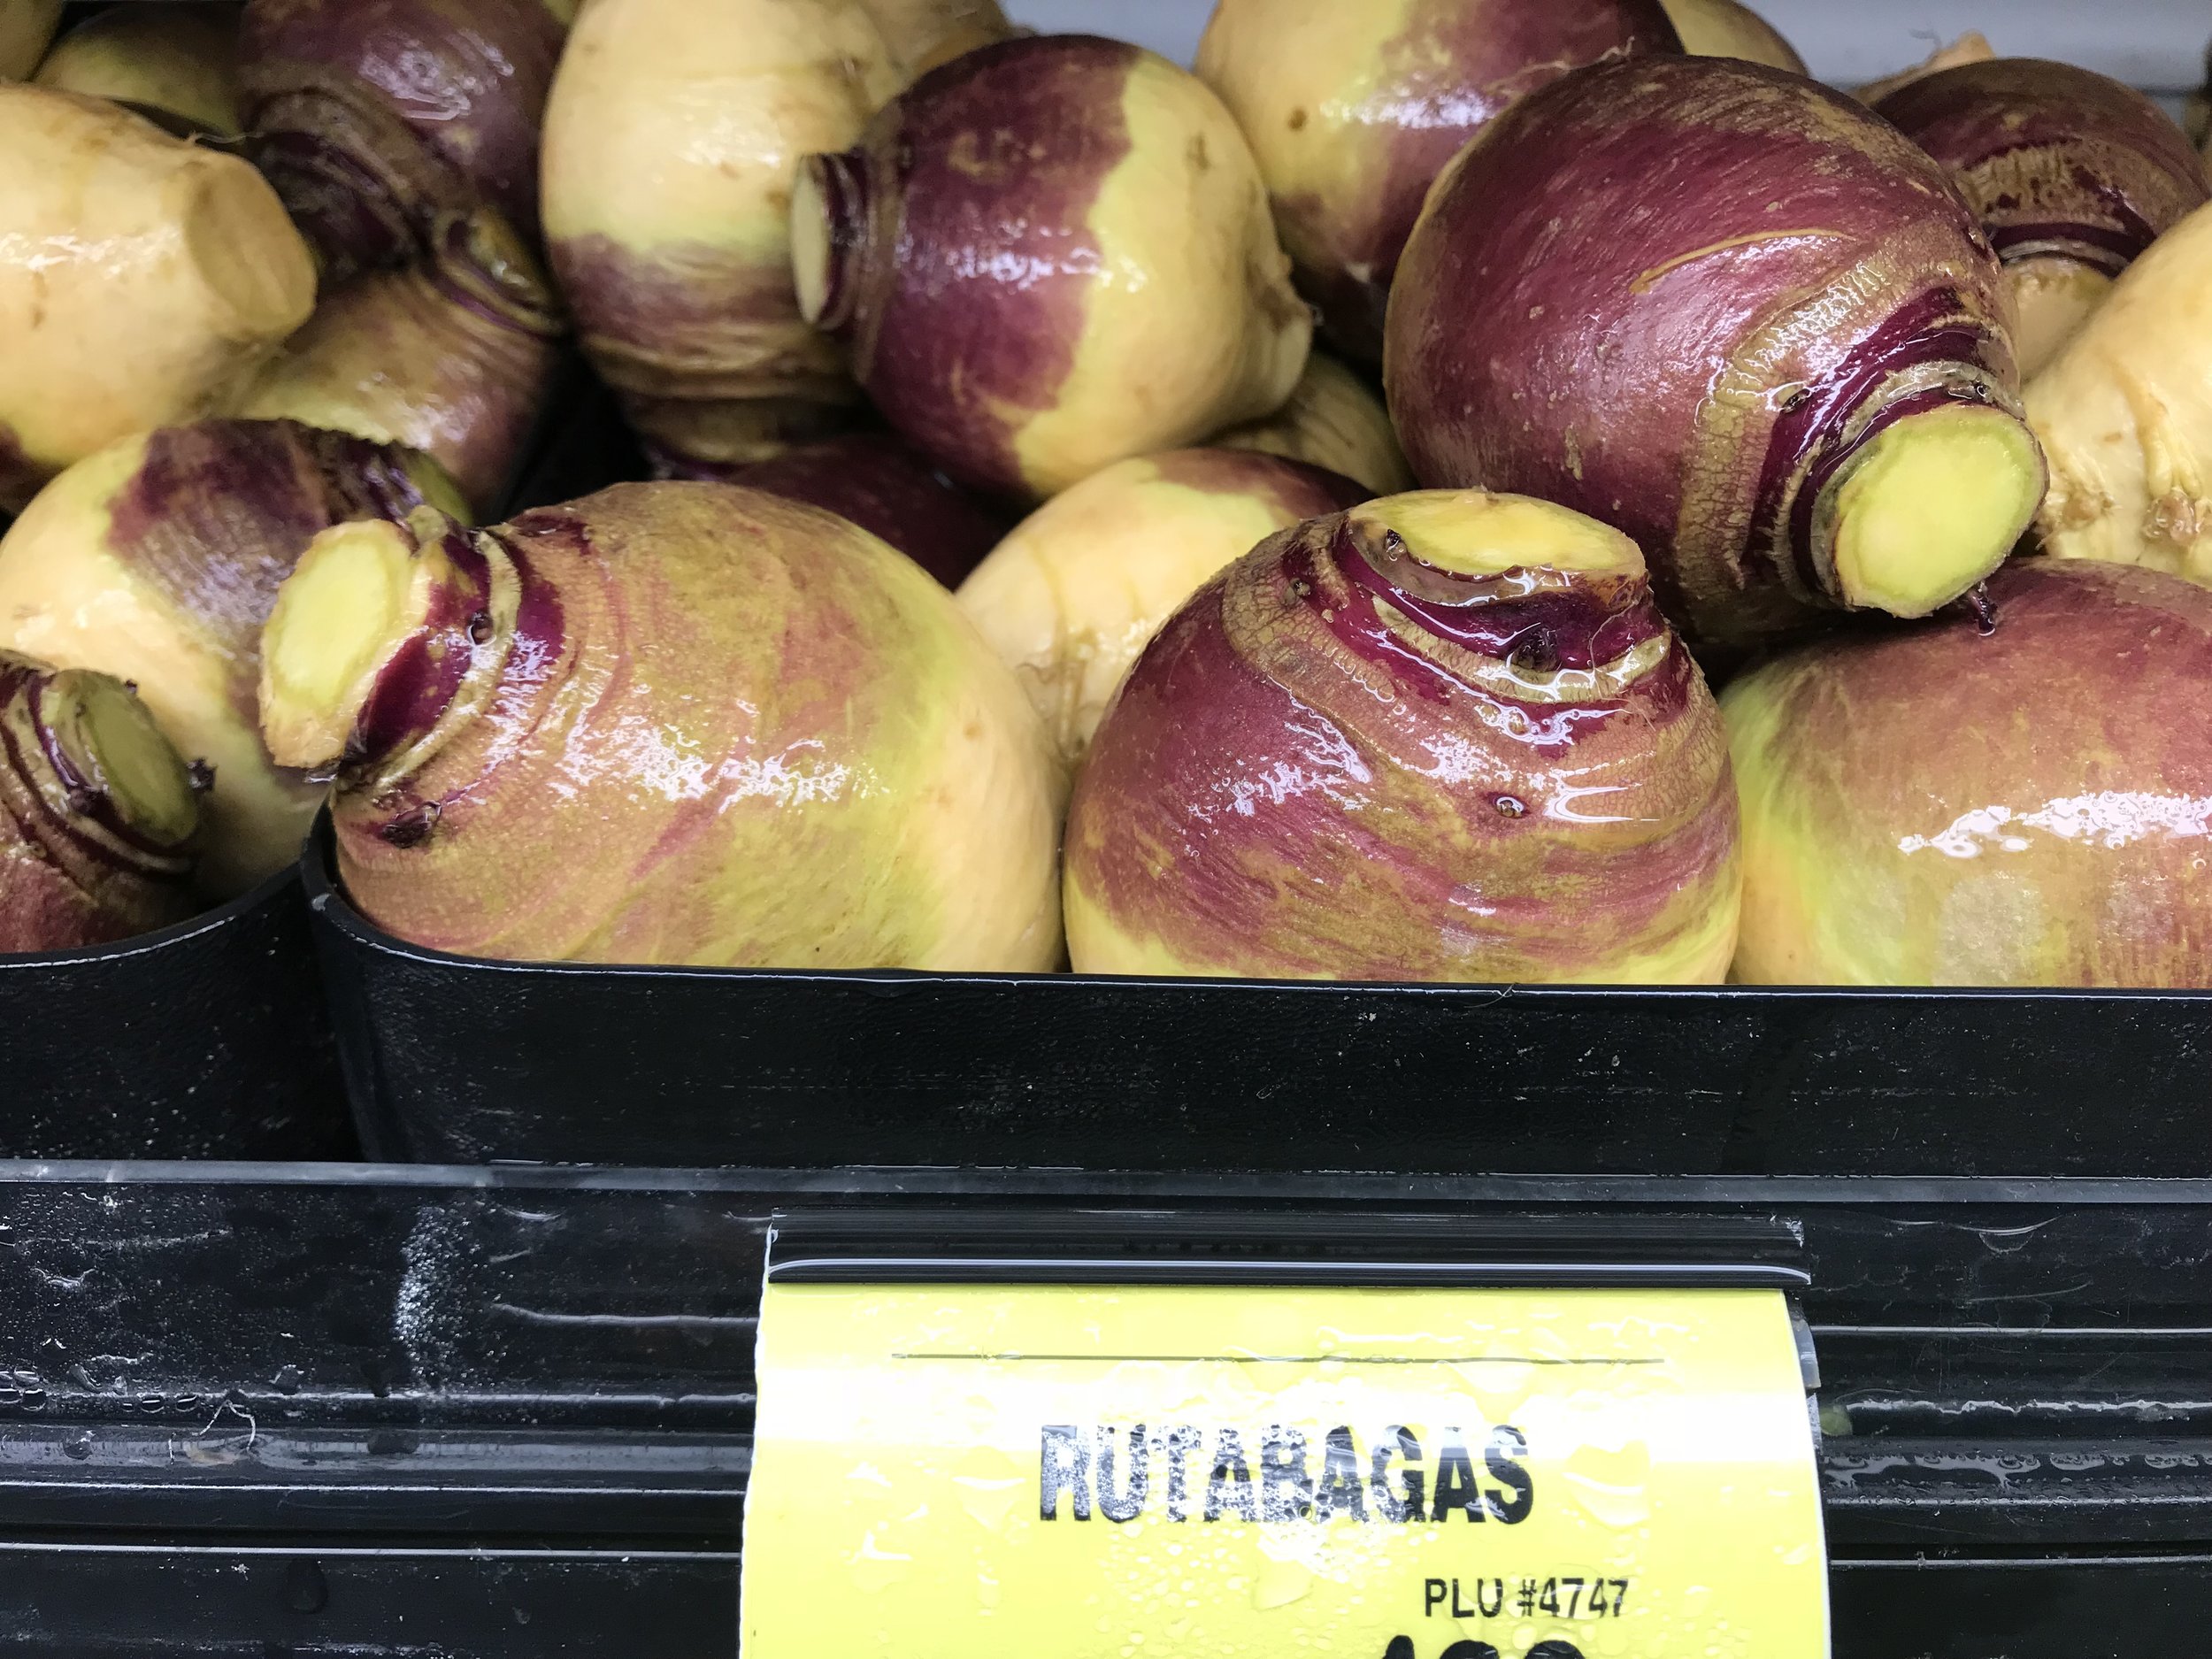


Here are the details:
Roasted Winter Vegetables
Ingredients:
3 rutabaga, cut into bite sized chunks
3 turnips, cut into bite sized chunks
4 parsnips, sliced
4 carrots, sliced
Olive oil
Salt, pepper, garlic powder, rosemary
How to:
Preheat oven to 425F.
Place vegetables in a bowl and toss with olive oil, salt, pepper, garlic powder and rosemary
Place vegetables on a baking sheet and cook for 25-30 minutes, or until tender when pierced with a fork.
Serve with a protein and vegetable!
YUM! Enjoy!!

A quick meal: tuna cakes
Okay... so yesterday was one of those days where nothing really went according to plan or as we expected. I often tell people that having a plan is one of the easiest ways to provide consistency and ultimately success in eating well and getting exercise in. I realize though that there are times when our plans don't work- that is just life. I also often suggest to people that they have a stock of foods that they know they can easily throw together for a quick meal.
Back to yesterday...We got home later than we anticipated from work and had only a little bit before we had friends coming over. People always ask me what our quick go to meals are, and I have started to feel boring telling people the same 3 or 4 that we usually choose. So, yesterday, I felt the challenge to create something different than we usually do. We decided to make tuna cakes!
Tuna is one of our go to proteins in these situations because it doesn't require thawing, cooking, or really much at all. It is also a great source of lean protein, has some omega 3 fatty acids, and some vitamin D as well. When buying tuna, get the tuna in water, not oil. Also, looked for canned light tuna instead of canned white. Canned white comes from albacore tuna, which is a bigger fish- meaning it has higher mercury content. Don't overdue tuna because it does contain mercury. For most individuals including those who are pregnant and breastfeeding, limit intake to about 2 cans of CANNED LIGHT TUNA per week (12 oz total). If you are choosing canned white tuna, limit intake to 1 can per week.

Okay, here is the recipe:
Ingredients
2 cans light tuna in water, drained
1 egg, lightly beaten
1/4 cup bread crumbs
a couple dashes of salt, pepper, celery seed and basil
How to:
Mix all ingredients in a bowl. Form into 2 patties with hands.
Heat a sauté pan with 1/2 tsp Ghee or avocado oil. Place patties in pan and cook until browned on the outside- flipping halfway through.
Easy peasy!
We also made a Sriracha mayo to go on top with 1/3 cup plain Greek yogurt, 1 tsp Sriracha, 1 tsp lemon juice, 2 tsp soy sauce and 1/4 tsp pepper
As far as the rest of the meal goes, we whipped up some quinoa and a mix of the veggies we had around already including sautéed garlicky Swiss chard: sauté roughly chopped Swiss chard in a tiny bit of Ghee/avocado oil with a couple of cloves of minced garlic, salt and pepper.
And viola! We had a satisfying, well balanced meal! And one to add to our list of quick ideas.
Give it a try! Or figure out what kind of quick meals you can make when a crazy day hits and get the ingredients, so you know you're prepared!
Chili and Cornbread for Halloween!
We always had chili the night of Halloween when I was a kid. Thinking back, I don't think it was a spoken tradition, but we did it every year. My mom made a good choice to fill us up with a warm and hearty meal because we would refuse to wear jackets over our costumes on the frigid October night. Kevin and I have stuck with that tradition and I wanted to share one of our favorite chili and cornbread recipes with you to eat this Halloween or anytime this winter!
The chili can be made in the crockpot or all at once. And the cornbread can be made into muffins or squares!
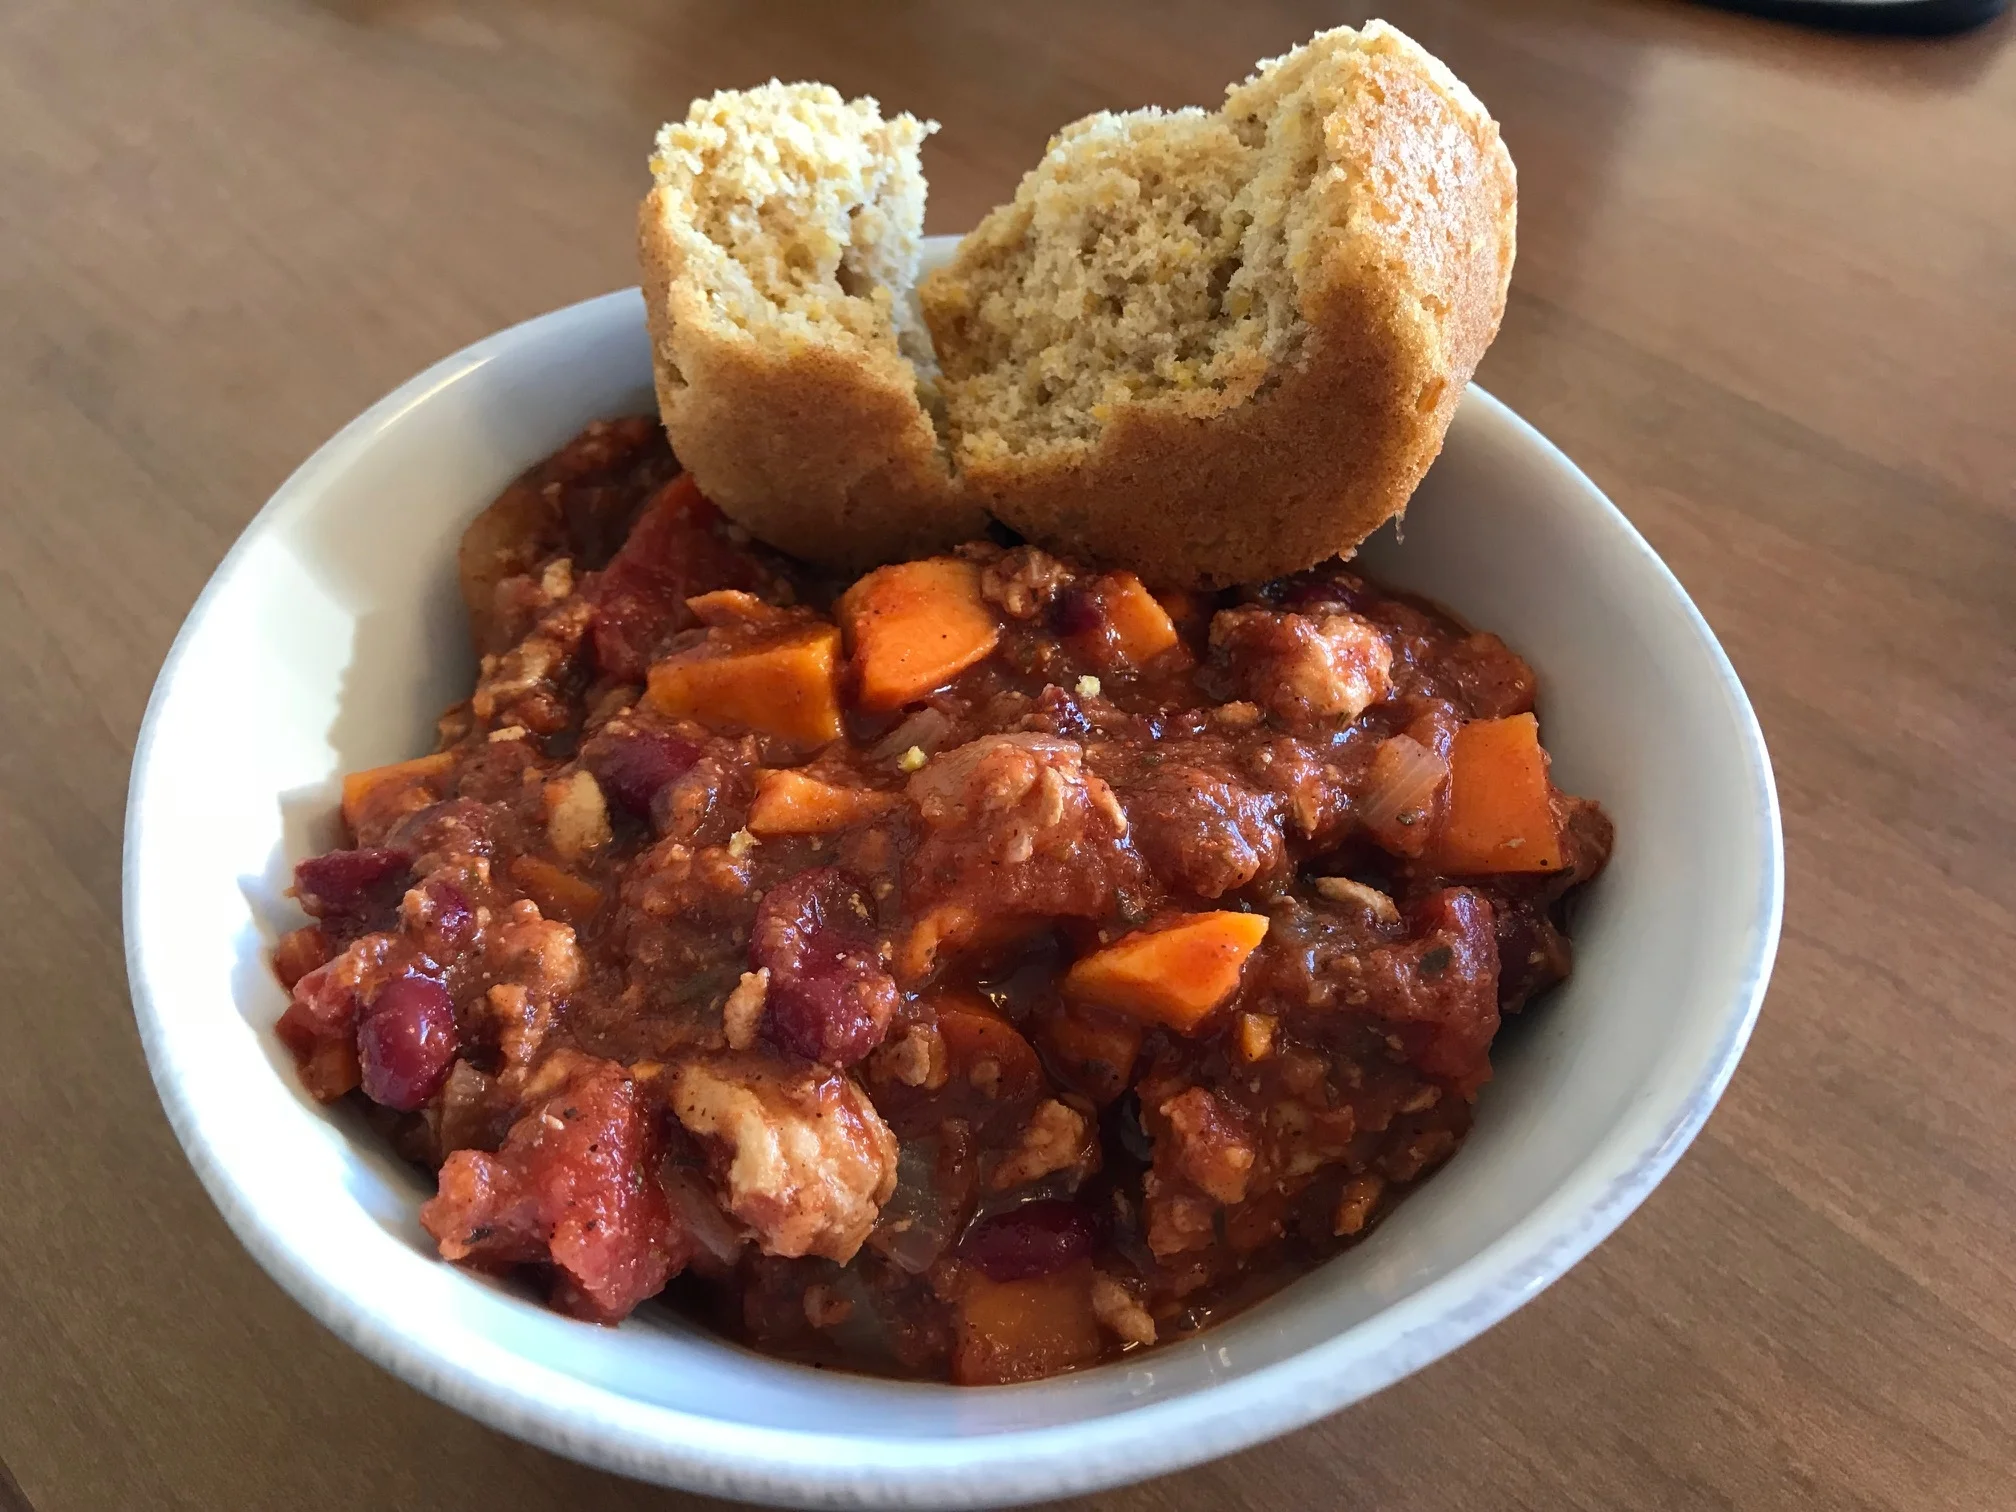
Sweet Potato Chili
Ingredients
2 lbs lean ground turkey
1 red onion diced
5 cloves garlic, minced
1 29 oz can low sodium tomato sauce
1 15 oz can low sodium petite diced tomatoes
2 15 oz can low sodium kidney beans, drained and rinsed
1-2 cups low sodium chicken broth
1 cup carrots, sliced
2-3 large sweet potatoes, peeled and cubed
1 TBSP thyme
1 tsp salt
2 tsp black pepper
1/4 cup chili powder
1-2 TBSP adobo chilis in sauce, dice the chilis (do less if you don't like spice)
1 TBSP oregano
How To
In a large saucepan, brown ground turkey, onion, and garlic. Drain off extra fat.
Meanwhile, combine tomato sauce, petite tomatoes, kidney beans, sweet potatoes, carrots, thyme, salt, pepper, chili powder, adobo chilis, and oregano in the crockpot.
When meat is cooked through, add to crockpot. Stir all ingredients together and add chicken broth accordingly. Start with 1 cup and add more if you want more liquid.
Set crockpot for low for 6-8 hours or high for 4-5 hours.
If you are not using a crockpot, follow the same directions, except cook in a large saucepan. Once ingredients are combined, bring to a boil, cover and simmer for about 30-40 minutes, or until sweet potatoes are soft.
Cornbread Muffins
Ingredients
1 cup whole wheat flour
1/2 tsp salt
1 TBSP baking powder
1 cup cornmeal
1 egg
1 cup milk
1/4 cup butter
How to:
Preheat oven to 425 F. Sift flour, salt, and baking powder into a bowl of mixer.
Add cornmeal and mix.
Add egg, milk, butter and mix until combined (no more that 1 minutes)
Grease 9 muffin tin slots and fill each evenly with batter.
Bake for 15 minutes, or until browned and toothpick comes out clean when inserted in the middle.
Can also make cornbread squares by using a 8x8 pan and baking for 20-25 minutes.
Serve with honey butter
*Cornbread recipe from Bob's Red Mill cornmeal package.